
Installation and Upgrade Guide User guide

Publication 1757-IN032B-EN-P - April 2001
3-14 Full PC Software Installation Procedures
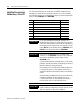
Creating an Emergency
Repair Disk
After all installations and drivers are installed, create your Emergency
Repair Disk. Use the following procedure to create an emergency repair
disk for your Windows NT installation.
1. Insert a blank diskette into the floppy drive.
2. Click Start
⇒Run.
3. Key in this command in the open entry field:
>rdisk /s<
and click OK.
4. Click Yes to create the Repair Disk.
5. Click OK to confirm the diskette is in the floppy drive.
6. Click OK to exit.
7. Label the Emergency Repair Disk and place the diskette in a secure
area.
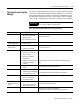
Browser – Internet
Explorer
• Microsoft Internet Explorer 5.01
File version: 5.00.2919.6304
• Use
Windows NT Explorer to find iexplore.exe
Right click on iexplore.exe and click Properties
⇒Version.
Logon Account • Verify that the installation
account, such as plx_user is
configured correctly.
Start
⇒Programs⇒Administrative Tools (Common)⇒User Manager
(Double-click plx_user in the username field of the dialog box.)
• If you need to create a logon account, refer toCreating the
plx_user Account on page 3-12.
View Options (Windows
NT Explorer)
• Show all Files
• Be certain to Hide file
extensions for known file types
selection is not checked.
Start
⇒Programs⇒Windows NT Explorer⇒View⇒Options
Function Required Setting Value Path to Setting
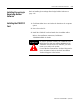
IMPORTANT All data on the floppy disk will be erased.