
Manual


Publication 1757-UM007D-EN-P - December 2008 11
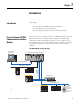
Introduction Chapter 1
ProcessLogix System Quick
Start
Use the following steps to quickly get the module running in a
ProcessLogix system. Detailed information about each step is available
in other sections of this manual or in the installation manual. You can
only have one scanner per RIO network. Remove any other scanners
on the RIO network before continuing.
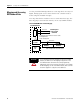
1. Install the 1757-ABRIO module in the chassis and connect it to
the RIO network.
See the Process Remote I/O (RIO) Communication Interface
Module Installation Instructions, publication 1757-IN916
.
2. Flash the controller with the latest firmware.
See Using NTools with ProcessLogix Software
on page 15.
3. Install the AbRioCfg software.
See Installing AbRioCfg Software
on page 19.
4. Autoconfigure or manually configure the RIO racks. This step
locates all connected racks.
See Autoconfigure the I/O Racks
on page 19 and Add Racks
Offline on page 33.
5. Add and configure block transfer modules.
See Adding Block Transfer Modules
on page 23.
6. Create tags for access by the ProcessLogix controller.
See Create a Tag
on page 30.
7. Map I/O data to the tags and save the configuration file.
See Mapping Data to Tags in AbRioCfg
Software on page 31.
8. Download the configuration to the 1757-ABRIO module.
See Download the Configuration
on page 35.
9. Configure the ProcessLogix controller to access information
within the 1757-ABRIO module using Control Builder software.
See Configure the 1757-PLX52 Controller
on page 53.
10. Access live data from the 1757-ABRIO module.
See Live Data Examples
on page 56.