
Installation Instructions User Manual


Rockwell Automation Publication 1756-IN005C-EN-P - March 2014 13
Chapter 1
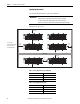
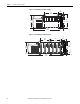
Install Chassis and Power Supplies
This chapter describes how to install standard and ControlLogix-XT versions of
the 1756 chassis with nonredundant power supplies.
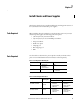
Tools Required
When installing either the standard or ControlLogix-XT versions of your 1756
chassis and power supplies, the following items are required:
• 3.18 mm (0.125 in.) slotted screwdriver
• 6.35 mm (0.25 in.) slotted or #2 Phillips screwdriver
• Torque screwdriver
• Needle-nose pliers
• Crimping tool
• Wire-stripping tool
• Drill
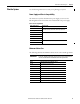
Parts Required
Use these tables to determine the parts required to install your chassis. These
parts are not included with the chassis and must be ordered separately.
Table 1 - Parts Required Per Mounting Tab
Tab Position With SEM Screws
(1)
(1) Phillips screw with attached star washer.
Without SEM Screws
To p • 1 Phillips screw
• 1 flat washer
• 1 split-lock washer
N/A
Bottom 1 SEM screw • 1 Phillips screw
• 1 star washer
Table 2 - Total Parts Required Per Chassis
Chassis Number of
Mounting Tabs
Total Parts Required Per Chassis
With SEM Screws Without SEM Screws
1756-A4, 1756-A7,
1756-A4LXT, 1756-A7LXT
2 top
2 bottom
• 2 Phillips screws
• 2 flat washers
• 2 split-lock washers
• 2 SEM screws
• 4 Phillips screws
• 2 flat washers
• 2 split-lock washers
• 2 star washers
1756-A10,
1756-A5XT, 1756-A7XT
3 top
3 bottom
• 3 Phillips screws
• 3 flat washers
• 3 split-lock washers
• 3 SEM screws
• 6 Phillips screws
• 3 flat washers
• 3 split-lock washers
• 3 star washers