
User Manual User guide

16 Publication 1756-UM534B-EN-P - November 2010
Chapter 1 The 1756-RIO Module-Getting Started
Prepare the Module
The following list summarizes the initial steps needed to prepare the 1756-
RIO module before setting up the remote network. These steps will be
discussed in detail in this chapter.
You can have only one scanner per RIO network. Remove any other scanners
on the RIO network before continuing. The RIO module ships in scanner
mode. You can adjust the instructions to fit the mode that matches your needs.
1. Install RSLinx software, version 2.54 or later, with an activation. Use
RSLinx Gateway or RSLinx Professional software. Do not use RSLinx
Lite software.
2. Install RSLogix 5000 programming software, version 17 or later, and the
associated controller firmware.
3. Install the 1756-RIO module in the 1756-ControlLogix chassis.
See publication 1756-IN610
.
Install the 1756-RIO module’s add-on profile found on the installation
CD shipped with the module, or download it from
http://
support.rockwellautomation.com/controlflash/LogixProfiler.asp
.
RSLinx software and RSLogix 5000 programming software must be
installed before the add-on profile.
See page 19
.
4. Create a project in RSLogix 5000 programming software.
5. Add a 1756 controller to your project.
See page 23
.
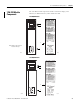
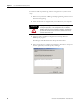
6. Add a 1756-RIO module to the project by right-clicking on the chassis
in the Controller Organizer and selecting New Module.
The Select Module dialog box appears.
7. Expand the Communications heading and select the 1756-RIO module.
Click OK.
See
page 24
.
8. Select the General tab on the Module Properties dialog box to set the
module properties.