Installation Instructions SLC 5/05 Processors Firmware/Operating System ControlFLASH Upgrade Catalog Numbers 1747-DU501 Topic Page System Requirements 3 Install ControlFLASH 3 Prior to Running ControlFLASH 3 Return the SLC 5/05 Processors to Initial Factory Conditions 4 Use ControlFLASH 5 After Successfully Updating Your SLC 5/05 Processor 16 About This Publication This document provides instructions on how to install the ControlFLASH™ utility, setup prerequisites for preparing the system for
SLC 5/05 Processors Firmware/Operating System ControlFLASH Upgrade Important User Information Solid-state equipment has operational characteristics differing from those of electromechanical equipment. Safety Guidelines for the Application, Installation and Maintenance of Solid State Controls (Publication SGI-1.1 available from your local Rockwell Automation sales office or online at http://www.rockwellautomation.
SLC 5/05 Processors Firmware/Operating System ControlFLASH Upgrade 3 Related Publications For Refer to this Document Publication A more detailed description on how to install and use your SLC™ 500 Modular Hardware Style Control System. SLC 500 Modular Hardware Style User Manua 1747-UM011 A more detailed description on how to install your SLC 500 Modular Processors.
SLC 5/05 Processors Firmware/Operating System ControlFLASH Upgrade 1. Save the current SLC 5/05 processor program. IMPORTANT The user program is cleared as part of the operating system upgrade process. You must restore your program after successfully loading the operating system upgrade. 2. Note the IP address assigned to the SLC 5/05 processor. When updating the processor, use BOOTP or fixed IP address, not DHCP.
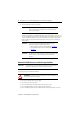
SLC 5/05 Processors Firmware/Operating System ControlFLASH Upgrade 5 This returns the processor to the initial factory conditions. GND VBB Use ControlFLASH ATTENTION: Do not interrupt the flash procedure. Once you have begun to download the firmware for either the daughtercard (step 18) or the motherboard (step 24), the SLC 5/05 is put into an unrecoverable state if you lose power or communications for any reason. 1. Launch the ControlFLASH application under Programs>Flash Programming Tools. 2.
SLC 5/05 Processors Firmware/Operating System ControlFLASH Upgrade 3. Insert the SLC 5/05 processor into an SLC chassis. 4. Attach an Ethernet cable to the processor from your computer (or a hub). IMPORTANT If you are connecting to the SLC 5/05 processor through a hub, you can use a standard Ethernet patch cable. If you are connecting directly to the SLC 5/05 processor from your computer, you need to use an Ethernet crossover cable. 5. Apply power to the chassis. 6.
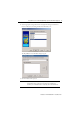
SLC 5/05 Processors Firmware/Operating System ControlFLASH Upgrade 7 8. Select the appropriate catalog number from the Catalog Number dialog box and click Next. For Series C Processors, select catalog numbers that are followed by a ‘/C’. The AB_SNMP.DLL – Enter IP Address dialog box appears. 9. Enter the IP address for the processor. IMPORTANT Use the IP address that was noted in step 2 of the section, Prior to Running ControlFLASH on page 3.
SLC 5/05 Processors Firmware/Operating System ControlFLASH Upgrade 10. Click the Get Info button. If the IP address was previously configured in the processor, go to step 12. The AB_SNMP – BOOTP Server dialog box appears, indicating that this IP address has not been configured into the processor. 11. Enter the hardware address of the SLC 5/05 processor that is being upgraded and click OK. The hardware address is noted in step 2 of the section, Prior to Running ControlFLASH, on page 3.
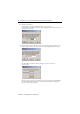
SLC 5/05 Processors Firmware/Operating System ControlFLASH Upgrade 9 12. Click OK. 13. Select the appropriate revision from the Firmware Revision dialog box and click Next.
SLC 5/05 Processors Firmware/Operating System ControlFLASH Upgrade The Summary dialog box appears. 14. Click Finish. The ControlFLASH dialog box appears. 15. Click Yes. If your PC has more than one Ethernet interface installed, the following dialog box displays the assigned IP addresses of each of the listed Ethernet interfaces. Proceed to the next step. If your PC does not have more than one Ethernet interface installed, go to step 18. 16.
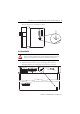
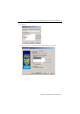
SLC 5/05 Processors Firmware/Operating System ControlFLASH Upgrade 11 17. Click OK. 18. You may need to wait several seconds before the Progress dialog box appears. A typical sequence is shown below. While the download is in progress, the ENET LED changes from a solid green to flashing green to solid red and then turns solid green again. When the daughtercard update is complete, the ENET LED flashes green. The download process of the daughtercard firmware can take up to approximately two minutes. 19.
SLC 5/05 Processors Firmware/Operating System ControlFLASH Upgrade 21. Click OK. 22. If your PC has more than one Ethernet interface installed, then the following dialog box displays the assigned IP addresses of each of the listed Ethernet interfaces. Proceed to the next step. If your PC does not have more than one Ethernet interface installed, go to step 24. 23. Highlight the IP address of the PC Ethernet interface that connects to the Ethernet network hosting the target processor. Click OK. 24.
SLC 5/05 Processors Firmware/Operating System ControlFLASH Upgrade 13 the update is complete, these four LED indicators remain on together. The download process of the firmware takes approximately 3 minutes. 25. Open the AB_SNMP dialog box from the task bar if it does not appear automatically. Follow the dialog box prompts to do the following: • Verify the LEDs have stopped flashing. • Turn off power to the chassis. • Remove the processor.
SLC 5/05 Processors Firmware/Operating System ControlFLASH Upgrade • Set the motherboard jumper J4 back to Protect. • Re-insert the processor. • Apply power to the chassis. 26. Once you have re-applied power, wait for the ENET LED indicator to turn solid green. Click OK. The AB_SNMP – BOOTP Server Running dialog box may appear. The Update Status dialog box appears. If the update was successful, the status text box is green and has an appropriate message.
SLC 5/05 Processors Firmware/Operating System ControlFLASH Upgrade 15 If the update was not successful, the status text box is red and has an appropriate message. 27. Click OK and you are returned to the Welcome to ControlFLASH dialog box. 28. You may either continue upgrading additional SLC 5/05 processors by clicking Next, or you may exit the program by clicking Cancel. If you click Cancel, you are asked to verify that you want to end the update session.
SLC 5/05 Processors Firmware/Operating System ControlFLASH Upgrade After Successfully Updating Your SLC 5/05 Processor 1. Remove power from the SLC 500 power supply and remove the processor from the chassis. ATTENTION: Do not remove the processor from the SLC 500 chassis until all power is removed from the SLC 500 power supply. 2. Apply the enclosed operating system upgrade label to the SLC 5/05 processor nameplate. 3. Re-insert the processor into the chassis and apply power. 4.
SLC 5/05 Processors Firmware/Operating System ControlFLASH Upgrade • 17 power down the processor and check the J4 jumper position. ATTENTION: Do not remove the processor from the SLC 500 chassis until all power is removed from the SLC 500 power supply. 3. Restart the firmware upgrade procedure in the Use ControlFLASH section. Target Module Not in Proper State for Programming The following dialog box appears when this error occurs: To clear this error: 1. Place the SLC 5/05 processor into PROG mode. 2.
SLC 5/05 Processors Firmware/Operating System ControlFLASH Upgrade Notes: Publication 1747-IN019G-EN-P - December 2011
SLC 5/05 Processors Firmware/Operating System ControlFLASH Upgrade 19 Notes: Publication 1747-IN019G-EN-P - December 2011
Rockwell Automation Support Rockwell Automation provides technical information on the Web to assist you in using its products. At http://www.rockwellautomation.com/support/, you can find technical manuals, a knowledge base of FAQs, technical and application notes, sample code and links to software service packs, and a MySupport feature that you can customize to make the best use of these tools.