Installation Instructions 1734 POINT I/O EtherNet/IP Adapter Catalog number 1734-AENT, Series B Table of Contents Topic Page Important User Information 2 Environment and Enclosure 3 Preventing Electrostatic Discharge 3 Additional Resources 4 North American Hazardous Location Approval 5 European Hazardous Location Approval 6 About The Adapter 7 Before You Begin 8 Determine Compatibility 8 Understand Messaging 8 Configure Autobaud 8 Install the Adapter 9 Set the Network Address 11
1734 POINT I/O EtherNet/IP Adapter Important User Information Solid-state equipment has operational characteristics differing from those of electromechanical equipment. Safety Guidelines for the Application, Installation and Maintenance of Solid State Controls (Publication SGI-1.1 available from your local Rockwell Automation sales office or online at http://www.rockwellautomation.com/literature/) describes some important differences between solid-state equipment and hard-wired electromechanical devices.
1734 POINT I/O EtherNet/IP Adapter 3 Environment and Enclosure ATTENTION: This equipment is intended for use in a Pollution Degree 2 industrial environment, in overvoltage Category II applications (as defined in IEC 60664-1), at altitudes up to 2000 m (6562 ft) without derating. This equipment is not intended for use in residential environments and may not provide adequate protection to radio communication services in such environments. This equipment is supplied as open-type equipment.
1734 POINT I/O EtherNet/IP Adapter Additional Resources Resource Description 1734 POINT I/O® EtherNet/IP Adapter User Manual, publication 1734-UM018. A detailed description of module functionality, configuration, installation procedure and information on how to use the 1734-AENT POINT I/O EtherNet/IP adapter (1734-AENT, Series B). Industrial Automation Wiring and Grounding Guidelines, publication 1770-IN041. More information on proper wiring and grounding techniques.
1734 POINT I/O EtherNet/IP Adapter 5 North American Hazardous Location Approval The following information applies when operating this equipment in hazardous locations: Informations sur l’utilisation de cet équipement en environnements dangereux: Products marked "CL I, DIV 2, GP A, B, C, D" are suitable for use in Class I Division 2 Groups A, B, C, D, Hazardous Locations and nonhazardous locations only.
1734 POINT I/O EtherNet/IP Adapter European Hazardous Location Approval The following applies when the product bears the Ex Marking This equipment is intended for use in potentially explosive atmospheres as defined by European Union Directive 94/9/EC and has been found to comply with the Essential Health and Safety Requirements relating to the design and construction of Category 3 equipment intended for use in Zone 2 potentially explosive atmospheres, given in Annex II to this Directive.
1734 POINT I/O EtherNet/IP Adapter 7 About The Adapter The Series B 1734-AENT POINT I/O EtherNet/IP Adapter is a communications adapter for POINT I/O modules. The adapter provides an interface for controlling and communicating with POINT I/O modules from an EtherNet/IP network.
1734 POINT I/O EtherNet/IP Adapter Before You Begin To effectively use your adapter, note the following considerations. Determine Compatibility If using the 1734-AENT adapter with a 1756-ENBT module or 1788-ENBT module, use the following required firmware versions for these bridge modules: • 1756-ENBT firmware version 2.3 or greater • 1788-ENBT firmware version 1.33 or greater If you use the BootP/DHCP Utility to assign IP addresses to the adapter, use version 2.3.2 or greater.
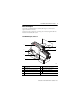
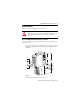
1734 POINT I/O EtherNet/IP Adapter 9 Install the Adapter Follow this procedure to install the adapter on the DIN rail. ATTENTION: You must only use Series C POINT I/O modules with 1734-AENT EtherNet/IP Adapters. Series A or Series B POINT I/O modules will not work with 1734-AENT EtherNet/IP Adapters (does not apply to POINTGuard modules). Mount the POINT I/O EtherNet/IP Adapter on a DIN Rail Position the I/O adapter vertically above the DIN rail.
1734 POINT I/O EtherNet/IP Adapter 2. Press down firmly to install the adapter on a DIN rail, noting that the locking mechanism locks the adapter to the DIN rail. 3. Set the network address thumbwheel switches to the desired value. See Set the Network Address for more information on setting the IP address. 4. Slide the safety end cap up to remove it, exposing the backplane and power interconnections. ATTENTION: Do not discard the end cap.
1734 POINT I/O EtherNet/IP Adapter 11 Set the Network Address The thumbwheel switches are set to 999 and DHCP enabled, by default. You can set the network Internet Protocol (IP) address in the following ways: • Use the thumbwheel switches on the adapter. • Use a Dynamic Host Configuration Protocol (DHCP) server, such as Rockwell Automation BootP/DHCP. • Retrieve the IP address from nonvolatile memory.
1734 POINT I/O EtherNet/IP Adapter If you set the switches to an invalid number (for example, 000 or a value greater than 254 excluding 888), the adapter checks to see if you enabled DHCP. DHCP Enabled and Not Enabled DHCP State Adapter Action Enabled Asks for an address from a DHCP server. The DHCP server also assigns other Transport Control Protocol (TCP) parameters. Not enabled Uses the IP address (along with other TCP configurable parameters) stored in nonvolatile memory.
1734 POINT I/O EtherNet/IP Adapter 13 Replace The Adapter Use these procedures to install a replacement adapter to an existing system. 1. Disconnect the Ethernet connector(s) from the adapter. 2. Pull up on the Removable Terminal Block (RTB) handle to remove the terminal block. WARNING: When you insert or remove the module while backplane power is on, an electrical arc can occur. This could cause an explosion in hazardous location installations.
1734 POINT I/O EtherNet/IP Adapter 9. Press firmly to seat the adapter on the DIN rail, noting that the adapter locking mechanism will snap into place. 10. Set the node address on the node address thumbwheel. 11. Insert the end of the terminal block opposite the handle into the base unit, noting that this end has a curved section that engages with the wiring base. 12. Rotate the terminal block into the wiring base until it locks itself into place. 13. Replace the adjacent module in its base. 14.
1734 POINT I/O EtherNet/IP Adapter 15 Wire The Adapter 0 0 2 Ethernet RJ-45 connector NC Chas Gnd C V 43264 NC = No Connection Chas GND = Chassis Ground C = Common V = Supply 0 1 NC NC Chas Gnd Chas Gnd 2 3 4 V DC IMPORTANT 5 C C V V 6 7 Do not connect 120/240V AC power to this supply. This DC supply will be connected to the internal power bus.
1734 POINT I/O EtherNet/IP Adapter WARNING: Do not wire more than two conductors on any single terminal. WARNING: To comply with the CE Low Voltage Directive (LVD), this equipment must be powered from a Safety Extra Low Voltage (SELV) or Protected Extra Low Voltage (PELV) compliant source. WARNING: If you connect or disconnect wiring while the field-side power is on, an electrical arc can occur. This could cause an explosion in hazardous location installations.
34 POINT I/O EtherNet/IP Adapter 17 Interpret Status Indicators Refer to the following diagram and table for information on how to interpret the status indicators.
1734 POINT I/O EtherNet/IP Adapter Indicator Status for Modules Network Activity Network status POINTBus status Off No link established. Flashing green/Off Transmit or receive activity present. Steady green Link established. Off Device not initialized. The module does not have an IP address. Flashing green No CIP connections present. Device has an IP address, but no CIP connections are established. Green CIP connections present.
1734 POINT I/O EtherNet/IP Adapter 19 Specifications POINT I/O EtherNet/IP Adapter — 1734-AENT, Series B Attribute Value Expansion I/O capacity, max • 63 modules • 5 rack optimized connections (for digital modules only) • 31 direct connections(1) • 1734-AENT backplane current output = 1.0 A. • Actual number of modules can vary. • Add up current requirements of modules you want to use to make sure they do not exceed the amperage limit of 1.0 A for the 1734-AENT adapter.
1734 POINT I/O EtherNet/IP Adapter Power Supply Attribute Value Input overvoltage protection Reverse polarity protected POINTBus output current, max 5V DC @ 1.0A Interruption Output voltage will stay within specifications when input drops out for 10ms at 10V with maximum load.
1734 POINT I/O EtherNet/IP Adapter 21 General Specifications Attribute Value Module input 10...28V DC @ 1000 mA POINTBus output, max 5V DC @ 1.0A Dimensions (HxWxD), approx. 76.2 x 54.9 x 133.4 mm (3.0 x 2.16 x 5.25 in.) Enclosure type rating None (open-style) Terminal base screw torque 0.8 Nm (7 lb-in) Weight, approx. 255 g (0.56 lb) Wiring category(1),(2) 1 – on power ports 1 – on communications ports Wire Size Power connections: 0.34... 2.1 mm2 (22...
1734 POINT I/O EtherNet/IP Adapter Environmental Specifications Attribute Value Vibration IEC 60068-2-6 (Test Fc, Operating): 5 g @ 10...500 Hz Shock, operating IEC 60068-2-27 (Test Ea, Unpackaged Shock) 30 g Shock, nonoperating IEC 60068-2-27 (Test Ea, Unpackaged Shock) 50 g Emissions CISPR 11: Group 1, Class A ESD Immunity IEC 61000-4-2: 6 kV contact discharges 8 kV air discharges Radiated RF Immunity IEC 61000-4-3: 10V/m with 1 kHz sine-wave 80% AM from 30...
1734 POINT I/O EtherNet/IP Adapter 23 Certifications Certification (when product is marked)(1) Value c-UL-us UL Listed Industrial Control Equipment, certified for US and Canada. See UL File E65584. UL Listed for Class I, Division 2 Group A,B,C,D Hazardous Locations, certified for U.S. and Canada. See UL File E194810. CE European Union 2004/108/EC EMC Directive, compliant with: EN 61326-1; Meas./Control/Lab.
Rockwell Automation Support Rockwell Automation provides technical information on the Web to assist you in using its products. At http://www.rockwellautomation.com/support/, you can find technical manuals, a knowledge base of FAQs, technical and application notes, sample code and links to software service packs, and a MySupport feature that you can customize to make the best use of these tools.