
supporting Sequence of Events
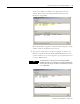
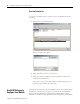


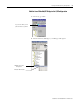
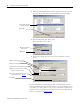
Table Of Contents
- 1732E-UM002A-EN-E 1732E EtherNet/IP ArmorBlock Supporting Sequence of Events User Manual
- Important User Information
- Table of Contents
- Preface
- Chapter 1 - About 1732E ArmorBlock Modules
- Chapter 2 - Module Overview
- Chapter 3 - Use the Module in an ArmorBlock System
- Chapter 4 - Install Your Module
- Chapter 5 - Configure the Module for Your EtherNet/IP Network
- Chapter 6 - Configure the Module Using RSLogix 5000
- Introduction
- Set Up the Hardware
- Create the Example Application
- Configure Your I/O Module
- Overview of the Configuration Process
- Add a New Bridge and Module to Your RSLogix 5000 Project
- Use the Default Configuration
- Change the Default Configuration
- Download Your Configuration
- Edit Your Configuration
- Access Module Data in RSLogix 5000
- Configure RSLogix 5000 and the 1756-EN2T Communication Module for CIP Sync
- Chapter Summary and What’s Next
- Chapter 7 - Module Features
- Introduction
- Determine Module Compatibility
- Module Features That Can Be Configured
- Chapter Summary and What’s Next
- Chapter 8 - Using the Module
- Chapter 9 - Interpret Status Indicators
- Chapter 10 - Troubleshoot the Module
- Appendix A - ArmorBlock 2 Port Ethernet Module Specifications
- Appendix B - Module Tags
- Appendix C - 1732E EtherNet/IP ArmorBlock Supporting Sequence of Events Data Tables
- Appendix D - Connect to Networks via Ethernet Interface
- Appendix E - 1732E ArmorBlock I/O Embedded Web Server
- Glossary
- Index
- How Are We Doing?
- Back Cover
Publication 1732E-UM002A-EN-P - March 2010
32 Configure the Module Using RSLogix 5000
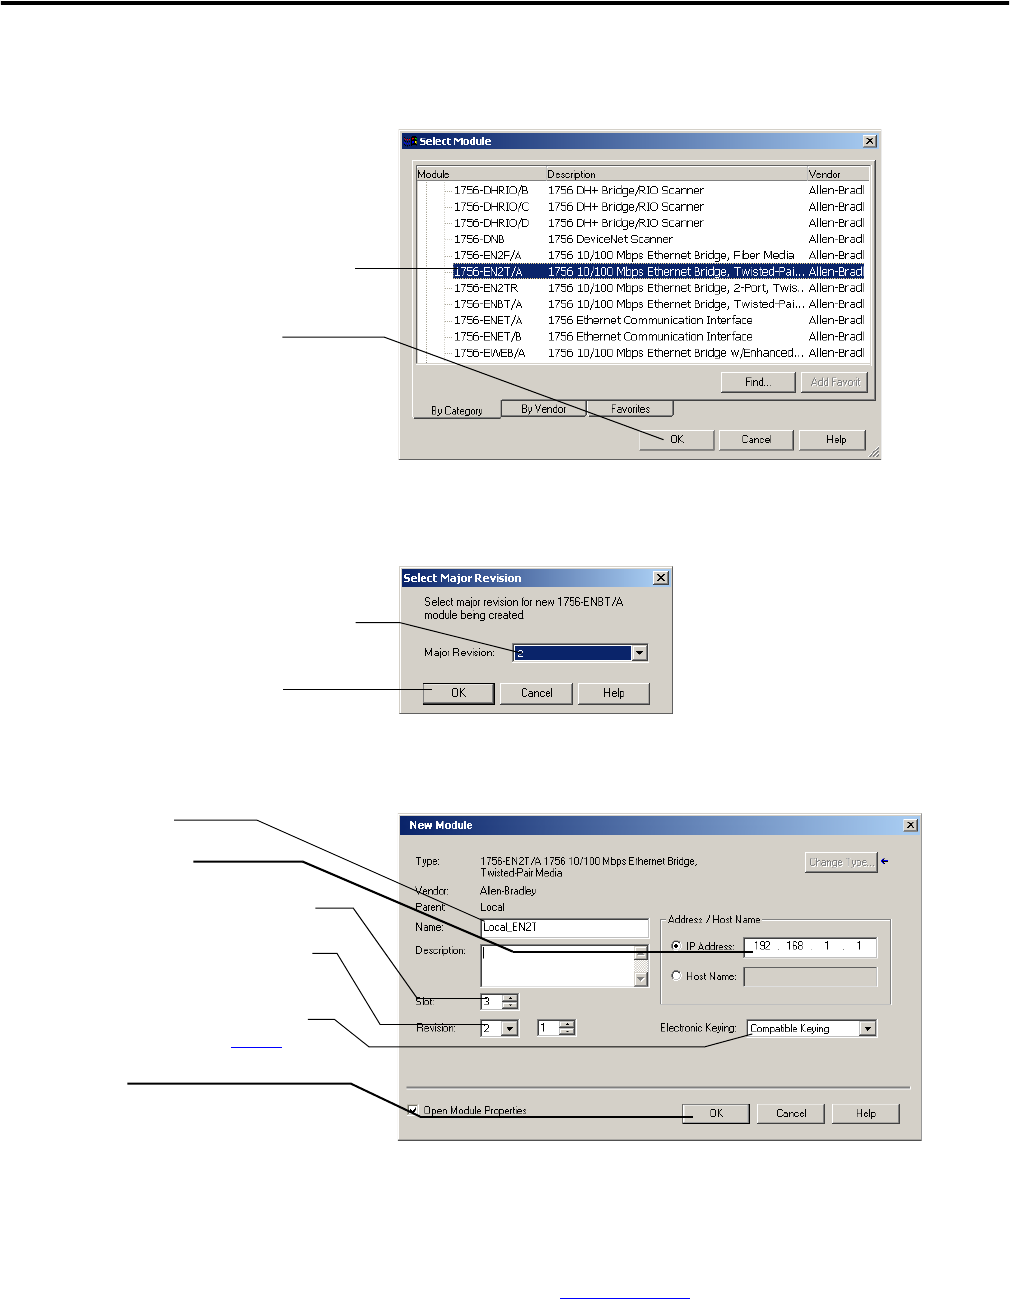
3. When the Select Module dialog appears, expand Communications and
select the new module. Select the 1756-EN2T EtherNet/IP Bridge.
4. The Select Major Revision dialog opens.
Select Major Revision 2 or later.
5. Configure the bridge. The first screen of the configuration wizard
opens.
The local 1756-EN2T communication module will communicate with the
1732E ArmorBlock module on EtherNet. Before you can communicate with
your module, you need to add it as a
slave
of the 1756-EN2T communication
module. For more information about using 1756 controller and EtherNet/IP
products, see publication ENET-UM001
.
A. Select the 1756-EN2T
EtherNet/IP Bridge.
B. Click OK.
A. Select the number of
major revision.
B. Click OK.
A. Name the bridge.
B. Enter the IP address.
C. Select slot 3 for the EtherNet/IP bridge.
D. Make sure the Minor Revision number
matches your module’s revision.
E. Choose an Electronic Keying method.
For more information, see page 49
.
F. Click OK.