
supporting Sequence of Events
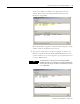
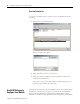


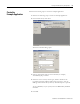
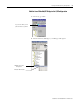
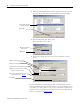
Table Of Contents
- 1732E-UM002A-EN-E 1732E EtherNet/IP ArmorBlock Supporting Sequence of Events User Manual
- Important User Information
- Table of Contents
- Preface
- Chapter 1 - About 1732E ArmorBlock Modules
- Chapter 2 - Module Overview
- Chapter 3 - Use the Module in an ArmorBlock System
- Chapter 4 - Install Your Module
- Chapter 5 - Configure the Module for Your EtherNet/IP Network
- Chapter 6 - Configure the Module Using RSLogix 5000
- Introduction
- Set Up the Hardware
- Create the Example Application
- Configure Your I/O Module
- Overview of the Configuration Process
- Add a New Bridge and Module to Your RSLogix 5000 Project
- Use the Default Configuration
- Change the Default Configuration
- Download Your Configuration
- Edit Your Configuration
- Access Module Data in RSLogix 5000
- Configure RSLogix 5000 and the 1756-EN2T Communication Module for CIP Sync
- Chapter Summary and What’s Next
- Chapter 7 - Module Features
- Introduction
- Determine Module Compatibility
- Module Features That Can Be Configured
- Chapter Summary and What’s Next
- Chapter 8 - Using the Module
- Chapter 9 - Interpret Status Indicators
- Chapter 10 - Troubleshoot the Module
- Appendix A - ArmorBlock 2 Port Ethernet Module Specifications
- Appendix B - Module Tags
- Appendix C - 1732E EtherNet/IP ArmorBlock Supporting Sequence of Events Data Tables
- Appendix D - Connect to Networks via Ethernet Interface
- Appendix E - 1732E ArmorBlock I/O Embedded Web Server
- Glossary
- Index
- How Are We Doing?
- Back Cover

Publication 1732E-UM002A-EN-P - March 2010
30 Configure the Module Using RSLogix 5000
Configure Your I/O Module
You must configure your module upon installation. The module will not work
until it has been configured with at least the default configuration.
RSLogix 5000 Configuration Software
You must use RSLogix 5000, version 17 or later to set configuration for your
module. You have the option of accepting default configuration for your
module or writing point level configuration specific to your application.
Both options are explained in detail, including views of software screens, in
this chapter.
Overview of the
Configuration Process
When you use the RSLogix 5000 software to configure a module, you must
perform the following steps:
1. Add the Local EtherNet/IP Bridge (1756-EN2T or 1756-EN2TR) to
your project’s I/O Configuration.
2. Add the 1732E-IB16M12SOEDR as a child of the 1756-EN2T module.
3. Accept the default configuration or change it to specific configuration
for the module.
4. Edit configuration for a module when changes are needed.
Add a New Bridge and
Module to Your
RSLogix 5000 Project
After you have started RSLogix 5000 and created a controller, you must add a
new bridge and a new module to your project. The bridge allows your module
to communicate with the controller.
The wizard allows you to create a new module and write configuration. You
can use default configuration or write specific configuration for your
application.
IMPORTANT
Click Help on the configuration dialogs shown in this section if
you need assistance in selecting and setting the parameters.