
User Manual User Manual


Rockwell Automation Publication 1608S-UM001A-EN-P - July 2013 4
Quick Start and Introduction Chapter 1
Quick Start and Introduction
Getting Started
Before you begin installation of your i-Sense® Voltage Sag Detector, complete the
steps below.
1. Inspect for shipping damage. If any damage is seen, contact the shipper.
2. Record the i-Sense
Serial Number: ___________ - ___________ - ___________
The S/N label is located on the bottom of the unit; it will be needed to
register/use this i-Sense.
3. Register the i-Sense (monitor subscription included with purchase, future
renewals will be required to continue accessing data.):
– Go to www.igrid.com
– Login, or follow the online instructions to register as an i-Grid® user.
– Follow the online instructions to register your new i-Sense.
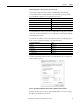
4. Configure the i-Sense hardware to match your nominal voltage:
– Find your Nominal Voltage (See Table 1 on page 13
)and record Voltage
Settings and Type here:
– Remove the right-side cover (two Phillips-head screws, top and
bottom)
– Verify that plug JP1 is installed correctly for your voltage
(See Table 1 on page 13)
– Verify that INPUT jumper wires are installed according to your wiring
diagram (See Table 2 on page 14
)
5. Configure the i-Sense software and communications according to the
Configuration Chapter. This step may be performed either before or after
installation. Needed supplies:
– A supply of power for the i-Sense: either (A) the external power supply
(not provided), plugged into the 9V DC jack or (B) AC mains power,
after installation. In normal operation, the i-Sense is powered by the
mains connection at INPUT_1.
– A laptop PC or workstation with Ethernet network card and Web
browser.
Type: 1608S-3V480K (3-channel) 1608S-6V480K (6-channel)
Wiring:
Voltage 480V 120V Other
Power Supply Plug JP1: White (< 250V): Red (> 250V):
LL LN S1: Single-Phase S2: Split-Phase