
User Manual


Rockwell Automation Publication 1502-UM052H-EN-P - June 2013 55
Chapter 5
Troubleshooting
Troubleshooting and
Contactor Coil Resistance
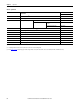
If an operating problem occurs, use the following troubleshooting chart to isolate
the cause of the failure and find corrective action. If the corrective action fails to
resolve the problem, consult your local Rockwell Automation field support
representative.
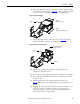
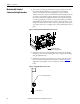
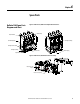
If faulty contactor coil(s) are the suspected cause of malfunction, refer to Table 7
for typical coil resistance values and check the contactor coils.
(1) Resistance values listed have a tolerance of ±10%. Refer to page 17 for measurement points at the contactor receptacle.
(2) Supplied only with mechanical latch option.
Table 6 - Troubleshooting
Symptom Possible Cause Actions
Contactor Chatters
(1)
• Loose connections in control circuit
• Coil leads reversed
• Control voltage too low
• Foreign material on contactor magnet
• Improper set-up of contactor auxiliary contact
assembly
• Faulty auxiliary contacts
• Faulty CR1 or CR2 interposing relay (mechanical latch
only)
• Faulty IntelliVAC or IntelliVAC Plus
• Latch not engaging
• Check all connections in control circuit for tightness
• Check wiring from the coil to the terminal block
assembly
• Measure control voltage. Refer to Contactor
Specifications for minimum pick-up voltage
• Clean magnet cores and armature
• Check set-up of contactor auxiliary contact assembly.
• Check master contact cartridges on contactor
• Ensure N.C. contact from contactor auxiliary assembly
is wired to auxiliary input on IntelliVAC or IntelliVAC
Plus
• Replace IntelliVAC or IntelliVAC Plus control module
• Check adjustment of mechanical latch
Coil Burnout • Coil leads improperly wired
• Faulty IntelliVAC or IntelliVAC Plus control module
(2)
• Improper set-up of contactor auxiliary contact
assembly
(1)
• Control voltage too high
(2)
• Check wiring from the coil to the terminal block
assembly
• Replace IntelliVAC or IntelliVAC Plus control module
(2)
• Check set-up of contactor auxiliary contact assembly
(1)
• Check for correct control voltage
(1)
Contactor does not energize • Loose connections in control circuit
• Damaged contactor auxiliary contacts
• Control voltage too low
• Improper set-up of contactor auxiliary contact assembly
• Faulty CR1 or CR2 interposing relay
(1)
• Faulty IntelliVAC or IntelliVAC Plus control module
(2)
• Check all connections in control circuit for tightness.
Check wiring from the coil to the terminal block
assembly
• Replace contactor auxiliary contact assembly
• Measure control voltage. Refer to Contactor
specifications for minimum pick-up voltage
• Check set-up of contactor auxiliary contact assembly
• Check CR1 and CR2 relay
(1)
• Check IntelliVAC or IntelliVAC Plus status LEDs
(2)
(1) Valid if mechanical latch contactors are controlled with electromechanical circuit only.
(2) Valid if IntelliVAC or IntelliVAC Plus control module is used (refer to 1503-UM053_-EN-P
and 1503-UM054_-EN-P).
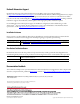
Table 7 - Typical Contactor Coil Resistance Values
Coil Part Number Description DC resistance (Ω)
(1)
80026-230-01 Operating Coil (each) 19.2 (9.6 x 2)
80022-067-01
(2)
Mechanical Latch Trip Coil 17.6