
Instruction Sheet Manual

Replace the ink collector unit if the following
message is issued in the display:
1. Tu r n OFF the printer.
2. Remove the new ink collector unit from
the packaging. Use the included gloves.
3. Remove the full ink collector unit from
the printer.
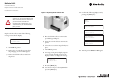
Figure 1 - Replacing the ink collector unit
4. Place the full ink collector unit into the
provided bag and dispose.
5. Insert the new ink collector unit into the
printer.
6. Close the cover so that it snaps firmly into
place.
7. Tu r n ON the printer.
8. A message in the printer display requests
you to reset the internal counter or the
display continues to display the message:
9. Press the [Menu] key
10. Use the arrow keys to select System then
press the [Enter] key.
11. Confirm the following display texts by
pressing the [Enter] key:
12. Turn the pr int er OFF, then ON again.
CAUTION: If the ink comes into contact
with your eyes wash out immediately with
water. If the ink comes into contact with
your skin wash the affected area
thoroughly with soap and water. If you
swallow ink rinse your mouth and drink
plenty of water.
Replace Ink
Collector Unit
Replace Ink
Collector Unit
Menu:
System
System:
Ink CU Replace
Overflow may
occur if Unit is
not replaced.
Reset counters?
Reset complete
Power Off/On
Bulletin 1492
ClearMark Printer
Replacement Ink Collector Unit
Installation Instructions