
User Manual User Manual

5-2 Rockwell Automation Publication 1492-UM008A-EN-P - June 2010
Chapter 5 Calibration
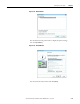
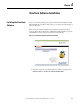
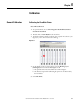
6. In the pull down menu select the GelSprinter GX3000/3050N printer .
See Figure 5.2.
Figure 5.2 -
7. Click [Map]. (The 1492-M5X5 is now linked to this printer)
8. Click [OK], with the "As Printer" selected. See Figure 5.2.
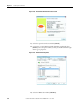
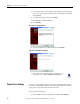
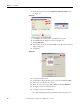
9. Click [Calibration].
10. Verif y a value of "7" in the box marked "Left" and a "66" in the box marked
"To p ". See Figure 5.3.
11. Click [Save].
Figure 5.3 -
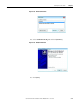
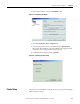
12. Load the 1492-M5X5 card.
13. Click on Print. (Pop-up window appears: leave heat off and click [OK].)
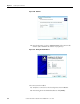
14. If the "X" is centered: proceed to step 19.
15. If the "X" is not centered: go to File -> Print, and click [Calibration].
16. See Figure 5.4 for horizontal adjustments.
17. See Figure 5.5 for vertical adjustments.
Note: When making adjustments use maximum increments of 0.5 mm.
7
6
9
13
8
11
10