Allen-Bradley SLC to SCANportt Communications Module (Cat.
Important User Information Because of the variety of uses for the products described in this publication, those responsible for the application and use of this control equipment must satisfy themselves that all necessary steps have been taken to assure that each application and use meets all performance and safety requirements, including any applicable laws, regulations, codes and standards. The illustrations shown in this guide are intended solely for purposes of example.
Table of Contents Preface Who Should Use this Manual? . . . . . . . . . . . . . . . . . . . . . . . . . . . Purpose of this Manual . . . . . . . . . . . . . . . . . . . . . . . . . . . . . . . . . Contents of this Manual . . . . . . . . . . . . . . . . . . . . . . . . . . . . . . Safety Precautions . . . . . . . . . . . . . . . . . . . . . . . . . . . . . . . . . . . . SLC Product Compatibility . . . . . . . . . . . . . . . . . . . . . . . . . . . . . . Terms and Abbreviations . . . . . . . . . . . . . . .
ii Using Enhanced Mode Chapter 4 Chapter Objectives . . . . . . . . . . . . . . . . . . . . . . . . . . . . . . . . . . . What Does Enhanced Mode Provide? . . . . . . . . . . . . . . . . . . . . . . What Are Datalinks? . . . . . . . . . . . . . . . . . . . . . . . . . . . . . . . . What Is Safe State Configuration Data? . . . . . . . . . . . . . . . . . . . What Is Messaging? . . . . . . . . . . . . . . . . . . . . . . . . . . . . . . . . Configuring the SLC to SCANport Module for Enhanced Mode . . . .
iii SCANport Messaging Appendix B Appendix Objectives . . . . . . . . . . . . . . . . . . . . . . . . . . . . . . . . . . Message and Reply Structures . . . . . . . . . . . . . . . . . . . . . . . . . . . Available SCANport Messages . . . . . . . . . . . . . . . . . . . . . . . . . . . SLC SCANport Messaging Ladder Program . . . . . . . . . . . . . . . . . . Example Messages and Replies . . . . . . . . . . . . . . . . . . . . . . . . . . Read Number of Parameters . . . . . . . . . . . . . . . . . . . . .
iv Publication 1203–5.
Preface Preface Read this preface to familiarize yourself with the rest of the manual.
P–2 Preface Contents of this Manual This manual contains the following information: Chapter: Publication 1203–5.9 –– October 1996 Title: Contents: Preface Describes the purpose, background, and scope of this manual. 1 Overview Provides an overview of the SLC to SCANport communications module. 2 Installing the SLC to SCANport Module Provides the procedures you need to install your SLC to SCANport communications module and attach it to the SCANport network.
Preface Safety Precautions P–3 Please read the following safety precautions carefully. ! ! ATTENTION: Only personnel familiar with SCANport devices and the associated machinery should plan or implement the installation, start-up, configuration, and subsequent maintenance of this communications module. Failure to comply may result in personal injury and/or equipment damage. ATTENTION: The SLC to SCANport module contains ESD (Electrostatic Discharge) sensitive parts and assemblies.
P–4 Preface Common Techniques Used in this Manual " Allen–Bradley Support This manual follows these conventions: • Bulleted lists provide information, not procedural steps. • Numbered lists provide sequential steps or hierarchical information. • Italic type is used for emphasis and chapter names. We also use this convention to call attention to helpful information.
Chapter 1 Overview Chapter Objectives Chapter 1 provides descriptions of the following: • the SLC to SCANport module • the available functions What is the SLC to SCANport Module? The SLC to SCANport module provides an interface between any SLC processor or other product that can control modules within a SLC rack and up to three SCANport devices as shown in Figure 1.1. Figure 1.
1–2 Overview What Functions Does the SLC to SCANport Module Provide? Your SLC processor or rack adapter determines what functions are available for the SLC to SCANport module.
Chapter 2 Installing the SLC to SCANport Module Chapter Objectives Chapter 2 covers the following information: • what you need to do before you install the SLC to SCANport module • how to install the SLC to SCANport module • how to remove the SLC to SCANport module Important: You cannot place an SLC rack unit containing an SLC to SCANport module in an enclosure that is less than 200 mm (8 in) deep.
2–2 Installing the SLC to SCANport Module Determine the Length of the SCANport Cable(s) To connect your SLC to SCANport module to a SCANport device, you need to use an Allen–Bradley SCANport cable. The maximum cable length between any two peripheral devices connected to any SCANport device cannot exceed 10 meters (33 feet). Therefore, in Figure 2.1, A+B+C≤10 meters and D+B+C≤10 meters.
Installing the SLC to SCANport Module 2–3 Figure 2.
2–4 Installing the SLC to SCANport Module Installing the SLC to SCANport Module To install the SLC to SCANport module into the chassis: 1. Set the DIP switches. For each SCANport device connected to the SLC to SCANport module, you need to set two DIP switches to select what happens when the SLC processor or rack adapter faults or is placed in program for the appropriate channel.
Installing the SLC to SCANport Module Set this DIP switch: Switches 7 and 8 To these settings: O P E N O – 8 7 1 2 3 4 5 6 7 8 6 5 2–5 To: SW7 Open (Off) SW8 Open (Off) Reserved 4 3 2 1 " If you select a state other than Fault, the channel enable bits located in the first two words of output data will retain their last state values. This ensures that the enabled SCANport connections remain active for those states.
2–6 Installing the SLC to SCANport Module 5. Apply firm, even pressure to seat the module in the I/O chassis backplane connectors. Make sure the plastic tabs snap into the rack. 6. Connect the SCANport cable(s) from the SCANport device(s) to the SCANport connections in the front of the module. Important: You must keep in mind that the maximum cable distance between any two devices connected to a single channel cannot exceed 10 meters (33 feet) of cable.
Chapter 3 Using Basic Mode Chapter Objectives Chapter 3 covers the following information: • a description of what basic mode provides • how to configure the SLC to SCANport module for basic mode • how to transfer data What Does Basic Mode Provide? Basic mode sends a 16–bit logic command and a 16–bit analog reference from the module to each SCANport device. It receives a 16–bit logic status and a 16–bit analog feedback signal from each connected SCANport device.
3–2 Using Basic Mode Figure 3.1 Example APS Screen Highlight the processor you want to use. For example, 1747–L532. 4. Press the F2 key. 5. Depending on your processor and version of APS, you may be asked to enter the operating system that your processor uses. 6. Press F5 to configure the I/O. The screen shown in Figure 3.2 is displayed. Figure 3.2 Example I/O Configuration Screen Publication 1203–5.
Using Basic Mode 3–3 7. Move the cursor to the slot containing the SLC to SCANport module. 8. Press F5 to modify the slot. The screen shown in Figure 3.3 is displayed. Figure 3.3 Prompt to Enter the Module ID Code 9. Enter the module ID code. For basic mode, the module ID code is 3516. 10.Press the Enter key. When you have entered the module ID code, you are returned to the screen shown in Figure 3.2 with the selected module now shown. If you press F9, the screen shown in Figure 3.
3–4 Using Basic Mode Figure 3.5 An Example of a Completed I/O Configuration Transferring Data To transfer data using the SLC to SCANport module, you need to be familiar with how the SLC I/O image table represents the internal data I/O mapping and how the input and output image channel status bits are defined.
Using Basic Mode 3–5 Channel Status Input Image Definitions The Input Image Channel Status bits are defined as follows: Channel 2 Status Bit 15 14 13 Not Used Channel 1 Status 12 11 V2 10 9 ID2 8 7 6 5 Not Used Not Used 4 3 2 1 0 V1 ID1 Word 0 V3 ID3 Word 1 Channel 3 Status These bits have the following definitions: This: ID1 ID2 ID3 V1 V2 V3 Represents: SCANport Channel 1, 2, or 3 Connected Adapter Port ID Number.
3–6 Using Basic Mode Channel Command Output Image Definitions The Output Image Channel Command bits are defined as follows: Channel 2 Command Bit 15 14 13 12 Channel 1 Command 11 Not Used 10 9 8 7 6 DE 2 5 4 Not Used Not Used 3 2 1 0 DE 1 DE 3 Word 0 Word 1 Channel 3 Command These bits have the following definitions: DE1 DE2 DE3 Example of Basic Mode Data Transfer SCANport Channel 1, 2, or 3 Data Enable bit.
Using Basic Mode 3–7 The portion of the program shown in Figure 3.7 provides start/stop control and a frequency reference to the 1305 drive connected to SCANport channel 1. The user start is a normally open push button, while the user stop is a normally closed push button. Figure 3.7 Example of Drive 1 Control and Reference | Drive 1 Drive 1 Drive 1 | | User User START | | Momentary Maintained Command | | START NOT STOP Bit | | Input Input | | I:2.0 I:2.0 O:1.
3–8 Using Basic Mode The portion of the program shown in Figure 3.8 provides start/stop control and a frequency reference to the 1305 drive connected to SCANport channel 2. This section functions the same as that shown in Figure 3.7 except for the changes in addresses. Figure 3.8 Example of Drive 2 Control and Reference | Drive 2 Drive 2 Drive 2 | | User User START | | Momentary Maintained Command | | START NOT STOP Bit | | Input Input | | I:2.0 I:2.0 O:1.
Using Basic Mode 3–9 The portion of the program shown in Figure 3.9 provides start/stop control and a frequency reference to the 1305 drive connected to SCANport channel 3. This section functions the same as that shown in Figure 3.7 and Figure 3.8 except for the changes in address. Figure 3.9 Example of Drive 3 Control and Reference | Drive 3 Drive 3 Drive 3 | | User User START | | Momentary Maintained Command | | START NOT STOP Bit | | Input Input | | I:2.0 I:2.0 O:1.
3–10 Using Basic Mode The following data table shows the input data read from the SLC to SCANport module via the SLC backplane. address I:1 I:1.1 I:1.2 I:1.3 I:1.4 I:1.5 I:1.6 I:1.
Chapter 4 Using Enhanced Mode Chapter Objectives Chapter 4 covers the following information: • a description of what enhanced mode provides • how to configure the SLC to SCANport module for enhanced mode • how to use the I/O image • how to configure G files • how to use M files What Does Enhanced Mode Provide? Enhanced mode supports the basic mode features which include a 16–bit logic command and a 16–bit analog reference from the module to each SCANport device as well as a 16–bit logic status and a 1
4–2 Using Enhanced Mode What Are Datalinks? Datalinks let you cyclically transfer parameter values to and from a SCANport device (provided that the SCANport device supports datalinks). By using datalinks, you can change the value of a parameter without using the SLC to SCANport messaging function. Each datalink consists of two 16–bit words of input and two 16–bit words of output when enabled. Up to 8 words in and 8 words out of data are available if supported in the connected SCANport device.
Using Enhanced Mode 4–3 What Is Messaging? Messaging lets you get and modify SCANport device parameters as well as providing access to other internal SCANport–related information or services. To use messaging, you need to configure the M file mechanism of the SLC processor. The M file mechanism is covered later in this chapter. Appendix B, SCANport Messaging, provides examples of SCANport messages.
4–4 Using Enhanced Mode 6. Press F5 to configure the I/O using the screen shown in Figure 4.2. Figure 4.2 An Example of the I/O Configuration Screen 7. Move the cursor to the slot containing the SLC to SCANport module. 8. Press F5 to modify the slot using the screen shown in Figure 4.3. Figure 4.3 Prompt to Enter the Module ID Code 9. Enter the module ID code. For enhanced mode, the module ID code is 13616. 10.Press the Enter key. Publication 1203–5.
Using Enhanced Mode 4–5 11. The slot is now configured for the SLC to SCANport module to be used in enhanced mode. This is shown in Figure 4.4 Figure 4.4 Example I/O Configuration Screen 12.Press F9 to add the information to configure the specialty I/O using the screen shown in Figure 4.5. Figure 4.
4–6 Using Enhanced Mode 14.Press F3 to configure the G file data using the screen shown in Figure 4.6. Figure 4.8 provides the definition of the G file data. Figure 4.6 Screen Used to Configure G File Data 15.When you return to the screen shown in Figure 4.5, press F5 to access the advanced set up menu to configure the size of the messaging buffers. 16.Press F5 to enter the size of the M0 file. For this module, the maximum file size is 800. 17.Press F6 to enter the size of the M1 file.
Using Enhanced Mode Using the I/O Image 4–7 The following SLC I/O image table represents the internal data I/O mapping for the SLC to SCANport module when configured as an enhanced mode module. Figure 4.
4–8 Using Enhanced Mode These status fields are defined as follows: Channel 1 Status Channel 2 Status 15 14 13 12 11 D2 C2 B2 A2 V2 X M0 STA Bit MSTAT CH3 10 MSTAT CH2 9 8 7 6 5 4 3 ID2 D1 C1 B1 A1 V1 ID1 Word 0 MSTAT CH1 D3 C3 B3 A3 V3 ID3 Word 1 Message Status Ch 1–3 2 1 0 Channel 3 Status These bits have the following definitions: This: ID1 ID2 ID3 V1 V2 V3 A–D1(–3) M0 STA MSTAT CH1–3 Represents the: SCANport Channel 1, 2, or 3 Connected Adapter Port ID
Using Enhanced Mode 4–9 The eight unique message buffers in the M0 file can contain a message for any of the three SCANport channels. You can select which message buffer is to be used for each channel with the corresponding MSG ID bits. This lets a message be written into a buffer only once and used as many times as needed. To transmit a message, the MSG ID bits are set to select the desired buffer and a channel’s Message Enable bit is set to 1.
4–10 Using Enhanced Mode Configuring G Files You can use G files to enable additional I/O (datalinks) between the SCANport device and the SLC to SCANport module. G files also hold the safe state values for the output data to be transferred to the SCANport devices when it is switch–configured to use it. The G file data is specified as follows: G=g–file, s=slot Figure 4.
Using Enhanced Mode 4–11 The G file datalink configuration field is defined as follows: Bit 15 14 13 12 11 10 ED EC 3 3 Not Used 9 8 7 EB 3 EA ED 3 2 6 5 EC EB 2 2 4 EA 2 3 2 ED EC 1 1 1 0 EB 1 EA 1 Gs.1 These bits have the following definitions: This: EA1 EA2 EA3 EB1 EB2 EB3 EC1 EC2 EC3 ED1 ED2 ED3 Represents: SCANport Channel 1, 2, or 3 Datalink A Enable bit. When set high (1), datalink A is enabled for the corresponding channel.
4–12 Using Enhanced Mode The M0 file image contains multiple transmit message buffers set up as shown in Figure 4.9. Figure 4.9 M0 File Structure e = slot location Message Buffer 0 Service M0:e.000 Service M0:e.400 Class M0:e.001 Class M0:e.401 Instance M0:e.002 Instance M0:e.402 Attribute M0:e.003 M0:e.004 Attribute M0:e.403 M0:e.404 Request Length = n Req Data 1 M0:e.005 Req Data 2 Req Data 1 M0:e.405 Req Data n ... M0:e.0xx Req Data n ... M0:e.4xx M0:e.100 Service M0:e.
Using Enhanced Mode 4–13 The M1 file image contains the contents of the multi–position DIP switch, an echo of the contents of the G file data, and three receive message buffers as shown in Figure 4.10. Figure 4.10 M1 File Structure Reserved DIP SW Datalink Enables Logic Command Channel 1 Analog Reference Channel 1 M1:e.000 Service (echo or error) M1:e.100 M1:e.001 Class (echo) M1:e.101 M1:e.002 Instance (echo) M1:e.102 Attribute (echo) Response Length = n M1:e.103 M1:e.104 M1:e.
4–14 Using Enhanced Mode Figure 4.11 shows the first M0 message buffer structure. Figure 4.11 SLC to SCANport Module M0 Buffer 0 Message Structure Header Information Service M0:e.b00 Class M0:e.b01 e = slot location Instance M0:e.b02 b = buffer 0–7 Attribute M0:e.b03 M0:e.b04 Request Length = n Req Data 2 Req Data 1 M0:e.b05 Req Data n ... M0:e.bxx Where: This field: Service Class Instance Attribute Request length Publication 1203–5.
Using Enhanced Mode This field: Req Data 4–15 Specifies: The actual data portion of the request message. Up to a maximum of 96 bytes of message data is available. This field is optional depending on the type of message sent. The response from the SCANport device appears in the message buffer of the channel used (Channel 1 = M1:e.100–199, Channel 2 = M1:e.200–299, Channel 3 = M1:e.300–399). Figure 4.12 shows the structure of the message response buffers inside the SLC M1 file. Figure 4.
4–16 Using Enhanced Mode Examples of Enhanced Mode Data Transfer The following examples are portions of the same program that is used to transfer data using the enhanced mode mechanism. Figure 4.13 shows an example configuration of the G file for the SLC to SCANport module. The Advanced Programming Software (APS) sets the first word; do not modify this word. Each bit in the second word enables a datalink. Refer to the manual for your SCANport device for more information about datalinks.
Using Enhanced Mode 4–17 Figure 4.
4–18 Using Enhanced Mode Figure 4.14 shows a portion of the program that enables all three SCANport channels on the SLC to SCANport module. Figure 4.14 Example of Enabling the SCANport channels | Channel 1 | | SCANport | | Enable | | O:1.0 | |–––––––––––––––––––––––––––––––––––––––––––––––––––––––––( )––––––| | | 0 | | | |Channel 2 | | | |SCANport | | | |Enable | | | | O:1.0 | | | +–––( )––––| | | | 8 | | | |Channel 3 | | | |SCANport | | | |Enable | | | | O:1.
Using Enhanced Mode 4–19 The portion of the program shown in Figure 4.15 provides start/stop control and a frequency reference to the 1305 drive connected to SCANport channel 1. The user start is a normally open push button, while the user stop is a normally closed push button. Figure 4.15 Example of Drive 1 Control and Reference | Drive 1 Drive 1 Drive 1 | | User User START | | Momentary Maintained Command | | START NOT STOP Bit | | Input Input | | I:2.0 I:2.0 O:1.
4–20 Using Enhanced Mode The portion of the program shown in Figure 4.16 provides start/stop control and a frequency reference to the 1305 drive connected to SCANport channel 2. This section functions the same as that shown in Figure 4.15 except for the changes in addresses. Figure 4.16 Example of Drive 2 Control and Reference | Drive 2 Drive 2 Drive 2 | | User User START | | Momentary Maintained Command | | START NOT STOP Bit | | Input Input | | I:2.0 I:2.0 O:1.
Using Enhanced Mode 4–21 The portion of the program shown in Figure 4.17 provides start/stop control and a frequency reference to the 1305 drive connected to SCANport channel 3. This section functions the same as that shown in Figure 4.15 and Figure 4.16 except for the changes in address. Figure 4.17 Example of Drive 3 Control and Reference | Drive 3 Drive 3 Drive 3 | | User User START | | Momentary Maintained Command | | START NOT STOP Bit | | Input Input | | I:2.0 I:2.0 O:1.
4–22 Using Enhanced Mode The following data table shows the input data read from the SLC to SCANport module via the SLC backplane. address I:1 I:1.1 I:1.2 I:1.3 I:1.4 I:1.5 I:1.6 I:1.7 I:1.8 I:1.9 I:1.10 I:1.11 I:1.12 I:1.13 I:1.14 I:1.15 I:1.16 I:1.17 I:1.18 I:1.19 I:1.20 I:1.21 I:1.22 I:1.23 I:1.24 I:1.25 I:1.26 I:1.27 I:1.28 I:1.29 I:1.30 I:1.
Using Enhanced Mode 4–23 The following data table shows the data to be sent to the SLC to SCANport module via the SLC backplane. address O:1 O:1.1 O:1.2 O:1.3 O:1.4 O:1.5 O:1.6 O:1.7 O:1.8 O:1.9 O:1.10 O:1.11 O:1.12 O:1.13 O:1.14 O:1.15 O:1.16 O:1.17 O:1.18 O:1.19 O:1.20 O:1.21 O:1.22 O:1.23 O:1.24 O:1.25 O:1.26 O:1.27 O:1.28 O:1.29 O:1.30 O:1.
4–24 Using Enhanced Mode For example, on a 1336 PLUS drive connected to channel 1 of an SLC to SCANport module installed in slot 1, use datalink A1 to control the value of parameter 27. To do this, you need to: 1. Set the lowest bit of the second word of the G file to a 1. This enables Datalink A on channel 1). 2. Use a Human Interface Module (HIM) to set parameter 111 (Data In A1) to 27. The value in O:1.8 now controls the value of parameter 27 in the 1336 PLUS drive.
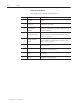
Chapter 5 Troubleshooting Chapter Objectives Chapter 5 provides information about the LED states. LED States The following table provides information about the LED states. LED State Description Off No module power The rack is not receiving power.
5–2 Troubleshooting Publication 1203–5.
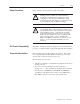
Chapter 6 Specifications Chapter Objectives Chapter 6 provides the specifications that you may need to install, repair, or use your SLC to SCANport communications module. Product Specifications The following are the product specifications.
6–2 Specifications European Union Directive Compliance If this product is installed within the European Union or EEA regions and has the CE mark, the following regulations apply.
Appendix Appendix Objectives A This appendix provides information about M0–M1 files and G files. The information is general in nature and supplements specific information contained in earlier chapters of this manual. Topics include: • M0–M1 files • G files " M0–M1 Files The SLC to SCANport module is considered to be a specialty I/O module. M0 and M1 files are data files that reside only in specialty I/O modules, such as the SLC to SCANport module.
A–2 M0, M1, and G Files To configure the M0 and M1 files: 1. Press F9 for Specialty I/O Configuration. The following functions are displayed. ISR NUMBER MODIFY G FILE ADVNCD SETUP G FILE SIZE F1 F3 F5 F7 2. Press F5 for Advanced Setup. The following functions are displayed: INPUT SIZE OUTPUT SIZE SCANNED INPUT SCANNED OUTPUT M0 FILE SIZE M1 FILE SIZE F1 F2 F3 F4 F5 F6 3. Press F5 for M0 File Size. 4.
M0, M1, and G Files A–3 Restrictions on Using M0–M1 Data File Addresses You can use M0 and M1 data file addresses in all instructions except the OSR instruction and the following instruction parameters: Instruction Parameter (uses file indicator #) BSL, BSR File (bit array) SQO, SQC, SQL File (sequencer file) LFL, LFU LIFO (stack) FFL, FFU FIFO (stack) Monitoring Bit Addresses For SLC 5/02 processors, the M0/M1 monitoring option is always disabled.
A–4 M0, M1, and G Files If you need to show the state of the M0 or M1 addressed bit, you can transfer the state to an internal processor bit. This is shown below, where an internal processor bit is used to indicate the true/false state of a rung. B3 ] [ 0 B3 ] [ 1 EQU EQUAL Source A N7:12 Source B N7:3 M0:3.0 ( ) 1 This rung will not show its true rung state because the EQU instruction is always shown as true and the M0 instruction is always shown as false.
M0, M1, and G Files A–5 The following COP instructions copy data from a processor bit file and integer file to an M0 file. For the example, assume the data is configuration information that affects how the specialty I/O module operates. S:1 ] [ 15 First scan bit. It makes this rung true only for the first scan after entering RUN mode. COP Copy FILE Source #B3:0 Dest #M0:1.0 Length 16 COP Copy FILE Source #N7:0 Dest #M0:1.
A–6 M0, M1, and G Files The following table shows approximate access times per instruction or word of data for the SLC 5/02, SLC 5/03, and SLC 5/04 processors.
M0, M1, and G Files A–7 SLC 5/03 Processor Example The SLC 5/03 access times depend on the instruction type. Consult the previous table for the correct access times to add. As an example, if you use a COP to M file instruction like the one shown, add 772 µs plus 23 µs per word. This adds 1554 µs to the SLC 5/03 scan time due to the COP instruction. Minimizing the Scan Time To keep the processor scan time to a minimum, reduce the use of instructions addressing the M0 or M1 files.
A–8 M0, M1, and G Files The following figure shows another economizing technique. The COP instruction addresses an M1 file, adding approximately 4.29 ms to the scan time if you are using a SLC 5/02 Series B processor. Scan time economy is realized by making this rung true only periodically, as determined by clock bit S:4/8. (Clock bits are covered in chapter 1 of the Advanced Programming Software Reference Manual, Publication 1747–6.11.
M0, M1, and G Files A–9 Configuring G Files Using APS Software The G file is configured as part of the I/O configuration procedure for the processor file.
A–10 M0, M1, and G Files The following figure shows the three G file data formats that you can select. Word addresses begin with the file identifier G and the slot number you have assigned to the specialty I/O module. In this case, the slot number is 1. Sixteen words have been created (addresses G1:0 through G1:15).
Appendix B SCANport Messaging Appendix Objectives This appendix contains information to help you use SCANport. The following topics are covered: • message and reply structures • examples of SCANport message structures Message and Reply Structures Before you can send a message, you need to copy the message into one of the M0 message buffers. SCANport messages access data structures within the SCANport device. These data structures are called objects.
B–2 SCANport Messaging Where: This field: Specifies: The action or service requested.
SCANport Messaging B–3 Figure B.2 shows the structure of the message response buffers inside the SLC M1 file. Figure B.2 M1 File Message Response Buffer Structures Header Information Service (error or echo) M0:e.b00 Class (echo) M0:e.b01 e = slot location Instance (echo) M0:e.b02 b = buffer 0–7 Attribute (echo) Response Length = n M0:e.b03 M0:e.b04 Resp Data 2 Resp Data 1 M0:e.b05 Resp Data n ... M0:e.
B–4 SCANport Messaging Available SCANport Messages You can use the following SCANport messages: Shown on page: This message: Read Number of Parameters Read Parameter Value Read Parameter Name Text Write a Value to Parameter B–8 Lets you: Request how many parameters the SCANport device supports. Request the value for a specific parameter. B–9 Request the name of a specific parameter. B–10 Write a value to a specific parameter.
SCANport Messaging B–5 Figure B.3 SLC Ladder Program Example Rung 2:0 | Wait for |SCANport |SCANport | | Reply to |Channel 1 |Channel 1 | | Message |READY |DONE | | B3:0 I:1.1 I:1.1 +COP–––––––––––––––+ | |––––] [––––––––]/[––––––––] [–––––––––––+–+COPY FILE +–+–| | 2 9 8 | |Source #M1:1.
B–6 SCANport Messaging Rung 2:2 | Setup |SCANport |SCANport | | Send |Channel 1 |Channel 1 | | Message |READY |DONE | | Buffer | | | B3:0 I:1.1 I:1.1 +COP–––––––––––––––+ | |––––] [––––––––] [––––––––]/[–––––––––––+–+COPY FILE +–+–| | 0 9 8 | |Source #N10:0| | | | | |Dest #M0:1.100| | | | | |Length 100| | | | | +––––––––––––––––––+ | | | | Message | | | | Buffer | | | | ID# | | | | O:1.0 | | | +––––(L)–––––––––––––––+ | | | 2 | | | | Message | | | | Buffer | | | | ID# | | | | O:1.
SCANport Messaging B–7 Read Number of Parameters The Read Number of Parameters message lets you request how many parameters the SCANport device supports. The following is an example of this request: Read Number of Parameters Value 000e M0:e.000 Service=Get Attribute Single 000f M0:e.001 Parameter Class 0000 M0:e.002 Instance 0002 M0:e.003 M0:e.004 Attribute=Last Parameter Number 0000 Data Length = 0 Response Value 000e M1:e.100 Service=Get Attribute Single 000f M1:e.
B–8 SCANport Messaging Read Parameter Value The Read Parameter Value message lets you request the value for a specific parameter. The following is an example of this request: Read Parameter Value Value 000e M0:e.000 Service=Get Attribute Single 000f M0:e.001 Parameter Class 0005 M0:e.002 Instance=Parameter #5 0001 M0:e.003 M0:e.004 Attribute=Value 0000 Data Length=0 Response Value 000e M1:e.100 Service=Get Attribute Single 000f M1:e.101 Parameter Class 0005 M1:e.
SCANport Messaging B–9 Read Parameter Name Text The Read Parameter Name Text message lets you request the name of a specific parameter. The following is an example of this request: Read Parameter Name Text Value 000e M0:e.000 Service=Get Attribute Single 000f M0:e.001 Parameter Class 0005 M0:e.002 Instance=Parameter #5 0007 M0:e.003 M0:e.004 Attribute=Parameter Name 0000 Data Length=0 Response Value 000e M1:e.100 Service=Get Attribute Single 000f M1:e.101 Parameter Class 0005 M1:e.
B–10 SCANport Messaging Write Value to Parameter The Write Value to Parameter message lets you write a value to a specific parameter. The following is an example of this request: Write a Value of 6 to Parameter 5 Value 0010 M0:e.000 Service=Set Attribute Single 000f M0:e.001 Parameter Class 0005 M0:e.002 Instance=Parameter #5 0001 Attribute=Value 0002 M0:e.003 M0:e.004 0006 M0:e.005 Data=Value of 6 Data Length=2 Bytes Response Value 0010 M1:e.100 Service=Set Attribute Single 000f M1:e.
SCANport Messaging B–11 Read Full Parameter The Read Full Parameter message lets you request the name and value of a specific parameter. The following is an example: Read Full Parameter 7 Value 0001 M0:e.000 Service=Get Attribute All 000f M0:e.001 Parameter Class 0007 M0:e.002 Instance=Parameter #7 0000 M0:e.003 M0:e.004 Attribute 0000 Response Value 0001 M1:e.100 Service=Get Attribute All 000f M1:e.101 Parameter Class 0007 M1:e.102 Instance=Parameter #7 0000 Attribute 0035 M1:e.
B–12 SCANport Messaging Figure B.8 shows an example of a Read Full Parameter request. This message reads all the information about parameter 7 from the SCANport device. It is encoded as shown in the following tables. You should note that the data is not word aligned. Figure B.
SCANport Messaging B–13 The following table shows how the data type field is coded: Data Type Value 1 2 3 4 5 6 7 8 Description of Data Type of Parameter Value Field 16–bit word 16–bit unsigned integer 16–bit signed integer Boolean Short integer Double integer Long integer Unsigned short integer The descriptor bits are defined as follows: This descriptor bit: 0 1 2 3 4 5 6 Has the following definition when set to 1: Not used. This bit should always be 0. Supports ENUM strings. Supports scaling.
B–14 SCANport Messaging The four formulas are shown here. The first two formulas are used when descriptor bit 6 is set to 1. (Internal Value + Offset) x Multiplier x Base Engineering Value = Divisor x 10 Decimal Precision Engineering Value x Divisor x 10 Decimal Precision Internal Value = Multiplier x Base (Internal Value + Offset) x Multiplier x Base Engineering Value = Divisor Engineering Value x Divisor – Offset Internal Value = Multiplier x Base Publication 1203–5.
SCANport Messaging B–15 Set Default Parameter Values The Set Default Parameter Values message lets you reset the values of all parameters to the factory default values. The following is an example of this request: Set Default Parameter Values Value 0005 M0:e.000 Service=Reset All to Factory Defaults 000f M0:e.001 Parameter Class 0000 M0:e.002 Instance 0000 M0:e.003 M0:e.004 Attribute 0000 Data Length=0 Bytes Response Value 0005 M1:e.100 Service=Reset All to Factory Defaults 000f M1:e.
B–16 SCANport Messaging Restore Parameter Values from Non–volatile Storage The Restore Parameter Values from Non–volatile Storage message lets you restore the values of all parameters to the values stored in non–volatile storage. The following is an example of this request: Restore Parameter Values from Non–Volatile Storage Value 0015 M0:e.000 Service=Restore from Storage 000f M0:e.001 Parameter Class 0000 M0:e.002 Instance 0000 M0:e.003 M0:e.
SCANport Messaging B–17 Save Parameter Values to Non–volatile Storage The Save Parameter Values to Non–volatile Storage message lets you save the values of all parameters to non–volatile storage. The following is an example of this request: Save Parameter Values to Non–Volatile Storage Value 0016 M0:e.000 Service=Save to Storage 000f M0:e.001 Parameter Class 0000 M0:e.002 Instance 0000 M0:e.003 M0:e.004 Attribute 0000 Data Length=0 Bytes Response Value 0016 M1:e.
B–18 SCANport Messaging Read Enum String for Value in Parameter The Read Enum String for Value in Parameter message lets you request the text string that corresponds to a specific bit in a specific parameter. The following is an example of this request: Read Enum String for a Value of 1 in Parameter #5 Value 004b M0:e.000 Service=Get Enum String 000f M0:e.001 Parameter Class 0005 M0:e.002 Instance=Parameter #5 0001 M0:e.003 M0:e.
SCANport Messaging B–19 Read Product Number The Read Product Number message lets you request the product number from the SCANport device. The following is an example of this request: Read Product Number Value 000e M0:e.000 Service=Get Attribute Single 0092 M0:e.001 Internal A–B Vendor Specific Class 0000 M0:e.002 Instance 0000 M0:e.003 M0:e.004 Attribute 0000 Data Length=0 Bytes Response Value 000e M1:e.100 Service=Get Attribute Single 0092 M1:e.
B–20 SCANport Messaging Read Product Text The Read Product Text message lets you request the product text from the SCANport device. The following is an example of this request: Read Product Text Value 000e M0:e.000 Service=Get Attribute Single 0092 M0:e.001 Internal A–B Vendor Specific Class 0000 M0:e.002 Instance 0001 M0:e.003 M0:e.004 Attribute 0000 Data Length=0 Bytes Response Value 000e M1:e.100 Service=Get Attribute Single 0092 M1:e.
SCANport Messaging B–21 Read Product Series Number The Read Product Series Number message lets you request the product series number from a SCANport device. The following is an example of this request: Read Product Series Number Value 000e M0:e.000 Service=Get Attribute Single 0092 M0:e.001 Internal A–B Vendor Specific Class 0000 M0:e.002 Instance 0003 M0:e.003 M0:e.004 Attribute 0000 Data Length=0 Bytes Response Value 000e M1:e.100 Service=Get Attribute Single 0092 M1:e.
B–22 SCANport Messaging Read Product Software Version The Read Product Software Version message lets you request the product software version from a SCANport device. The following is an example of this request: Read Product Software Version Value 000e M0:e.000 Service=Get Attribute Single 0092 M0:e.001 Internal A–B Vendor Specific Class 0001 M0:e.002 Instance 0001 M0:e.003 M0:e.004 Attribute 0000 Data Length=0 Bytes Response Value 000e M1:e.100 Service=Get Attribute Single 0092 M1:e.
SCANport Messaging B–23 Scattered Read The Scattered Read message lets you request the values of multiple parameters, not necessarily starting from parameter 1. The following is an example of this request: Scattered Read Value 0032 M0:e.000 Service=Get Attribute Scattered 0093 M0:e.001 Internal A–B Vendor Specific Class 0000 M0:e.002 Instance 0000 Attribute 000c M0:e.003 M0:e.004 0001 M0:e.005 Parameter 1 0000 M0:e.006 Always 0 0002 M0:e.007 Parameter 2 0000 M0:e.008 M0:e.
B–24 SCANport Messaging Figure B.17 shows a Scattered Read request. This example reads the values of three parameters. N10:4 contains the length of the data in bytes (three parameters require 12 bytes). A pair of words are required for each parameter being read (starting at N10:5). The first word of each pair is the parameter number. The second word is a place holder. The response message (N11 file) has the same structure as the request message with a few changes.
SCANport Messaging B–25 Scattered Write The Scattered Write message lets you write the values of multiple parameters, not necessarily starting from parameter 1. The following is an example of this request: Scattered Write Value 0034 M0:e.000 Service=Set Attribute Scattered 0093 M0:e.001 Internal A–B Vendor Specific Class 0000 M0:e.002 Instance 0000 Attribute 000c M0:e.003 M0:e.004 0005 M0:e.005 Parameter 5 0001 M0:e.006 Value 0006 M0:e.007 Parameter 6 0002 M0:e.008 M0:e.
B–26 SCANport Messaging The response message (N11 file) has the same structure as the request message with a few changes. If an error occurred while writing one of the parameters, the high bit of that parameter number is set and the second word of the pair contains an error code. If the high bit of the parameter number is not set, the second word of the pair contains a zero. Figure B.
SCANport Messaging B–27 Read Parameter Link from Parameter Number The Read Parameter Link from Parameter Number message lets you request the parameter link information for a specific parameter. The following is an example of this request: Read Parameter Link from Parameter Number 5 Value 000e M0:e.000 Service=Get Attribute Single 0099 M0:e.001 Internal A–B Vendor Specific Class 0005 M0:e.002 Instance=Parameter #5 0000 M0:e.003 M0:e.
B–28 SCANport Messaging Write Parameter Link from Parameter Number The Write Parameter Link from Parameter Number message lets you write the parameter link information for a specific parameter. The following is an example of this request: Write Parameter Link to Parameter Number 5 Value 0010 M0:e.000 Service=Set Attribute Single 0099 M0:e.001 Internal A–B Vendor Specific Class 0005 M0:e.002 Instance=Parameter #5 0000 Attribute=Link 0002 M0:e.003 M0:e.004 0007 M0:e.
SCANport Messaging Error Codes B–29 The following error codes are possible: If you get this number: 0 1 2 3 4 5 6 7 0fdH (253) 0feH (254) Then: No error occurred. The operation was successful. The service failed. The SCANport device could not perform this request. Service not supported. Class not supported. Instance not supported. Attribute not supported. Value out of range.
B–30 SCANport Messaging Publication 1203–5.
Index B basic mode configuring, 3–1 description of, 3–1 example, 3–6 example of completed configuration, 3–4 module ID code, 3–3 output image channel command, 3–6 SLC I/O image table, 3–4 C contents of manual, P–2 D datalinks, 4–2 definitions, P–3 DIP switch configuration, 2–4 location, 2–1 E enhanced mode channel command output image, 4–9 configuring, 4–3 datalinks, 4–2 description of, 4–1 examples, 4–16– 4–25 G files, 4–10 M files, 4–11 module ID code, 4–4 status field definitions, 4–8 error codes, B–
I–2 Index safe state values, 4–2, 4–11 SLC I/O image table for basic mode, 3–4 for enhanced mode, 4–7 SLC product compatibility, P–3 SLC to SCANport module configuring for basic mode, 3–1 configuring for enhanced mode, 4–3 described, 1–1 features provided, 1–2 installing, 2–4 removing from chassis, 2–6 specifications, 6–1 terms, P–3 troubleshooting, 5–1
We Want Our Manuals to be the Best! You can help! Our manuals must meet the needs of you, the user. This is your opportunity to make sure they do just that. By filling out this form you can help us provide the most useful, thorough, and accurate manuals available. Please take a few minutes to tell us what you think. Then mail this form, FAX it, or send comments via E-Mail. FAX: to your local Allen-Bradley Sales Office or 414/242-8579 E-Mail: via Internet to “SEPATTER@ABPOST.remnet.ab.
NO POSTAGE NECESSARY IF MAILED IN THE UNITED STATES BUSINESS REPLY MAIL FIRST CLASS PERMIT NO. 413 MEQUON, WI POSTAGE WILL BE PAID BY ADDRESSEE ALLEN-BRADLEY Attn: Marketing Communications P.O.
Allen-Bradley, a Rockwell Automation Business, has been helping its customers improve productivity and quality for more than 90 years. We design, manufacture and support a broad range of automation products worldwide. They include logic processors, power and motion control devices, operator interfaces, sensors and a variety of software. Rockwell is one of the world’s leading technology companies. Worldwide representation.