
Instructions

3
Installation
Successful installation of this hardware depends on accurate
measuring and marking, followed by drilling straight holes that
align properly in both workpieces. There are a lot of variables in
determining where to drill for the holes, including the dimensions
of your stock and whether the outside edge of the assembled
pieces will be flush or offset to create a reveal. As a general
example, these instructions will show how to connect a 1
1
⁄2" x 3
1
⁄2"
stretcher (the actual dimensions of a nominal 2x4 board) to a 3
1
⁄2"
x 3
1
⁄2" leg (the actual dimensions of a nominal 4x4 post), with a
1/4" reveal. If your materials are of different dimensions or your
situation calls for a different reveal, you will need to calculate the
measurements for your drilling locations.
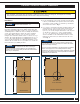
0.75"
1.5"
Stretcher End
9/16" diameter
bolt hole
1.75"
1.75"
3.5"
Fig. 1 Fig. 2
PRODUCT SPECIFIC SAFETY WARNINGS
> After installation, periodically check all hardware to make sure it hasn’t come loose during use, and retighten as necessary.
Non-permanent blue thread locker also could be used to help prevent loosening.
Minimum stock thickness: 1
1
⁄2"
It’s a good idea to label the inside and
outside faces of the stretcher and the faces of the leg to
which the stretchers will be attached. This will help avoid
confusion and help ensure that you drill holes in the correct
faces of your workpieces.
1. Locate and mark the center on the end of the stretcher. This
is where you will drill the 9/16" diameter hole for the bolt. In
our example scenario, it will be 1
3
⁄4" from the top and bottom
and 3/4" in from each face. Fig. 1.
2. Use a square to extend the horizontal centerline from the end
onto the inside face of the stretcher. Then calculate how far
from the end of the stretcher the hole for the cross dowel
needs to go. To do this, subtract the thickness of the leg from
4
3
⁄4". In this case, the leg is 3
1
⁄2", so the equation would be
4
3
⁄4" – 3
1
⁄2" = 1
1
⁄4". Then measure 1
1
⁄4" in from the end of the
stretcher and make a vertical mark on the inside face. This
marks the location for the 7/8" diameter hole for the cross
dowel. Fig. 2.
1.25"
Stretcher Inside Face
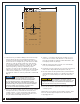
Because of the diameter of the washer,
the through hole in the leg must be centered at least 3/4"
from the edge of the leg. Otherwise, the washer will extend
beyond the edge of the leg.
If you’re mounting stretchers at the same height on adjacent
faces of the legs, be sure to vertically offset the drilling
locations for the bolts and cross dowels. Otherwise, the holes
in the leg will intersect and it will be impossible to install the
hardware for both stretchers.
7/8" diameter
cross dowel hole