
Owner's Manual

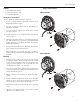
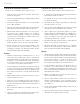


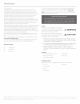

Table Of Contents
- RFX3-PMXDK Installation & Operation
- PMX-2 Installation & Operation
- RM1652B Installation & Operation
- Front Speaker Enclosure Installation & Operation
- Front Subwoofer Enclosure Installation & Operation
- RM110D2B Subwoofer Installation & Operation
- TM400X4ad Amplifier
- Amplifier Installation Kit Installation & Operation

Installation Considerations
This section focuses on some considerations for installing your Can-
Am
Ma
verick
X3
front
speaker enclosures. These speaker enclosures are
designed
to
work
in conj
unct
ion with Rockford's other
X3
specific audio
kits and parts.
If
you
feel uns
ur
e a
bout
installing this system you
rse
lf,
have
it
installed
by a qualified technician.
When drilling holes, make sure
what
is on
the
other
side.
Be
sure that
any electrical, fuel lines or any other important components are fr
ee
and clear from the area.
~WARNING
A
CAUTION
A CAUTION
Bef
or
e installation, disconnect the
batt
ery
negati
ve(
·)
terminal
to
preve
nt
damage to
the
unit
, fire and/or possible injury.
Before beginning any installation,
follow
these s
impl
e rules:
Be
sure
to
ca
refully
rea
d and understand
the
in
structions before
attempt
ing to insta
ll
the
se
speaker enclosures.
•
Cons
ult
yo
ur
UT
V's
service manual for
mod
el specific information.
Models may differ from year
to
year depending on factory
opt
ions
and aftermarket accessories added.
•
This speaker kit is specifi
ca
lly designed to
wo
rk with Rockford
Fosgate's
PM
and RM
se
r
ies
of
speakers.
With the addition of an amplifier
or
source unit, be
su
re
that
your
curre
nt
charging system is in proper
working
order.
Visit
rockfordfosgate.com
for more comprehensive
product
information.
•
Visit
ourVouTube
channel for comprehensive installation videos
demonstrating complete
in
stallation guid
es
and install tips.
NEED
HELP
WITH
YOUR
INSTALLATION?
-@uouTUBE
VISIT
ouR
CHANNEL
FOR
A
COMPLETE
I'
INSTALLATION
VID
EO
AND
OTHER
TIPS
WWW.YOUTUBE.COM/USERIROCKFORDFOSGATE
Applicable Models:
Can-Am
Maverick
X3
(2
&
4 seat models)
These fro
nt
spea ker enclos
ur
es
are d
es
igned to work with
Roc
kf
ord
Fosgat
e's
RFX3
-
K4
I
RFX3
-
K8
amplifier wiri
ng
kit
s and
RFX3
-
PM
X
DK
dash
kit. The enclos
ur
e can be installed in
both
2-
sea
t and 4-seat
mode
ls
replaci
ng
the factory d
ash
panels.
Step
1.
Remove the
fu
se
cover and
th
e
(4)
pl
as
tic rivets
that
are
ad
jace
nt
to
the
fu
se
panel access hole.
Installation
Step
2.
Remove
the
remaining screws
that
secure the driver
I
passenger dash pane
l.
NOTE:
There are
(2)
factory clips that need
to
be transferred from the
original pane
ls
to
the
new Rockford
pa
nels.
Step 3.
Mo
unt
the
new speaker panels using
the
existing hardware.
Step
4.
Place speaker harness
dow
n
the
speaker cutout hole and
route toward the center
of
the vehicle
to
behind the fuse block
access hole.
Step
5.
Co
nnect
the
speaker harness
to
the
speak
er.
Step 6. Secure the speak
er
with
th
e supplied speaker har
dw
ar
e.
Step
7.
Repeat steps for
th
e enclosu
re
on the o
ther
si
de
.
Step
8.
Feed the speaker wire
up
into the dash and connect
to
either
th
e source
unit
or
amplif
ier.
Step 9.
Po
wer up and t
es
t
the
system
S
tep
10.
Reinstall
th
e
fu
se
cove
r.
3