Installation assistance availible at: www.rockfordfosgate.com/rftech 1998-2013 HARLEY-DAVIDSON® SPEAKERS TMS6RG • TMS6SG 1230-59287-01-A Printed in China TMS5 041416 Serial Number: Date of Purchase: 600 South Rockford Drive • Tempe, Arizona 85281 United States Direct: (480) 967-3565 • Toll Free: (800) 669-9899 R O C K F O R D F O S G AT E .
Introduction Dear Customer, Congratulations on your purchase of the world’s finest brand of audio products. At Rockford Fosgate we are fanatics about musical reproduction at its best, and we are pleased you chose our product. Through years of engineering expertise, hand craftsmanship and critical testing procedures, we have created a wide range of products that reproduce music with all the clarity and richness you deserve.
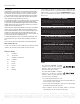
Specifications TMS6RG TMS6SG TMS5 Nominal Diameter - inch (mm) 6.5 (165) 6.5 (165) 5.25 (133) Description 2-Way 2-Way 2-Way 4Ω 4Ω 4Ω Frequency Response (Hz) 65-20kHz 65-20kHz 65-20kHz Voice Coil Diameter - inch (mm) 1.4 (35.6) 1.4 (35.6) 1.4 (35.6) Power Handling - Watts (RMS/Peak) 75/150 75/150 65/130 Fs - Free Air Resonance (Hz) 86.5 86.5 86.5 Qts 0.52 0.52 0.58 Vas - cu. ft. (Liter) 0.198 (5.6) 0.198 (5.6) 0.191 (5.
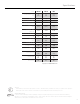
Specifications TMS6RG 90° 45° 5.5” Dia. (140mm) 2.5” (63mm) 2.1” (53mm) 5.0” Dia.
Specifications TMS6SG 90° 45° 5.5” Dia. (140mm) 2.5” (63mm) 2.1” (53mm) 5.0” Dia.
Specifications TMS5 5.4” Dia. (137mm) 6.4” Dia. (162mm) 5.9” (150mm) 2.0” (52mm) 2.5” (63mm) 2.8” (72mm) 4.6” (116mm) illus.-3.
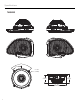
Installation Installation Considerations Contents • (1) Pair of 2-Way Speakers with Grilles • Installation & Operation Manual • Hardware Pack Installation Tools The following is a list of suggested tools needed for installation: • Wrenches / Sockets - 7/16”, 3/8”, 1/2”, 10mm • Allen Wrench - 1/8”, 5/32” • Torx - T10, T25 • #2 Phillips Screw Driver This section focuses on some considerations for installing your motorcycle replacement speakers.
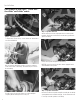
Installation Front Speakers for Ultra Classic®, Electra Glide®, Street Glide® and Tri Glide® models. Step 2 - Speaker Removal Step 1 - Fairing Removal To begin with, remove the top screws below the windshield to remove the windshield. After the fairing is removed, unplug the wires from both speaker terminals. Remove the screws that secure the factory speaker and grille to the fairing. Remove each speaker and grille from the fairing.
Installation NOTE: There are two screw lengths included in the hardware pack. For this fairing application, use the longer screws on the top two mounting holes of the speaker. After the screws are removed, use your socket or ratcheting wrench to unbolt the turn signal brackets. Connect the speakers by sliding the speaker wire connectors over the speaker terminals NOTE: Some turn signal brackets stay attached and some can be completely removed.
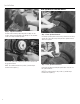
Installation Rear Speakers for Tour-Pak models. Step 3 - Speaker Installation Insert the new Rockford speaker and grille assembly onto the speaker opening on the backside of the fairing. Use the included screws to securely mount the speakers Connect the speakers by sliding the speaker wire connector over the speaker terminals NOTE: The smaller terminal is the positive (+) and the larger terminal is the negative (-).
Installation Insert the new Rockford speaker into the speaker pod. Place the grille over the speaker and attach with the included screws to mount to the pod.
Warranty Rockford Corporation offers a limited warranty on Rockford Fosgate products on the following terms: Length of Warranty POWER Amplifiers – 2 Years BMW® Direct Fit Speakers – 2 Years Source Units – 1 Year All other products – 1 Year Any Factory Refurbished Product – 90 days (receipt required) What is Covered This warranty applies only to Rockford Fosgate products sold to consumers by Authorized Rockford Fosgate Dealers in the United States of America or its possessions.