
Owner's Manual
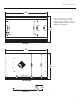
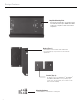
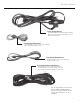
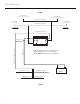
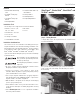

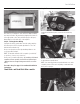
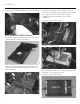
Table Of Contents

8
You will need to disconnect the harness from the headlight to
completely take the fairing off of the motorcycle.
Step 2 - Mounting Plate and Bracket Mounting
Using the Type 2 bracket, align bracket on the bottom side of the
mounting plate using the bracket type indicators.
On the top edge, you will screw in the two threaded pins into the
mounting plate. These are used to align the mounting plate with
the rubber busings on top of the factory radio.
Step 3 - Amplifier Mounting
Mount amplifier upside down (as pictured) with the supplied
screws to the mounting plate. Align the amplifier to the appropriate
holes on the plate. They are labeled for either a PUNCH
®
or POWER compact chassis amplifier in 2 and 4 channel
configurations.
Example below: 2-Channel PUNCH
®
Amplifer
Example below: 4-Channel PowerAmplifer
Once the amplifier is mounted, you can now begin plugging in the
wiring harness in their appropriate sockets.
Example below: 2-Channel PUNCH
®
Amplifer
Installation