
Owner's Manual
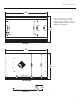
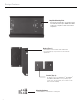
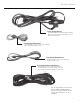
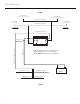
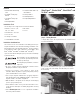

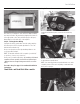
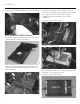
Table Of Contents

7
Contents
Installation Tools
The following is a list of suggested tools needed for installation:
• Wrenches / Sockets - 7/16”,
3/8”, 1/2”, 10mm
• Allen Wrenches - 1/8”, 5/32”
• Torx - T10, T25
• #2 Phillips Screw Driver
• Small Flat Blade Screw Driver
• Wire Cutters
• Scissors
• Extruded Heat Sink Mounting
Plate
• Road Glide
®
Fairing Style
Bracket
• Street Glide
®
Fairing Style
Bracket
• Mounting Hardware
• Power/Ground Wire Harness w/
Inline Maxifuse
• Front Input Harness
• Front Output Harness
• Rear Input/Output Harness
Installation
Installation Considerations
This section focuses on some considerations for installing your motorcycle
amplifier installation kit. This manual will illustrate the installation of two
different fairing styles offered by Harley-Davidson
®
from the production
years ranging from 1998 to 2013. (Ultra Classic
®
, Electra Glide
®
, Street
Glide
®
, Tri Glide
®
, Road Glide
®
, Road Glide Ultra
®
and CVO
TM
.)
If you feel unsure about installing this system yourself, have it installed by
a qualified technician.
Before installation, disconnect the battery neg-
ative (-) terminal to prevent damage to the unit,
fire and/or possible injury.
Before beginning any installation, follow these
simple rules:
• Be sure to carefully read and understand the instructions before
attempting to install this motorcycle audio kit.
• Consult your motorcycle’s service manual for model specific
information. Models may differ from year to year depending on factory
options and aftermarket accessories added.
• This motorcycle amplifier installation kit is specifically designed to
work with Rockford Fosgate’s POWER and PUNCH
®
compact chassis
amplifiers in both 2 or 4-channel configurations.
• With the addition of an amplifier, be sure that your current charging
system is in proper working order.
• Utilize a blanket or fender cover to protect the front fender from tools
or any other items that may be accidentally dropped while removing
the fairing.
• Visit rockfordfosgate.com for more comprehensive installation
videos and product information.
Ultra Classic
®
, Electra Glide
®
, Street Glide
®
and
Tri Glide
®
models.
Step 1 - Fairing Removal
To begin with, remove the top bolts below the windshield and
remove the windshield.
Once you have the windshield set aside, remove the remaining
screws on the inside of the fairing. This will allow you to remove
the front fairing.