
Owner's Manual
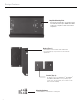
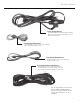
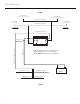
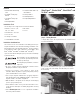

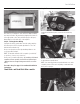
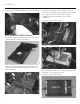


Table Of Contents

11
Installation
Example below: 4-Channel Power Amplifer
Note: Refer to your amplifier owner’s manual for additional wiring
and setup information. Be careful when plugging in the harnesses
to the appropriate socket. The 4-pin Molex plugs for the Input /
Output Harnesses fit in both sides of the amplifier.
Step 4 - Fairing Speaker Wiring
Unplug the the factory speaker wires from the speaker and plug
them directly in to the Front Speaker Input Harness. These are
labeled clutch and brake side.
Now you can plug the new Front Speaker Output Harness onto
your new speaker terminals.
NOTE: The terminals utilize the 1/8” for negative (-) and the 1/4”
for positive (+) sizes for easy connections.
Route power / ground through fairing. (If installing a 4-Channel
amplifer and rear speakers, feed the Rear Speaker Input
/ Output Harness through fairing towards the rear of the
bike.)
All Models
Step 5 - Routing Power Harness / Rear Speaker Harness
Pass the Power / Ground Harness and Rear Speaker Harness
through the fairing and route next to the factory wiring harness.
Routing the new wire harnesses along with the factory harness is
recommended. Be sure to zip tie the harnesses together for a clean,
tight fit.
Due to the size wire for the Power / Ground Harness and Rear
Speaker Harness (if applicable), it is recommended to route
the wiring under the gas tank along the top of the frame on the
motorcycle.
Note: Refer to the motorcycle manufacturer owner’s manual for
instructions regarding gas tank removal.
(4-Channel Amplifier)
Step 6 - Rear Speaker Installation
With the seat already removed, route the Rear Speaker Harness
toward the rear of the motorcycle over the fender along the brake
side of the motorcycle.
Unplug the factory speaker wires from the speaker and plug them
directly in to the Rear Speaker Input / Output Harness. These are
labeled clutch and brake side.
NOTE: The terminals utilize the 1/8” for negative (-) and the 1/4”
for positive (+) sizes for easy connections.
Once all of the terminals are connected, insert the new speaker and
fasten to the speaker pod.
Step 9 - Connect Battery
Connect the positive (+) and negative (-) wires to the battery. The
system is ready to test. Reinstall fairing and seat when system
check is completed.