
Owner's Manual
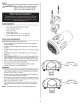
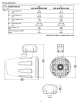
Table Of Contents

SAFETY
~CAUTION:
Before
installation,
disconnect
the
battery
•
negative (-)
terminal
to
prevent damage
to
the
unit, fire
and/or
possible
injury.
PRACTICE
SAFE
SOUND™
Continuous
exposure
to
sound
pressure
levels
over
I
OOdB
may
cause
permanent
hearing
loss.
High
powered
auto
sound
systems
may
produce
sound
pressure
levels well
over
130dB.
Use
common
sense
and
practice
safe
sound.
CARTON
CONTENTS
(I)
Set
Marine Grade
M2
Wakeboard Tower Speakers
(I)
Set
of
adjustable swivel
clamps
(I)
Allen
head wrench
(I)
Mol
ex speaker harness
(I)
Set
of
rubber inserts for
I 1/2"
-
I
3/4"
applications
(I)
Set
of
rubber inserts for
I 7/8" -
2
3/4"
applications
INSTALLATION
CONSIDERATIONS
Before beginning any
installation, follow
these simple rules:
I.
Be
sure
to
carefully read
and understand
the
instructions before attempting
to
install
these speakers.
2.
For safety, disconnect
the
negative lead from
the
battery prior
to
beginning
the
installation.
3.
For easier assembly, we suggest you run
all
wires prior
to
mounting your speakers
in
place.
4. Use
high
quality connectors for a
reliable installation
and
to
minimize
signal
or
power loss.
5.
Think
before
you
drill!
Be
careful
not
to
cut
or
drill
into
gas
tanks,
fuel
lines,
brake
or
hydraulic
lines,
vacuum lines
or
electrical wiring when working
on
any
vehicle.
If
installation
in
a boat, take care
not
to
cut
or
drill
through
the
main
hull.
6. Never run wires
in
the
open area of
the
boat. Running the wires inside
the
wake-
board
tower
and
hull
area provides
the
best protection.
7. Avoid running wires over
or
through sharp edges. Use rubber
or
plastic
grommets
to
protect any wires routed through metal.
MOUNTING
I.
Determine
where
the
speakers
will
be mounted.
Be
sure
that
the
mounting loca-
tion has sufficient
clearance
in
all
directions for
the
speaker
to
swivel; conduct a
full
rotation
to
ensure there
is
no obstruction.
2. Mark
the
locations on
the
underside
of
the
clamping
surface for
the
speaker har-
ness
to
be feed through.
Drill
the holes with a 3/8" bit.
3. Feed
the
speaker wires through
the
hole and connect
to
the speaker harness.
Be
sure
to
observe proper polarity when connecting
the
wires. The speaker harness's
negative wire
is
indicated with a "black-stripe".
4. Feed
the
speaker
harness through
the
center
of
the
base of
the
clamp.
Fit
the
clamp
to
the mounting area and tighten
the
bolts evenly with
the
supplied
allen
wrench.
NOTE:
Use the proper rubber insert for the corresponding
clamping
diameter.
i
I
I
Adjusts to fit
1 1
/2"
---
1
3/4"
(3.
81
em) (4.45cm)
Adjusts
to
fit
1 7/8"
---
2
3/4"
(4.76cm) (6.99cm)
l