RF-RBWS02_09-0535_MAN_ENG_V1.
RF-RBWS02_09-0535_MAN_ENG_V1.fm Page 2 Thursday, August 27, 2009 7:39 PM Wireless Outdoor Speaker Contents Important safety instructions ..................................... 3 Features............................................................................... 6 Using your outdoor speaker kit................................21 Troubleshooting ............................................................26 Specifications..................................................................27 Legal notices ...
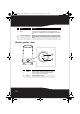
RF-RBWS02_09-0535_MAN_ENG_V1.fm Page 3 Thursday, August 27, 2009 7:39 PM wireless speaker for convenient operations at night. The speaker operates on eight batteries or from a wall socket using an AC adapter, and offers you rich sounding bass and crisp treble.
RF-RBWS02_09-0535_MAN_ENG_V1.fm Page 4 Thursday, August 27, 2009 7:39 PM 9 Do not defeat the safety purpose of the polarized or grounding-type 10 11 12 13 14 15 16 plug. A polarized plug has two blades with one wider than the other. A grounding type plug has two blades and a third grounding prong. The wide blade or the third prong are provided for your safety. If the provided plug does not fit into your outlet, consult an electrician for replacement of the obsolete outlet.
RF-RBWS02_09-0535_MAN_ENG_V1.fm Page 5 Thursday, August 27, 2009 7:39 PM How does Rocketboost™ work? Rocketboost technology can connect all audio devices throughout your home to form a convenient, private, and secure home audio network. Every Rocketboost network must contain a device called a manager, which directs network data traffic and helps devices join the network. The network can have only one manager, which is selected using the Hub switch on the back of all Rocketboost transmitters.
RF-RBWS02_09-0535_MAN_ENG_V1.fm Page 6 Thursday, August 27, 2009 7:39 PM Features • 2.
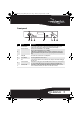
RF-RBWS02_09-0535_MAN_ENG_V1.fm Page 7 Thursday, August 27, 2009 7:39 PM Front panel TM 1 2 3 4 5 6 7 # Feature Description 1 Power/Join button Press to turn the sender/receiver on, then hold to initiate joining. Press again to go into standby. Upon insertion of the AC adapter, the unit powers up automatically. Lights blue when the HUB STATUS is set to “DISABLE”. Lights green when the HUB STATUS is set to “ENABLE”.
RF-RBWS02_09-0535_MAN_ENG_V1.fm Page 8 Thursday, August 27, 2009 7:39 PM Back panel 1 2 3 4 1 # 1 Feature Description External antenna Receives signals from external senders. Sends signals to external receivers. 2 DC IN jack Plug the AC adapter into this jack. AUDIO IN/OUT jacks When used as a sender, plug an external audio source into the AUDIO IN jack. When used as a receiver, plug your speaker system into the AUDIO OUT jack.
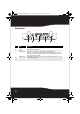
RF-RBWS02_09-0535_MAN_ENG_V1.fm Page 9 Thursday, August 27, 2009 7:39 PM Wireless speaker - front POWER / /JOIN 6 BASS VOL VOL POWER /JOIN SO UR CE 1 2 CHARGE BASS CHARGE 7 8 CHANNEL L - MONO - R SOURCE 3 CHANNEL L - MONO - R 4 TM 4 SOURCE 5 9 10 # Feature Description 1 Volume control knob Turn this knob to increase or decrease the volume. 3 Power on/ Standby/Join Source button Press to turn the speaker on, then hold to initiate joining. Press again to go to standby.
RF-RBWS02_09-0535_MAN_ENG_V1.fm Page 10 Thursday, August 27, 2009 7:39 PM # Feature 9 Channel MONO (L/R) indicators 10 Description If two wireless outdoor speakers are connected to the sender, left lights when the left audio channel is on and right lights when the right audio channel is on. If both channels are on simultaneously, both left and right light, indicating mono mode. Audio source signal indicator Lights when there is an active link and the speaker receives audio signals from a sender.
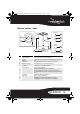
RF-RBWS02_09-0535_MAN_ENG_V1.fm Page 11 Thursday, August 27, 2009 7:39 PM Remote control 4 1 5 2 6 7 8 3 TM # 1 Feature Description /| Standby/On button Volume / 2 3 BASS button 4 Input A 5 Input B buttons (device) Press to turn the sender/receiver or wireless speaker on. Press again to go to standby. Press to adjust the volume of the device. The sender/receiver is a line level device, so this will only operate the volume control on the speaker.
RF-RBWS02_09-0535_MAN_ENG_V1.fm Page 12 Thursday, August 27, 2009 7:39 PM # Feature 6 Volume 7 8 Description buttons (stream) Press to adjust the volume of all devices receiving the same audio stream. Press to mute all devices. Press again to unmute the stream that receives (mute - all) the IR command. To unmute other streams, you must point the remote control at a device muted for that stream. Next Source button Press to select the next source.
RF-RBWS02_09-0535_MAN_ENG_V1.fm Page 13 Thursday, August 27, 2009 7:39 PM 3 Replace the bottom cover on the speaker and fasten with the three screws you removed. 8 NiMH C cells or alkalines (not provided) Bottom of the wireless speaker Charging the wireless speaker When the battery power becomes low, the charge indicator light will initially blink, indicating the need to charge the speaker. If it does not receive a charge, the indicator light will eventually go off.
RF-RBWS02_09-0535_MAN_ENG_V1.fm Page 14 Thursday, August 27, 2009 7:39 PM • If the CHARGE indicator blinks green (quickly), it indicates that you need to replace your rechargeable batteries with new ones. 15V DC LINK 15V DC Speaker back Note: Make sure that the batteries are fully charged for at least 16 hours. This will guarantee a longer operating lifetime for the batteries. The wireless speaker lets you charge when it is powered on or in standby mode.
RF-RBWS02_09-0535_MAN_ENG_V1.fm Page 15 Thursday, August 27, 2009 7:39 PM Setting up your remote control To set up your remote control: 1 Remove the insulation sheet before using the remote control for the first time. 2 Aim the remote control at the IR sensor on the front lens from a maximum distance of 23 ft. (7 m) away and the maximum angle of +/- 30 degrees from the center line.
RF-RBWS02_09-0535_MAN_ENG_V1.fm Page 16 Thursday, August 27, 2009 7:39 PM To replace the battery: 1 Squeeze and pull to release the battery tray. You can remove the battery door with your fingernails by using the spaces set back in the remote control 1 2 2 Match the polarity on the lithium cell with a plus sign (+) on the battery tray. 3 3 Slide the tray with the new battery into the battery compartment until it clicks into place.
RF-RBWS02_09-0535_MAN_ENG_V1.fm Page 17 Thursday, August 27, 2009 7:39 PM Using the remote control • To avoid possible failure, read the following instructions and handle the remote control properly. • Do not drop or jar the remote control. • Do not spill water or any liquid on the remote control. • Do not place the remote control on a wet object. • Do not place the remote control under direct sunlight or near sources of excessive heat. Caution: Danger of explosion if battery is incorrectly replaced.
RF-RBWS02_09-0535_MAN_ENG_V1.fm Page 18 Thursday, August 27, 2009 7:39 PM Connecting your wireless sender/receiver When connecting to an audio source • Using the supplied audio cable, connect the AUDIO IN jack of the sender/receiver to the AUDIO OUTPUT jack of your audio device (such as an A/V receiver, PC, or iPod®). (Supplied) To audio output jack, such as a personal music player.
RF-RBWS02_09-0535_MAN_ENG_V1.fm Page 19 Thursday, August 27, 2009 7:39 PM Connect the adapter to a power outlet Notes: Make sure that the power outlet matches the sender/receiver’s AC input (100-240V) before connecting. Connect the AC adapter to a power outlet only after all other connections are completed. To connect the power: • Connect one end of the adapter to the DC IN jack of the sender/receiver, then plug the other end into a power outlet. The device automatically powers up.
RF-RBWS02_09-0535_MAN_ENG_V1.fm Page 20 Thursday, August 27, 2009 7:39 PM To adjust the antennas: 1 Pull the antennas up from their stored position. 2 Adjust the antennas for best reception. We recommend that the antennas be oriented vertically for best wireless performance. In some circumstances you might get better range by setting the antennas at a 45° angle to each other, forming the top of a “V” between the two.
RF-RBWS02_09-0535_MAN_ENG_V1.fm Page 21 Thursday, August 27, 2009 7:39 PM Using your outdoor speaker kit Note: The HUB STATUS switch is shipped from the factory in the On position for use with the outdoor speaker. If you already have Rocketboost components in your house and another node is configured to be the hub, put the hub switch in the Disable mode and join both the sender/receiver and the outdoor speaker to the hub that you already own.
RF-RBWS02_09-0535_MAN_ENG_V1.fm Page 22 Thursday, August 27, 2009 7:39 PM To use the unit as a sender with another node as the hub (only follow these instructions if you have an existing Rocketboost network. Otherwise skip to the Listening to Music section): 1 Set the HUB STATUS switch to DISABLE. Important: Make sure that the HUB STATUS switch is set to DISABLE before the sender/receiver is turned on. • The power-on indicator LED lights blue when the HUB STATUS switch is set to DISABLE.
RF-RBWS02_09-0535_MAN_ENG_V1.fm Page 23 Thursday, August 27, 2009 7:39 PM 5 Perform the same steps to join the wireless speaker. Put your existing hub in joining mode and then put the speaker in joining mode by pressing and holding the power button on the speaker. Power on LED POWER /JOIN BASS CHARGE CHANNEL L - MONO - R SOURCE TM The Tx LED lights when an input signal is connected, and does not light if a signal is not connected (when a 3.
RF-RBWS02_09-0535_MAN_ENG_V1.fm Page 24 Thursday, August 27, 2009 7:39 PM Rejoining your sender and speaker In case you need to re-join these devices (this operation is not necessary out of the box as these devices are already joined at the factory). To rejoin your Sender and Wireless speaker (this assumes you do not have any other Rocketboost products or the Sender is your hub for your Rocketboost network) please make sure the hub switch is set to Enable.
RF-RBWS02_09-0535_MAN_ENG_V1.fm Page 25 Thursday, August 27, 2009 7:39 PM Listening to music To listen to music: 1 Turn on the sender/receiver and the wireless speaker. Make sure that there is an active link between the sender/receiver and the wireless speaker. 2 Turn on the audio source and your speaker system. 3 Adjust the volume level on your speaker system. Note: When the wireless speaker is employed as left or right speaker, the corresponding Channel MONO L/R indicator lights up.
RF-RBWS02_09-0535_MAN_ENG_V1.fm Page 26 Thursday, August 27, 2009 7:39 PM To turn off the transmitter: • Remove the 3.5 mm plug from the back of the unit and the transmitter will automatically stop transmitting. The TX light will go out. Troubleshooting Check this list for a possible solution before calling for service.
RF-RBWS02_09-0535_MAN_ENG_V1.fm Page 27 Thursday, August 27, 2009 7:39 PM Problem Connecting a device When trying to change the source on a Rocketfish unit the Power LED flashes 5 times. Solution • When you try to join a device to a network that has too many nodes, the device will stay in joining mode until it times out (30 second timeout). Upon timeout the unit should be on and will flash the power ring LED in a slow blink indicating it is not connected to the network.
RF-RBWS02_09-0535_MAN_ENG_V1.fm Page 28 Thursday, August 27, 2009 7:39 PM Tweeter - 8 ohms Woofer - 4 ohms Rated output power (at 10% thd) Tweeter - 5 W Woofer - 22 W 15.83 x 9.13 x 9.13 inches Dimensions (WxHxD) (402 x 210.8 x 210.8 mm) 99.5 oz. Weight (28.20 kg) Speaker impedance Legal notices FCC Part 15 This device complies with Part 15 of the FCC Rules.
RF-RBWS02_09-0535_MAN_ENG_V1.fm Page 29 Thursday, August 27, 2009 7:39 PM FCC warning Changes or modifications not expressly approved by the party responsible for compliance with the FCC Rules could void the user’s authority to operate this equipment. Copyright © 2009 Rocketfish. Rocketfish and the Rocketfish logo are trademarks of Best Buy Enterprise Services, Inc. Rocketboost and the Rocketboost logo are trademarks of Best Buy Enterprise Services, Inc.
RF-RBWS02_09-0535_MAN_ENG_V1.
RF-RBWS02_09-0535_MAN_ENG_V1.fm Page 31 Thursday, August 27, 2009 7:39 PM One-year limited warranty Rocketfish Products (“Rocketfish”) warrants to you, the original purchaser of this new RF-RBWS02 (“Product”), that the Product shall be free of defects in the original manufacture of the material or workmanship for one (1) year from the purchase of the Product (“Warranty Period”). This Product must be purchased from an authorized dealer of Rocketfish brand products and packaged with this warranty statement.
RF-RBWS02_09-0535_MAN_ENG_V1.
RF-RBWS02_09-0535_MAN_ENG_V1.fm Page 36 Thursday, August 27, 2009 7:39 PM www.rocketfishproducts.com (800) 620-2790 Distributed by Best Buy Purchasing, LLC 7601 Penn Avenue South, Richfield, MN 55423-3645 USA © 2009 Best Buy Enterprise Services, Inc. All rights reserved. ROCKETFISH is a trademark of Best Buy Enterprise Services, Inc. All other products and brand names are trademarks of their respective owners.