V1 FINAL FOR PRINT RF-RCMBO2_10-1280_MAN_V1_English.fm Page 1 Wednesday, December 15, 2010 9:02 AM 2.
RF-RCMBO2_10-1280_MAN_V1_English.fm Page 2 Wednesday, December 15, 2010 8:59 AM 2.4 GHz Wireless Combo Contents Important safety instructions ..................................... 3 Introduction ...................................................................... 4 Features............................................................................... 4 Package contents .................................................. 5 System requirements ........................................... 5 Keyboard top ....
RF-RCMBO2_10-1280_MAN_V1_English.fm Page 3 Wednesday, December 15, 2010 8:59 AM Using the combo driver ..............................................14 Installing the combo driver .............................14 Configuring the mouse .....................................14 Uninstalling the combo driver........................19 Maintaining .....................................................................20 Troubleshooting ............................................................20 Specifications....
RF-RCMBO2_10-1280_MAN_V1_English.fm Page 4 Wednesday, December 15, 2010 8:59 AM Introduction Congratulations on your purchase of a Rocketfish 2.4 GHz Wireless Combo. This guide explains how to correctly operate and get the best performance from your wireless keyboard and mouse. Read this user guide carefully before using your product, then keep it next to your computer for quick reference.
RF-RCMBO2_10-1280_MAN_V1_English.fm Page 5 Wednesday, December 15, 2010 8:59 AM Package contents Before you start using your keyboard and mouse the first time, verify that your package contains the following: • • • • • • Keyboard Laser Mouse 2.
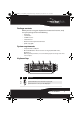
RF-RCMBO2_10-1280_MAN_V1_English.fm Page 6 Wednesday, December 15, 2010 8:59 AM # 6 Icon Description 4 Stop button. Press to stop CD or DVD playback. 5 Previous track button. Press to go to the previous track on a CD or previous chapter on a DVD. 6 Next track button. Press to go to the next track on a CD or next chapter on a DVD. 7 Increase volume button. Press to increase the volume. 8 Decrease volume button. Press to decrease the volume. 9 Mute volume button. Press to mute the sound.
RF-RCMBO2_10-1280_MAN_V1_English.fm Page 7 Wednesday, December 15, 2010 8:59 AM Keyboard status LED Color Description Green The keyboard is turned on and the battery level normal. Flashing red The battery level is low. Flashing green The keyboard is pairing. Keyboard bottom CONN EC T OF F ON # Item Description 1 CONNECT button Press to put the keyboard in pre-pairing mode. 2 OFF ON switch Slide to turn the keyboard on or off.
RF-RCMBO2_10-1280_MAN_V1_English.fm Page 8 Wednesday, December 15, 2010 8:59 AM Mouse top # 1 Item Description Left button Press to perform left-button actions like selecting items or opening programs. 2 Forward button Press to go to the next page in a Web browser. 3 Back button Press to go to the previous page in a Web browser. 4 Right button Press to perform standard right-mouse actions such as opening pop-up menus or viewing help information.
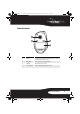
RF-RCMBO2_10-1280_MAN_V1_English.fm Page 9 Wednesday, December 15, 2010 8:59 AM Mouse bottom CONNECT OFF ON # Item Description 1 Laser sensor 2 CONNECT button Detects the mouse movements and sends signals to the computer to move the mouse pointer on the screen. Press to put the mouse in pre-pairing mode. 3 OFF ON switch Slide to turn the mouse on or off. 4 Battery compartment Provides storage for the batteries and receiver.
RF-RCMBO2_10-1280_MAN_V1_English.fm Page 10 Wednesday, December 15, 2010 8:59 AM Setting up the keyboard and mouse Installing keyboard batteries To install keyboard batteries: 1 Remove the battery compartment cover. 2 Insert two AA batteries into the battery compartment. Make sure that the + and – symbols on the batteries align with the + and – symbols in the battery compartment. 3 Replace the battery compartment cover.
RF-RCMBO2_10-1280_MAN_V1_English.fm Page 11 Wednesday, December 15, 2010 8:59 AM Installing the mouse batteries To install mouse batteries: 1 Press the tab to release the battery compartment cover, then remove the cover. 2 Insert two AA batteries into the battery compartment. Make sure that the + and – symbols on the batteries align with the + and – symbols in the battery compartment.
RF-RCMBO2_10-1280_MAN_V1_English.fm Page 12 Wednesday, December 15, 2010 8:59 AM 3 Replace the battery compartment cover.
RF-RCMBO2_10-1280_MAN_V1_English.fm Page 13 Wednesday, December 15, 2010 8:59 AM Setting up the keyboard and mouse To set up the keyboard and mouse: 1 Plug the 2.4 GHz receiver into an available USB port on your computer. 2 Slide the power switch of the mouse to ON, to turn the mouse on. 3 Slide the power switch of the keyboard to ON, to turn the keyboard on. The computer recognizes the keyboard and mouse automatically. The keyboard and mouse are ready to use.
RF-RCMBO2_10-1280_MAN_V1_English.fm Page 14 Wednesday, December 15, 2010 8:59 AM Using the combo driver To use advanced functions, such as tilt wheel driver, dynamic search and magnifier, you need to install the mouse driver and software. Installing the combo driver To install the combo driver: 1 Insert the installation CD (provided) in the CD drive on your computer. 2 3 4 5 The installation program should start automatically.
RF-RCMBO2_10-1280_MAN_V1_English.fm Page 15 Wednesday, December 15, 2010 8:59 AM Configuring mouse buttons To configure the buttons: 1 Click the Button list arrow to open the list of buttons, then click the button you want to configure. 2 Click the Function list arrow to open the list of functions, then click the function you want to assign to the button. 3 To restore default button functions, click Use Default.
RF-RCMBO2_10-1280_MAN_V1_English.fm Page 16 Wednesday, December 15, 2010 8:59 AM Adjusting the double-click speed To adjust the double-click speed: 1 2 3 4 To adjust double-click speed, drag the slider. To test the click speed, double-click the Test Area icon. To restore to default settings, click Reset to Default Value. Click other tabs to make more adjustments, or click OK to save your selections and close the program.
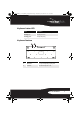
RF-RCMBO2_10-1280_MAN_V1_English.fm Page 17 Wednesday, December 15, 2010 8:59 AM 2 To restore the default orientation settings, click Reset Orientation. 3 Click other tabs to make more adjustments, or click OK to save your selections and close the program. Adjusting the wheel settings To adjust the wheel settings: 1 To select the wheel scrolling method, click: 2 3 4 5 6 7 • Enable Universal Scrolling—Uses common scrolling functions.
RF-RCMBO2_10-1280_MAN_V1_English.fm Page 18 Wednesday, December 15, 2010 8:59 AM Adjusting pointer behavior To adjust pointer behavior: 1 Click the pointer options. You can select: • Pointer Wrap—The pointer goes to the opposite side of the screen when it reaches the screen edge. • X Focus—Activates a window when the pointer moves over the title bar. • Slow Motion—Slows down the pointer when the Shift key is pressed for a more precise positioning.
RF-RCMBO2_10-1280_MAN_V1_English.fm Page 19 Wednesday, December 15, 2010 8:59 AM To hide the system tray’s mouse icon: • Uncheck Show mouse icon in systray, then click OK to save changes and close application. Uninstalling the combo driver To uninstall the combo driver: 1 Click Start, All Programs, Rocketfish 2.4G Wireless Combo, then click Uninstall Rocketfish 2.4G Wireless Combo Driver. A message asks if you are sure you want to uninstall the driver. 2 Click Yes to continue.
RF-RCMBO2_10-1280_MAN_V1_English.fm Page 20 Wednesday, December 15, 2010 8:59 AM Maintaining To clean your keyboard and mouse, wipe them with a soft, lint-free cloth slightly moistened with water. Troubleshooting If you have any problems with your 2.4 GHz keyboard or mouse, check the following: • Make sure that your computer meets the system requirements. • Make sure that the batteries in the keyboard and mouse are installed correctly.
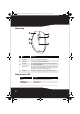
RF-RCMBO2_10-1280_MAN_V1_English.fm Page 21 Wednesday, December 15, 2010 8:59 AM Specifications Mouse Keyboard 1.14 × 19.8 × 8.35 inches (29 x 503 x 212 mm) Resolution Mouse: 1.7 × 4.9 × 2.88 inches (43.28 x 124.57 x 73.2 mm) Dongle: 0.63 × 1.26 × 0.216 inches (16 x 32 x 5.5 mm) 1200 DPI @ 10 inch/sec n/a Tracking speed Maximum 30 inch/sec (76.2 cm/sec) n/a Dimensions H×L×W Operating temperature Mouse (without battery): 3.17 oz. (90 g) 30.69 oz. (870 g) (without battery) Dongle: 0.09 oz. (2.
RF-RCMBO2_10-1280_MAN_V1_English.fm Page 22 Wednesday, December 15, 2010 8:59 AM Legal notices FCC Part 15 This device complies with Part 15 of the FCC Rules. Operation of this product is subject to the following two conditions: (1) this device may not cause harmful interference, and (2) this device must accept any interference received, including interference that may cause undesired operation.
RF-RCMBO2_10-1280_MAN_V1_English.fm Page 23 Wednesday, December 15, 2010 8:59 AM DHHS and FDA safety certification This product is made and tested to meet safety standards of the FCC, requirements and compliance with safety performance of the U.S. Department of Health and Human Services, and also with FDA Radiation Performance Standards 21 CFR Subchapter J. Canada ICES-003 statement This Class B digital apparatus complies with Canadian ICES-003.
RF-RCMBO2_10-1280_MAN_V1_English.
RF-RCMBO2_10-1280_MAN_V1_English.fm Page 25 Wednesday, December 15, 2010 8:59 AM One-year limited warranty Rocketfish Products (“Rocketfish”) warrants to you, the original purchaser of this new RF-RCMBO2 (“Product”), that the Product shall be free of defects in the original manufacture of the material or workmanship for one (1) year from the purchase of the Product (“Warranty Period”).
RF-RCMBO2_10-1280_MAN_V1_English.
RF-RCMBO2_10-1280_MAN_V1_English.
RF-RCMBO2_10-1280_MAN_V1_English.fm Page 28 Wednesday, December 15, 2010 9:02 AM www.rocketfishproducts.com (800) 620-2790 Distributed by Best Buy Purchasing, LLC 7601 Penn Avenue South, Richfield, MN 55423-3645 USA © 2010 BBY Solutions, Inc. All rights reserved. ROCKETFISH is a trademark of BBY Solutions, Inc. All other products and brand names are trademarks of their respective owners.