Bluetooth Combo RF-BTCMB02 User Guide
Bluetooth Combo Contents Important safety instructions ..................................... 3 Introduction ...................................................................... 4 Features............................................................................... 4 Package contents .................................................. 5 System requirements ........................................... 5 Keyboard top .......................................................... 6 Keyboard status LED............
Installing and using software....................................18 Installing the software.......................................18 Using the Bluetooth stack for the first time in Windows XP...........................................................19 Using the keyboard and mouse...............................23 Checking battery status ....................................23 Changing the low battery alarm settings...25 Adjusting the tilt/scroll wheel ........................26 Maintaining ..................
9 To reduce the risk of fire or electric shock, do not expose this device to rain, moisture, dripping, or splashing, and no objects filled with liquids, such as vases, shall be placed on it. 10 Batteries should not be exposed to excessive heat such as sunshine, fire, or the like. Caution: Danger of explosion if battery is incorrectly replaced. Replace only with the same or equivalent type. Introduction Congratulations on your purchase of the RF-BTCMBO2 Bluetooth keyboard and mouse.
USB Bluetooth receiver • Bluetooth specification v1.0, v2.0, and v2.
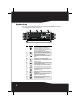
Keyboard top Note: To use the keyboard hotkeys, you must install the WIDCOMM Bluetooth stack. See “Installing the software” on page 18.
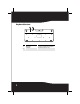
# Icon 13 14 15 16 17 18 19 20 21 22 Description Status LED. For more information, see “Keyboard status LED” on page 7. E-mail button. Press to open your e-mail program. Sleep button. Press to put your computer in sleep mode. Press again to wake your computer. Home button. Press to go to your home page in a Web browser. Search button. Press to open the Search window. My Favorite button. Press to open the list of your favorite Web sites. Back Web page button.
Keyboard bottom CONN EC T OF F 8 ON # Item Description 1 CONNECT button Press to put the keyboard in pre-pairing mode. 2 OFF ON switch Slide to turn the keyboard on or off.
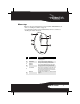
Mouse top Note: To use the mouse hotkey buttons, you must install the WIDCOMM Bluetooth stack. See “Installing the software” on page 18. To use horizontal scrolling, you must install the Bluetooth mouse software. See “Installing the software” on page 18. # Item 1 Left button 2 Forward button Description Press to perform left-button actions like selecting items or opening programs. Press to go to the next page in a Web browser. 3 Back button Press to go to the previous page in a Web browser.
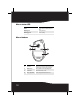
Mouse status LED Color Flashing red Description The mouse is turned on and the battery level normal. The battery level is low. Flashing green The mouse is pairing. Green Mouse bottom CONNECT OFF 10 ON # Item 1 Laser sensor Description Detects the mouse movements and sends signals to the computer to move the mouse pointer on the screen. 2 CONNECT button Press to put the mouse in pre-pairing mode. 3 OFF ON switch Slide to turn the mouse on or off.
Setting up the keyboard and mouse Installing keyboard batteries To install keyboard batteries: 1 Remove the battery compartment cover. 2 Insert two AA batteries into the battery compartment. Make sure that the + and – symbols on the batteries align with the + and – symbols in the battery compartment. 3 Replace the battery compartment cover.
Installing the mouse batteries To install mouse batteries: 1 Press the tab to release the battery compartment cover, then remove the cover. 2 Pull the receiver out of the battery compartment.
3 Insert two AA batteries into the battery compartment. Make sure that the + and – symbols on the batteries align with the + and – symbols in the battery compartment. 4 Replace the battery compartment cover.
Pairing the keyboard and mouse There are three methods for pairing the keyboard and mouse: • “Automatic pairing in boot mode” on page 14. • “Pairing by using the WIDCOMM Bluetooth stack” on page 15 Automatic pairing in boot mode To pair automatically in boot mode: 1 With your computer turned off, plug the USB Bluetooth receiver into an available USB port. 2 OFF ON 1 2 Slide the power switch of the mouse to turn the mouse on. 3 Turn on the computer and use the keyboard to enter the BIOS setup.
Turning on the USB keyboard and mouse settings in BIOS If pairing in boot mode did not work, you may need to turn on the USB keyboard and mouse settings in the BIOS. To turn on the USB keyboard and mouse settings in BIOS: 1 Make sure that the Bluetooth connection has been established before turning on your computer. Note: If the keyboard did not automatically connect, you need to use a different keyboard for this task.
To pair using the Bluetooth stack: 1 Press the CONNECT buttons on the mouse and keyboard to start pairing. Your computer starts to search for all Bluetooth devices. When the mouse is connected, the Confirmation Required message appears.
2 Click to confirm that the mouse is connected. When the keyboard is connected, the Bluetooth Security Setup dialog box appears. 3 Use the paired keyboard to type the digits shown on the screen, then press Enter. The keyboard is connected. Note: The keyboard and mouse enter the power saving mode when not used for a period of time.
Installing and using software Installing the software To use the keyboard and mouse hotkey buttons, you must install the software on the included CD. To install the software: 1 Plug the USB Bluetooth receiver into a USB port on your computer. 2 Insert the included CD in the disc drive. The introductory screen appears automatically. If the screen does not appear automatically, double-click the autorun.exe file on the CD. 3 Click Install Driver. The Welcome screen appears.
To uninstall the Rocketfish Bluetooth Combo software: 1 Remove the USB Bluetooth receiver. 2 In Windows Vista or Windows 7, click Start, Control Panel, then click Programs and Features. Or In Windows XP, click Start, Settings, Control Panel, then click Add/Remove Programs. 3 Click Rocketfish Bluetooth Combo in the program list, then click Uninstall (Windows Vista or Windows 7)or Remove (Windows XP). A confirmation message appears. 4 Click Yes to uninstall or No to cancel.
2 Follow the on-screen instructions to complete the configuration. When the Bluetooth configuration is complete, the Bluetooth Device Selection dialog box appears and the computer starts searching for Bluetooth devices. 3 Click on the device you want to connect with, then follow the on-screen instructions to enable the selected device. Interpreting the Bluetooth icon The Bluetooth icon acts as an indicator for receiver status.
Connecting to other Bluetooth devices in Windows XP Note: You must install the software on the included CD in order to connect to other Bluetooth devices. To connect to other Bluetooth devices: 1 Make sure that the USB Bluetooth receiver has been plugged in to your computer. 2 Put Bluetooth devices, such as printers, modems, and PDAs, into search/pair mode so the Bluetooth receiver will recognize and connect to them (see the device’s documentation for instructions).
Setting up Bluetooth in Windows Vista or Windows 7 To set up Bluetooth stack in Windows Vista or Windows 7: 1 Double-click the Bluetooth 2 3 4 5 6 7 22 icon in the system tray. The Bluetooth Settings screen opens. Click the Devices tab, then click Add. The Add Bluetooth Device Wizard starts. Click My device is set and ready to be found, then click Next. Select the device(s) you want to enable, then click Next. Set a passkey yourself or let the setup wizard choose one for you. Click Next to continue.
Using the keyboard and mouse Checking battery status Note: You must install the software on the included CD and pair the keyboard and mouse before you can check battery status. To check the keyboard battery status: • Click Start, Control Panel, Keyboard, then click Bluetooth. The Keyboard Properties dialog box opens with the Bluetooth tab on top. The remaining battery power level is shown.
To check the mouse battery status: • Click Start, Control Panel, Mouse, then click Bluetooth. The Mouse Properties dialog box opens with the Bluetooth tab on top. The remaining battery power level is shown.
Changing the low battery alarm settings To change the low battery alarm settings: 1 Open the Keyboard Properties dialog box or the Mouse Properties dialog box. For instructions, see “Checking battery status” on page 23. 2 Click Low Battery Alarm. The Low Battery Alarm dialog box opens. 3 Change the settings you want, then click OK. You can change the level at which you want the alarm to occur and turn the audio and visual notifications on or off.
Adjusting the tilt/scroll wheel Your mouse comes with an advanced scroll wheel that lets you scroll horizontally as well as vertically.
To adjust the tilt/scroll wheel: 1 Right-click the Mouse icon in the system tray, then click Adjust Property. The Bluetooth Mouse Property dialog box opens. 2 To set the vertical scroll speed, click one of the following, then click OK. • Scroll x line(s) per notch—Sets the number of lines to scroll when the scroll wheel is moved one notch. Specify the number of lines with the up and down arrows. • Scroll one screen per notch—Scrolls the entire window when the scroll wheel is moved one notch.
Maintaining To clean your Bluetooth keyboard and mouse, wipe them with a soft, lint-free cloth slightly moistened with water. Troubleshooting If you have any problems with your Bluetooth keyboard or mouse, check the following: • Make sure that your computer meets the system requirements. • Make sure that the batteries in the keyboard and mouse are installed correctly. Make sure that the + and – symbols on the batteries align with the + and – symbols inside the keyboard and mouse battery compartments.
Specifications Mouse Dimensions H×L×W Resolution Tracking speed Weight Keyboard Mouse: 1.7 × 4.9 × 2.88 inches (43.28 x 124.57 x 73.2 mm) Dongle: 0.18 × 0.75 × 0.53 inches (4.5 x 19.15 x 13.55 mm) 1200 DPI @ 10 inch/sec 1.14 × 19.8 × 8.35 inches (29 x 503 x 212 mm) n/a Maximum 30 inch/sec (76.2 cm/sec) n/a Mouse (without battery): 3.17 oz. (90 g) Dongle: 0.1 oz. (3 g) 4 buttons with tilt scroll wheel 31.75 oz.
Legal notices FCC Part 15 This device complies with Part 15 of the FCC Rules. Operation of this product is subject to the following two conditions: (1) this device may not cause harmful interference, and (2) this device must accept any interference received, including interference that may cause undesired operation. This equipment has been tested and found to comply within the limits for a class B digital device, pursuant to Part 15 of the FCC Rules.
DHHS and FDA safety certification This product is made and tested to meet safety standards of the FCC, requirements and compliance with safety performance of the U.S. Department of Health and Human Services, and also with FDA Radiation Performance Standards 21 CFR Subchapter J. Canada ICES-003 statement This Class B digital apparatus complies with Canadian ICES-003.
One-year limited warranty Rocketfish Products (“Rocketfish”) warrants to you, the original purchaser of this new RF-BTCMBO2 (“Product”), that the Product shall be free of defects in the original manufacture of the material or workmanship for one (1) year from the purchase of the Product (“Warranty Period”). This Product must be purchased from an authorized dealer of Rocketfish brand products and packaged with this warranty statement. This warranty does not cover refurbished Product.
• Damage due to acts of God, such as lightning strikes • Accident • Misuse • Abuse • Negligence • Commercial use • Modification of any part of the Product, including the antenna This warranty also does not cover: • Damage due to incorrect operation or maintenance • Connection to an incorrect voltage supply • Attempted repair by anyone other than a facility authorized by Rocketfish to service the Product • Products sold as is or with all faults • Consumables, such as fuses or batteries • Products where the f
www.rocketfishproducts.com (800) 620-2790 Distributed by Best Buy Purchasing, LLC 7601 Penn Avenue South, Richfield, MN 55423-3645 USA © 2009 Best Buy Enterprise Services, Inc. All rights reserved. ROCKETFISH is a trademark of Best Buy Enterprise Services, Inc. All other products and brand names are trademarks of their respective owners.