RF-AHD35_09-0774_MAN_ENG_V3.fm Page 1 Friday, September 25, 2009 6:51 AM 3.
RF-AHD35_09-0774_MAN_ENG_V3.fm Page 2 Friday, September 25, 2009 6:51 AM Rocketfish RF-AHD35 3.5" Hard Drive Enclosure Kit Contents Introduction ................................................................. 2 Safety information ..................................................... 3 Features ......................................................................... 3 Using the hard drive enclosure ............................. 7 Appendix...................................................................
RF-AHD35_09-0774_MAN_ENG_V3.fm Page 3 Friday, September 25, 2009 6:51 AM Safety information • Always read these safety instructions and this User Guide carefully. Keep this User Guide for future reference. • Take precautions to avoid static electricity discharge or short circuits when connecting this enclosure to your computer. • Do not use this enclosure close to water, rain, or high humidity. • Do not use or store this enclosure in damp locations.
RF-AHD35_09-0774_MAN_ENG_V3.fm Page 4 Friday, September 25, 2009 6:51 AM • • • • Rapid heat dissipation. Can stand or lie down while operating. Supports Plug-and-Play and is hot swappable. Has one power on with backup active indicator and one card reader active indicator. Package contents • • • • • • • • • 3.
RF-AHD35_09-0774_MAN_ENG_V3.
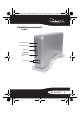
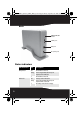
RF-AHD35_09-0774_MAN_ENG_V3.fm Page 6 Friday, September 25, 2009 6:51 AM Back POWER ON/OFF button eSATA port USB port DC power jack Status indicators LED indicators LED Backup button Card reader 6 Description Solid The hard drive is turned on. Flashing Data is being transmitted between your computer and the hard drive. Off The hard drive is turned off. Solid A memory card is in the reader. Flashing Data is being transmitted between your computer and the card reader.
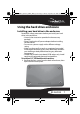
RF-AHD35_09-0774_MAN_ENG_V3.fm Page 7 Friday, September 25, 2009 6:51 AM Using the hard drive enclosure Installing your hard drive in the enclosure Read these safety precautions before you install your hard drive in the enclosure: • Use only the accessories provided in the accessory package. • Always unplug the AC power adapter before installing the hard drive. • Do not use a power supply with a different voltage rating.
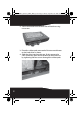
RF-AHD35_09-0774_MAN_ENG_V3.fm Page 8 Friday, September 25, 2009 6:51 AM 2 Secure one metal brace to each side of the drive using two screws. 3 Place four rubber pads onto each of the two metal braces on the hard drive as shown. 4 Slide the drive into the enclosure, firmly connect the SATA connector, then secure the drive to the enclosure by tightening the four screws through the rubber pads.
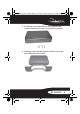
RF-AHD35_09-0774_MAN_ENG_V3.fm Page 9 Friday, September 25, 2009 6:51 AM 5 Put the front cover plate back on the enclosure, then secure it with the four screws you previously removed. 6 Place four rubber feet on the back of the case, then put four rubber feet on the stand.
RF-AHD35_09-0774_MAN_ENG_V3.fm Page 10 Friday, September 25, 2009 6:51 AM Connecting the enclosure to your computer Before connecting your external storage enclosure: • Confirm that your system supports SATA. If your system does not support SATA, please install an eSATA host card. • Confirm that the eSATA port on your system is working properly. If not, please refer to your computer manufacturer for assistance in getting the eSATA port to work properly.
RF-AHD35_09-0774_MAN_ENG_V3.fm Page 11 Friday, September 25, 2009 6:51 AM Note: Some motherboards do not support eSATA hot-plug and play function. If your motherboard does not, follow these steps to set up your RF-AHD35: 1. Shut down your computer. 2. Turn on your RF-AHD35, then connect it to your computer. 3. Power on your computer. Notes: Windows XP/2000/Vista/7 No drivers are necessary when using Windows XP/2000/Vista/7.
RF-AHD35_09-0774_MAN_ENG_V3.fm Page 12 Friday, September 25, 2009 6:51 AM Note: Most USB devices require that USB device software drivers be installed before connecting them to a computer. When installing a USB device, always follow the USB peripheral’s installation instructions provided by the manufacturer. Using your memory card reader The enclosure provides two memory card slots.
RF-AHD35_09-0774_MAN_ENG_V3.fm Page 13 Friday, September 25, 2009 6:51 AM 5 Remove the memory card. Caution: Do not remove memory cards while the card reader LED is flashing or blinking. Formatting a memory card To format a memory card: 1 Click Start, and then click My Computer. 2 Under Removable Storage, right-click the memory card icon representing the card type inserted, then click Format.
RF-AHD35_09-0774_MAN_ENG_V3.fm Page 14 Friday, September 25, 2009 6:51 AM Installing the software The installation CD includes backup software to enable you to back up your files. Note: This Roxio BackOnTrack software runs only on Windows 7, Windows Vista, and Windows XP computers using USB. Important: Before installing the backup software, make sure that your Windows operating system has been updated to the latest service pack. To make sure you have the latest service pack, run Windows Update.
RF-AHD35_09-0774_MAN_ENG_V3.fm Page 15 Friday, September 25, 2009 6:51 AM 3 Click Install Roxio® BackOnTrack™ 3 LE. The Welcome screen opens.
RF-AHD35_09-0774_MAN_ENG_V3.fm Page 16 Friday, September 25, 2009 6:51 AM 4 Click NEXT. The Roxio End-User License Agreement screen opens.
RF-AHD35_09-0774_MAN_ENG_V3.fm Page 17 Friday, September 25, 2009 6:51 AM 5 Read the license agreement, then click NEXT to agree. The Customer Information screen opens.
RF-AHD35_09-0774_MAN_ENG_V3.fm Page 18 Friday, September 25, 2009 6:51 AM 6 Enter your information, then click NEXT. The Choose Setup Type screen opens.
RF-AHD35_09-0774_MAN_ENG_V3.fm Page 19 Friday, September 25, 2009 6:51 AM 7 Choose the setup type, then click Install to start installation. It may take several minutes to install the software.
RF-AHD35_09-0774_MAN_ENG_V3.fm Page 20 Friday, September 25, 2009 6:51 AM 8 When installation is complete, the Setup Wizard Completed screen opens. 9 Click FINISH to complete the installation.
RF-AHD35_09-0774_MAN_ENG_V3.fm Page 21 Friday, September 25, 2009 6:51 AM Using your enclosure Starting Roxio BackOnTrack To start Roxio BackOnTrack: 1 Press the backup button (the button with the Rocketfish logo on it) on the front of the enclosure. Or, click Start, BackOnTrack, then click BackOnTrack Home. The first time you run the software, the Product Registration screen opens.
RF-AHD35_09-0774_MAN_ENG_V3.fm Page 22 Friday, September 25, 2009 6:51 AM 2 Complete the Product Registration information as prompted (first time only). The main screen opens. 3 To back up or restore files, follow the on-screen guide. For help, press F1 or click Help. Customizing your card reader To make the memory card slots easier to recognize, you can customize the drive icons.
RF-AHD35_09-0774_MAN_ENG_V3.fm Page 23 Friday, September 25, 2009 6:51 AM To install the multimedia card reader software: 1 Insert the included Multimedia Card Reader CD into your disc drive. The software starts automatically. If it doesn’t, browse your disc drive, then double-click Run.exe. 2 Click Install Multimedia Card Reader. The following screen opens. 3 Click Next, then follow the on-screen instructions to install the software.
RF-AHD35_09-0774_MAN_ENG_V3.fm Page 24 Friday, September 25, 2009 6:51 AM 4 Click Finish to complete the multimedia card reader software installation. Your computer restarts. After the multimedia card reader software is installed, Windows displays new drive icons for each of the slots instead of the standard Windows drive icon. When Windows detects a card in a slot, the corresponding drive icon turns from gray to a color that indicates the card type.
RF-AHD35_09-0774_MAN_ENG_V3.fm Page 25 Friday, September 25, 2009 6:51 AM Uninstalling the multimedia card reader software To uninstall the multimedia card reader software: 1 Open the Control Panel. 2 Follow the on-screen instructions to remove the software completely from your computer. 3 After the program is completely uninstalled, restart your computer. Appendix Creating A New Partition Note: The best way to partition a new hard drive is by using the manufacturers program.
RF-AHD35_09-0774_MAN_ENG_V3.fm Page 26 Friday, September 25, 2009 6:51 AM Caution: Doing the following will erase any existing data on the drive. If the drive is damaged and you wish to recover the data, continuing may overwrite the existing information! Creating a new partition in Windows XP/2000/Vista/7 To create a new partition in Windows XP/2000/Vista/7: 1 Right click on "My Computer" and choose Manage. 2 Under “Storage” on the LEFT pane, select Disk Management.
RF-AHD35_09-0774_MAN_ENG_V3.fm Page 27 Friday, September 25, 2009 6:51 AM 2 Locate the Utilities folder on the Mac OS CD and double-click it to open the folder. 3 Double-click the Drive Setup icon to open the program. 4 In the list of drives, select the drive you want to initialize. 5 Click Initialize. To format your hard drive with Mac OS Extended format: This method of formatting hard drives that allows for more efficient use of hard drive storage space. 1 Click Custom Setup.
RF-AHD35_09-0774_MAN_ENG_V3.fm Page 28 Friday, September 25, 2009 6:51 AM Note: If the hard drive will not mount on your system, format the drive with a FAT32 or NTFS partition first through a PC system. Once formatted, connect the [name of enclosure] to your Mac and run the Disk Utility tool again.
RF-AHD35_09-0774_MAN_ENG_V3.fm Page 29 Friday, September 25, 2009 6:51 AM My computer does not detect the enclosure • Check the power adapter and make sure the adapter is working. • Make sure all of the cables and plugs are securely fastened. • Make sure that the SATA cable or the USB cable is connected firmly to your enclosure and computer. • Make sure that the USB cable or eSATA cable is not broken. • Open the enclosure and make sure that all connections are securely fastened.
RF-AHD35_09-0774_MAN_ENG_V3.fm Page 30 Friday, September 25, 2009 6:51 AM My memory card appears in My Computer but I get errors when writing or reading • Make sure that the memory card is fully inserted into the slot. • Try a different memory card of the same type in the same slot. If a different memory card works, replace the original memory card. • Some cards have a read/write security switch. Make sure that the security switch is set to Write Enabled.
RF-AHD35_09-0774_MAN_ENG_V3.fm Page 31 Friday, September 25, 2009 6:51 AM Memory cards supported Power supply Indicators OS compatibility Operating temperature Operating humidity Certification • SD • MMC • MS • MS PRO • xD • CF (Type I & II) • MicroDrive Desktop dual-voltage AC adapter 5V/12V/2A • One card reader active indicator • One power on with backup active indicator • Windows 2000 • Windows XP • Windows Vista • Windows 7 • Mac OS X version 10.3.
RF-AHD35_09-0774_MAN_ENG_V3.fm Page 32 Friday, September 25, 2009 6:51 AM This equipment has been tested and found to comply within the limits for a class B digital device, pursuant to Part 15 of the FCC Rules. These limits are designed to provide reasonable protection against harmful interference in a residential installation.
RF-AHD35_09-0774_MAN_ENG_V3.fm Page 33 Friday, September 25, 2009 6:51 AM One-year limited warranty Rocketfish Products (“Rocketfish”) warrants to you, the original purchaser of this new RF-AHD35 (“Product”), that the Product shall be free of defects in the original manufacture of the material or workmanship for one (1) year from the purchase of the Product (“Warranty Period”). This Product must be purchased from an authorized dealer of Rocketfish brand products and packaged with this warranty statement.
RF-AHD35_09-0774_MAN_ENG_V3.fm Page 34 Friday, September 25, 2009 6:51 AM How to obtain warranty service? If you purchased the Product at a retail store location, take your original receipt and the Product to the store you purchased it from. Make sure that you place the Product in its original packaging or packaging that provides the same amount of protection as the original packaging.
RF-AHD35_09-0774_MAN_ENG_V3.fm Page 35 Friday, September 25, 2009 6:51 AM • Products where the factory applied serial number has been altered or removed REPAIR REPLACEMENT AS PROVIDED UNDER THIS WARRANTY IS YOUR EXCLUSIVE REMEDY. ROCKETFISH SHALL NOT BE LIABLE FOR ANY INCIDENTAL OR CONSEQUENTIAL DAMAGES FOR THE BREACH OF ANY EXPRESS OR IMPLIED WARRANTY ON THIS PRODUCT, INCLUDING, BUT NOT LIMITED TO, LOST DATA, LOSS OF USE OF YOUR PRODUCT, LOST BUSINESS OR LOST PROFITS.
RF-AHD35_09-0774_MAN_ENG_V3.fm Page 36 Friday, September 25, 2009 6:51 AM www.rocketfishproducts.com (800) 620-2790 Distributed by Best Buy Purchasing, LLC 7601 Penn Avenue South, Richfield, MN 55423-3645 USA © 2009 Best Buy Enterprise Services, Inc. All rights reserved. ROCKETFISH is a trademark of Best Buy Enterprise Services, Inc. All other products and brand names are trademarks of their respective owners.