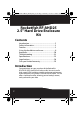
09-0772 RF-AHD25_MAN_ENG_V3.fm Page 1 Monday, October 12, 2009 10:55 AM v4 R1 2.
09-0772 RF-AHD25_MAN_ENG_V3.fm Page 2 Monday, October 12, 2009 10:55 AM Rocketfish RF-AHD25 2.5" Hard Drive Enclosure Kit Contents Introduction ................................................................. 2 Safety information ..................................................... 3 Features ......................................................................... 3 Using the hard drive enclosure ............................. 6 Appendix....................................................................
09-0772 RF-AHD25_MAN_ENG_V3.fm Page 3 Monday, October 12, 2009 10:55 AM Safety information • Always read these safety instructions and this User Guide carefully. Keep this User Guide for future reference. • Take precautions to avoid static electricity discharge or short circuits when connecting this enclosure to your computer. • Do not use this enclosure close to water, rain, or high humidity. • Do not use or store this enclosure in damp locations.
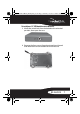
09-0772 RF-AHD25_MAN_ENG_V3.fm Page 4 Monday, October 12, 2009 10:55 AM Package contents • • • • • • • • • 2.5" SATA hard drive enclosure USB cable eSATA cable Two CDs Quick Setup Guide 5 Volt/1 amp AC adapter An extra swappable cover plate Carrying bag Accessories: • Screwdriver • 4 screws System requirements • PC or Macintosh with an available USB 2.0 port or eSATA port • Microsoft Windows 2000, Windows XP, Windows Vista, or Windows 7 operating system or Mac OS X version 10.
09-0772 RF-AHD25_MAN_ENG_V3.
09-0772 RF-AHD25_MAN_ENG_V3.fm Page 6 Monday, October 12, 2009 10:55 AM Status indicators Operation mode Led Starting mode Active mode Solid The hard drive is turned on. Flashing Data is being transmitted between your computer and the hard drive. Off The hard drive is turned off.
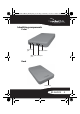
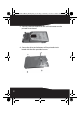
09-0772 RF-AHD25_MAN_ENG_V3.fm Page 7 Monday, October 12, 2009 10:55 AM To install your 2.5" SATA hard drive in the enclosure: 1 Move the switch lock from the locked to the unlocked position, then open the case. 2 Remove the four screws from the printed circuit board and remove the circuit board from the enclosure.
09-0772 RF-AHD25_MAN_ENG_V3.fm Page 8 Monday, October 12, 2009 10:55 AM 3 Securely connect the drive to the SATA connector on the printed circuit board. 4 Secure the drive to the bottom of the printed circuit board with the four provided screws.
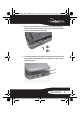
09-0772 RF-AHD25_MAN_ENG_V3.fm Page 9 Monday, October 12, 2009 10:55 AM 5 Return the printed circuit board to the enclosure, with the hard drive facing down, then secure it with the four screws you previously removed. 6 Insert the tab from the top of the enclosure into the slot and snap the lid into place. Then slide the switch to the locked position.
09-0772 RF-AHD25_MAN_ENG_V3.fm Page 10 Monday, October 12, 2009 10:55 AM Connecting the enclosure to your computer Before connecting your external storage enclosure: • Confirm that your system supports SATA. If your system does not support SATA, please install an eSATA host card. • Confirm that the eSATA port on your system is working properly. If not, please refer to your computer manufacturer for assistance in getting the eSATA port to work properly.
09-0772 RF-AHD25_MAN_ENG_V3.fm Page 11 Monday, October 12, 2009 10:55 AM Note: Some motherboards do not support eSATA hot-plug and play function. If your motherboard does not, follow these steps to set up your RF-AHD25: 1. Shut down your computer. 2. Turn on your RF-AHD25, then connect it to your computer. 3. Power on your computer. Notes: Windows 2000/XP/Vista/7 No drivers are necessary when using Windows XP/2000/Vista.
09-0772 RF-AHD25_MAN_ENG_V3.fm Page 12 Monday, October 12, 2009 10:55 AM To disconnect the enclosure from your Macintosh computer without shutting it down: 1 Drag the USB icon into the TRASH. 2 Unplug the enclosure. Installing the software The installation CD includes backup software to enable you to back up your files. Note: This Roxio BackOnTrack software runs only on Windows 7, Windows Vista, and Windows XP computers using USB.
09-0772 RF-AHD25_MAN_ENG_V3.fm Page 13 Monday, October 12, 2009 10:55 AM 3 Click Install Roxio® BackOnTrack™ 3 LE. The Welcome screen opens.
09-0772 RF-AHD25_MAN_ENG_V3.fm Page 14 Monday, October 12, 2009 10:55 AM 4 Click NEXT. The Roxio End-User License Agreement screen opens.
09-0772 RF-AHD25_MAN_ENG_V3.fm Page 15 Monday, October 12, 2009 10:55 AM 5 Read the license agreement, then click NEXT to agree. The Customer Information screen opens.
09-0772 RF-AHD25_MAN_ENG_V3.fm Page 16 Monday, October 12, 2009 10:55 AM 6 Enter your information, then click NEXT. The Choose Setup Type screen opens.
09-0772 RF-AHD25_MAN_ENG_V3.fm Page 17 Monday, October 12, 2009 10:55 AM 7 Choose the setup type, then click Install to start installation. It may take several minutes to install the software.
09-0772 RF-AHD25_MAN_ENG_V3.fm Page 18 Monday, October 12, 2009 10:55 AM 8 When installation is complete, the Setup Wizard Completed screen opens. 9 Click FINISH to complete the installation.
09-0772 RF-AHD25_MAN_ENG_V3.fm Page 19 Monday, October 12, 2009 10:55 AM Using your enclosure Starting Roxio BackOnTrack To start Roxio BackOnTrack: 1 Press the backup button (the button with the Rocketfish logo on it) on the front of the enclosure. Or, click Start, BackOnTrack, then click BackOnTrack Home. The first time you run the software, the Product Registration screen opens.
09-0772 RF-AHD25_MAN_ENG_V3.fm Page 20 Monday, October 12, 2009 10:55 AM 2 Complete the Product Registration information as prompted (first time only). The main screen opens. 3 To back up or restore files, follow the on-screen guide. For help, press F1 or click Help. Appendix Creating A New Partition Note: The best way to partition a new hard drive is by using the manufacturers program. Most hard drives should come with a CD that includes its installation program.
09-0772 RF-AHD25_MAN_ENG_V3.fm Page 21 Monday, October 12, 2009 10:55 AM Caution: Doing the following will erase any existing data on the drive. If the drive is damaged and you wish to recover the data, continuing may overwrite the existing information! Creating a new partition in Windows 2000/XP/Vista/7 To create a new partition in Windows 2000/XP/Vista/7: 1 Right click on "My Computer" and choose Manage. 2 Under “Storage” on the LEFT pane, select Disk Management.
09-0772 RF-AHD25_MAN_ENG_V3.fm Page 22 Monday, October 12, 2009 10:55 AM 2 Locate the Utilities folder on the Mac OS CD and double-click it to open the folder. 3 Double-click the Drive Setup icon to open the program. 4 In the list of drives, select the drive you want to initialize. 5 Click Initialize. To format your hard drive with Mac OS Extended format: This method of formatting hard drives that allows for more efficient use of hard drive storage space. 1 Click Custom Setup.
09-0772 RF-AHD25_MAN_ENG_V3.fm Page 23 Monday, October 12, 2009 10:55 AM Note: If the hard drive will not mount on your system, format the drive with a FAT32 or NTFS partition first through a PC system. Once formatted, connect the [name of enclosure] to your Mac and run the Disk Utility tool again.
09-0772 RF-AHD25_MAN_ENG_V3.fm Page 24 Monday, October 12, 2009 10:55 AM My computer does not detect the enclosure • Check the power adapter and make sure the adapter is working. • Make sure all of the cables and plugs are securely fastened. • Make sure that the SATA cable or the USB cable is connect firmly to your enclosure and computer. • Make sure the USB cable or eSATA cable is not broken. • Open the enclosure and make sure that all the connections are securely fastened.
09-0772 RF-AHD25_MAN_ENG_V3.fm Page 25 Monday, October 12, 2009 10:55 AM Specifications Specifications are subject to revision or update without notice. Hard drive type Dimensions Interface to device Interface to computer Connectors/buttons 2.5“SATA hard drive up to 500 GB 0.66 × 5.19 × 3.42 inch (1.7 × 13.2 × 8.7 cm) D × L × W SATA USB 2.
09-0772 RF-AHD25_MAN_ENG_V3.fm Page 26 Monday, October 12, 2009 10:55 AM Legal notices FCC Part 15 This device complies with Part 15 of the FCC Rules. Operation of this product is subject to the following two conditions: (1) this device may not cause harmful interference, and (2) this device must accept any interference received, including interference that may cause undesired operation.
09-0772 RF-AHD25_MAN_ENG_V3.fm Page 27 Monday, October 12, 2009 10:55 AM Canada ICES-003 statement This Class B digital apparatus complies with Canadian ICES-003.
09-0772 RF-AHD25_MAN_ENG_V3.fm Page 29 Monday, October 12, 2009 10:55 AM One-year limited warranty Rocketfish Products (“Rocketfish”) warrants to you, the original purchaser of this new RF-AHD25 (“Product”), that the Product shall be free of defects in the original manufacture of the material or workmanship for one (1) year from the purchase of the Product (“Warranty Period”). This Product must be purchased from an authorized dealer of Rocketfish brand products and packaged with this warranty statement.
09-0772 RF-AHD25_MAN_ENG_V3.fm Page 30 Monday, October 12, 2009 10:55 AM How to obtain warranty service? If you purchased the Product at a retail store location, take your original receipt and the Product to the store you purchased it from. Make sure that you place the Product in its original packaging or packaging that provides the same amount of protection as the original packaging.
09-0772 RF-AHD25_MAN_ENG_V3.fm Page 31 Monday, October 12, 2009 10:55 AM • Products where the factory applied serial number has been altered or removed REPAIR REPLACEMENT AS PROVIDED UNDER THIS WARRANTY IS YOUR EXCLUSIVE REMEDY. ROCKETFISH SHALL NOT BE LIABLE FOR ANY INCIDENTAL OR CONSEQUENTIAL DAMAGES FOR THE BREACH OF ANY EXPRESS OR IMPLIED WARRANTY ON THIS PRODUCT, INCLUDING, BUT NOT LIMITED TO, LOST DATA, LOSS OF USE OF YOUR PRODUCT, LOST BUSINESS OR LOST PROFITS.
09-0772 RF-AHD25_MAN_ENG_V3.fm Page 32 Monday, October 12, 2009 10:55 AM www.rocketfishproducts.com (800) 620-2790 Distributed by Best Buy Purchasing, LLC 7601 Penn Avenue South, Richfield, MN 55423-3645 USA © 2010 Best Buy Enterprise Services, Inc. All rights reserved. ROCKETFISH is a trademark of Best Buy Enterprise Services, Inc. All other products and brand names are trademarks of their respective owners.