
Data Sheet


3. If instead you see only a device called HMSoft, the wixel has not been able to
correctly communicate with the HM-10 module. Check your wiring. And also check
that you have loaded the xBridge2.wxl file on the wixel.
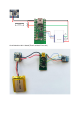
4. If you establish a BLE connection to the bridge, the green LED on the HM-1x module
will go on, and the YELLOW LED on the Wixel will go on shortly after. This shows
that the wixel is aware of the connection.
5. If you have not yet entered your Transmitter ID in xDrip, you will notice the RED LED
will blink 4 times every 10 seconds. This is showing you that the wixel is telling xDrip
it doesn’t have a Transmitter ID to work with yet.
6. If you have entered your Transmitter ID in xDrip, and the bridge has received it, the
RED LED will blink (about ½ second on and off) while it is waiting for a packet from
the transmitter.
NOTE: If you have used the L command on a USB terminal to toggle LEDs off NO
LEDs will light as described above.
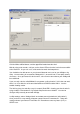
7. If you would like to see more of what is going on, connect the wixel with a mini USB
cable to a PC or laptop. After a time (up to 5 minutes if it was sleeping when you
connected), the Green LED will light. Connect a terminal program to the device. The
wixel WILL SLEEP while connected to the terminal program, but only to a mode that
allows the USB to remain open, if it has received a Dexcom Transmitter Packet, sent
it, and received an ACK packet from the app.
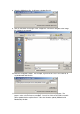
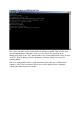
8. If you would like to see the communications it is sending, you can open a serial
terminal and connect to the wixel. Use 9600, 8, 1, no parity as the settings of the
terminal. Note, that XBridge can send output that is NOT in text, so on occasion you
will see silly characters. But you will also see a lot of diagnostic messages telling you
what is going on. You can also send an “s” or an “S” from the terminal and you will
get a Status message, detailing the contents of the Flash storage variables, and the
variables that hold these values in the program. See below for details of the types of
messages.