
Guide


ROBOTICS ADVENTURE BOOK SCOUTER MANUAL STEM 8
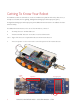
Install the drivers for the Arduino Uno (Robot) :
(See also: step-by-step screenshots for installing the Uno: http://arduino.cc/en/Main/ArduinoBoardUno )
6. Plug in the robot and wait for Windows to begin its driver installation process. After a few moments, the process will
fail, despite its best efforts.
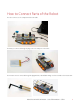
7. Click on the Start Menu, and open up the Control Panel. While in the Control Panel, navigate to System and Security.
Next, click on System. Once the System window is up, open the Device Manager.
8. Look under Ports (COM & LPT). You should see an open port named “Arduino UNO (COMxx)”
9. Right click on the “Arduino UNO (COmxx)” port and choose the “Update Driver Software” option.
10. Next, choose the “Browse my computer for Driver software” option.
11. Finally, navigate to and select the Uno’s driver file, named “ArduinoUNO.inf”, located in the “Drivers” folder of the
Arduino Software download (not the “FTDI USB Drivers” sub-directory).Windows will finish up the driver installation
from there.
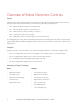
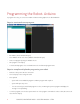
Opening the programming environment:
12. Double-click the “Arduino” application.
13. Under the “Tools” menu, select “ArduBlock”
14. From there you can start building a program by dragging code blocks from the menu on the left side of the
ArduBlock window.