
User's Guide

WR-3700 Series User’s Guide
16
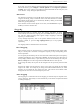
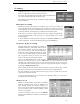
Select the range of memory numbers to scan, mode and group restrictions. Click on the Scan
button to start scanning, or click on the Close button to exit the dialog box (your settings will
be remembered).
When the scanner reaches the end of the memory range, it loops back to the start of the range
and starts again.
A feature provided with memory scanning allows you to assign ‘priority’ memory number.
When this is used, the priority memory number is scanned after a certain number of
memories is scanned. How many frequencies are scanned before the priority frequency is
specified by the Scanning interval.
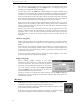
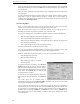
Scanner Options
There are several options that can be set for the scanner to suit your needs. You can specify
how the scanner operates when it pauses at a signal and how fast it scans.
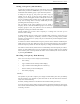
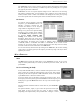
When the scanner finds a signal, it has two basic options: pause or stop. If ‘pause’ is
specified, you can force the scanner to continue, stop, exclude or wait.
If you leave it waiting, there are four different options to allow it to continue automatically:
• When the signal disappears (drops below the squelch level)
• After a fixed period of time (regardless of the signal level)
• When the signal disappears during a fixed period of time or after the fixed period of
time (whichever comes first)
• After a signal disappears for at least a fixed period of time.
The fixed period of time is specified by the ‘Delay time’.
The scan rate specifies the maximum number of frequencies per second the scanner will
check, but could be slower than specified if you have other programs running.
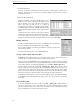
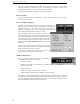
When the scanner stops or pauses at a signal, you can set it up to perform certain tasks:
• Write the frequency to memory
• Store the settings into the log
• Start recording the audio to a sound file
• Alert the operator
To write the frequency to memory, select Write to
memory and specify the range of memory numbers
that the scanner can write to. You can also assign a
group number that the frequency will be associated
with. Check the Confirm box to confirm each
frequency before it is written.
To store the current settings (frequency, mode, date,
time and signal strength) to the log, select Store to
log.
The audio signal can be recorded when a
transmission is found by selecting Record audio, specifying a file name to record to and
specifying the sampling rate and bits per sample.
The file name can also include a #d, #t, and/or #f to specify the date, time and frequency
respectively. If you need a # in the file name, enter ## (double-hash). The date and time will
be represented as a six digit number. The date order depends on your country settings in
Windows (will be typically DDMMYY or MMDDYY), and the time is HHMMSS (24
hour). The frequency will be represented by a number in kHz with no leading zeros, spaces
or decimal places.