
User's Guide


WR-3700 Series User’s Guide
5
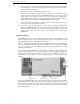
3700e Hardware Installation
1. First install the software (see below).
2. Connect the supplied power adaptor to the +12V DC power socket on the rear of the
unit, and switch the unit on.
3. Connect the supplied RS-232 (or optional PC Card Adaptor) cable between the
computer and the WiNRADiO unit.
4. Connect the antenna to the BNC connector at the rear of the unit, and extend the antenna
up and as far away as possible.
Software Installation
1. Insert the WiNRADiO installation disk into your floppy drive.
2. If you are using Windows 95, 98 or NT 4, click on the ‘Run’ command in the ‘Start’
menu. If you are using Windows 3.1x or NT 3.5x, Click on the ‘Run’ command in the
‘File’ menu in Program Manager or File Manager.
3. Type A:\INSTALL (or B:\INSTALL if your floppy drive is B).
4. After the Welcome dialog box and Licence agreement, you will be prompted to enter a
directory to install the WiNRADiO software. You can either choose to accept the
default, or you may enter your own.
5. The installation will then proceed to install the necessary files onto your hard disk. You
will then be asked whether you want to add an icon to Windows. If you accept, you will
then be asked which program group to add the icon to.
6. If this is the first installation in Windows 3.1x, 95 or 98, you will then be asked to
restart Windows. The WiNRADiO receiver will not work until Windows has been
restarted. In Windows NT, a hardware configuration utility will pop up allowing you to
specify the hardware settings for the software (see the next section ‘I/O Configuration’
for more details).
WiNRADiO software is periodically upgraded. Check out the newest software version on our
Web site at www.winradio.com. If you wish to be automatically notified of upgrades and
other WiNRADiO related information, please register with our user database by sending an
e-mail message with subject heading REGISTER to support@winradio.com.