
User's Manual
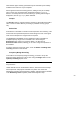
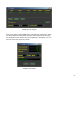

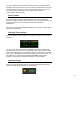
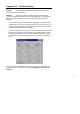
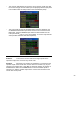
Table Of Contents
- WiNRADiO
- G3 Series Radio Receiver
- Introduction
- Installation
- Getting Started
- Connecting the Antenna
- Using WiNRADiO G3 SERIES
- Appendix A - Troubleshooting
- Appendix B – Sound Card Controls
- Appendix C - Dealing with Interference
- Appendix D - Inside WR-G3 SERIES
- Appendix E – Professional Demodulator
- Appendix F - Developer Support
- Declaration of Conformity

- 32 -
When the range definition is done, close this window, then close the scanner
settings. Then activate the
Range
button in the
Scanning
control panel:
Scanning Control Panel
When you press the
Scan Forward
button [
>>
], the scanner will commence
scanning from the start frequency of the first range. When the last frequency
of the first range is reached, it will then continue onto the next range, etc.
When it reaches the end of the last range, it will go back to the start of the
first range and continue looping infinitely until a signal is found, or until
manually stopped or paused. If you use the
Scan Backward
[
<<
] button, the
process will be exactly reversed (i.e. starting from the top frequency of the
last range and working its way downwards).
You can stop or pause this activity using the
Stop
or
Pause
buttons. If you
use the
Pause
button, then restarting scanning using Scan Forward or Scan
Backward buttons will resume the action from the paused frequency. If you
stop scanning with the
Stop
button, then using the Scan Forward or Scan
Backward buttons will recommence scanning from the initial (or the last)
frequency again.
If no ranges are specified in the Ranges list, then activating scanning in the
Range mode will result in no action.
An additional useful feature of frequency range scanning is that all found
frequencies can be automatically stored in memory, even if the receiver is
left unattended. To do this, enable the
Auto Store
checkbox in the Scan
ranges set-up window, and specify the memory range to which the
frequencies should be written. You can also specify a special Group Number
to be assigned to such frequencies.
When using the Auto Store option, you should also set the appropriate
conditions for scanning when the signal is found (for example, Pause when
signal found, and Resume after the minimum delay time will provide the
fastest scanning and writing into memory).