
Data Sheet


4/27/2018 OpenCR1.0
http://emanual.robotis.com/docs/en/parts/controller/opencr10/ 24/50
6. 3. Install on Windows
6. 3. 1. Install Driver
To use OpenCR’s USB port as a serial port in Windows, you need a USB CDC driver. You can
install the USB driver provided by ST.
http://www.st.com/en/development-tools/stsw-stm32102.html
6. 3. 2. Install Arduino IDE(Windows)
Download the latest version of Arduino IDE from the official arduino homepage, and install
it. Currently, the OpenCR will be on service in the version 1.16.0 or later.
https://www.arduino.cc/en/Main/Software
The Arduino IDE for Windows is available as an installation version and a compressed
version, so you can install it using your preferred method.
6. 3. 3. Porting to Arduino IDE(Windows)
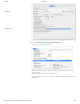
6. 3. 3. 1. Preferences
After Arduino IDE is run, click File → Preferences in the top menu of the IDE. When the
Preferences window appears, copy and paste following link to the Additional Boards
Manager URLs textbox. (This step may take about 20 min.)
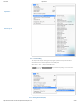
6. 3. 3. 2. Install the OpenCR package via Boards Manager
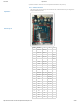
1. Click Tools → Board → Boards Manager.
2. Type OpenCR into the textbox to find the OpenCR by ROBOTIS package. After it finds
out, click Install.
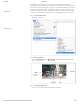
3. After the installation, “INSTALLED” will be appeared.
4. See if OpenCR Board is now on the list of Tools → Board. Click this to import the
OpenCR Board source.
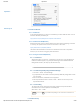
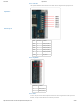
6. 3. 3. 3. Port setting
This step shows the port setting for the program uploads. The OpenCR should be
connected to the PC and the OpenCR via the USB ports.
Select Tools → Port → COM1.
Caution The value of COM1 may be different depending on the environment connected to the
PC.
6. 4. Arduino Pinmap
https://raw.githubusercontent.com/ROBOTIS-GIT/OpenCR/master/arduino/opencr_release/package_
OpenCR1.0
Back to Top ▲