
Specifications

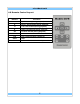

microBus-Cam II
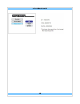
3.0 Electrical Connections
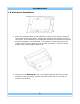
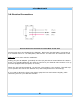
Access the Power Connector from the Rear of the Unit
Connect each wire as indicated by the diagram. Make sure that the battery connection is
to a constant source of +12 VDC power, and fuse the +12 VDC wire at a maximum of 2A.
That's it! You're done with the installation.
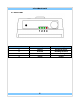
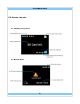
Finally, plug the AV Adaptor (provided) into the A/V jack that is located below the camera.
Insert your standard RCA-type A/V cable to connect to your desired video monitor or TV (it
must be equipped with A/V inputs, of course).
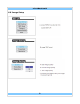
When the unit has been powered, you will see a live image in your monitor. That will help
you to position the unit for the desired view, and to adjust the focus accordingly.
If you need to adjust the focus, then lightly grasp the lens and rotate it slightly, while
confirming focus in your attached monitor.
6