
Data Sheet

Features
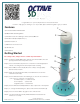
A) Power On/Filament Withdraw/Off
B) ABS/PLA Mode Setting Switch
C) Extruder Feed Control Setting Continuous/Pause/Manual
D) Extruder Feed Speed Up/Down (+/-)
E) Filament Feed Port
F) USB Power Connection Port
G) LED Indicator
H) Rest Stand
Getting Started
For safety’s sake, always exercise caution to prevent burns.
Step 1) Plug the included USB power cable into the 3D Pen USB connection
port (F) and then into a live power source.
Step 2) Press Power button (A) and look to ensure that a red led light (G) has
turned on showing that the 3D Pen print head is heating.
Step 3) Select ABS or PLA mode (B). Be sure to always use high quality
filament for best results.
Step 4) When the red led light turns blue, insert filament into the 3D Pen
Filament Feed Port (E).
Step 5) Use the Extruder Feed Control Setting (C) to select mode of extrusion
control such as continuous or manual feed.
short button press = continuous feed
short 2nd press = pause feed
long button press = manual feed
Step 6) Use the Extruder Feed Speed buttons (D) to adjust rate of feed speed.
Step 7) To change material during use, press and hold the Power button (A).
Step 8) Press the Power button (A) again to turn off the 3D Pen.
NOTE* The 3D Pen will automatically withdraw filament material after 30
minutes of no activity.
Congratulations on your recent purchase of the Octave 3D Pen!!
In order to help get you creating as soon as possible, please review this guide to get you started.
A
B
C
D
E
F
H
G
+
-
Octave Systems Inc.
www.octave.com 2398 Walsh Avenue Santa Clara, CA 95051 1.800.626.8539
Part# 3D-OS-3DPen
Octave 3D Pen Online Info Page
2016/10/26 - instruction sheet rev. 0