
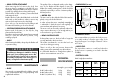
Specifications


ENGLISH
17
ASSEMBLY
• CUTTER BOWL ATTACHMENT
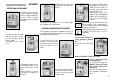
1) With the motor base fa-
cing you, make sure that the
bowl is straight in relation to
the motor shaft, with the
magnetic bar moved slightly
to the left.
2) Turn the bowl to the right
until the motor base connec-
tors are securely positioned
in their sockets.
The handle is now in front
of you.
3) Engage the blade on the
motor shaft and lower it
right to the bottom of the
bowl.
Make sure that it is correctly
positioned, by rotating it in
the bowl.
3) Engage the white plastic
sling plate on the motor
shaft and check that it is
properly positioned at the
bottom of the bowl.
Depending on type of use
(Side A or B), disengage the
plate from the ejecting disc
hub, return it and engage
it back.
SIDE A facing upwards (ejection rib
downwards) for any vegetables or
citrus fruit which require careful handling
(tomatoes, mushrooms...).
SIDE B facing upwards (ejection rib up-
wards) for all other types of fruit or
vegetables.
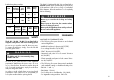
4) Choice of disc:
a) If you have opted for a
slicing, grating or julienne
disc:
Position the disc on the sling
plate.
Only for the R 402 / R 402 V.V. models:
b) If you have chosen the
dicing equipment:
i.e. a grid and slicing disc.
Only the 8 mm and 10 mm
discs can be fitted with a
dicing grid.
Position the dicing grid in
the vegetable preparation
bowl
4) Place the lid on the bowl
and rotate to the right until
it clicks.
The device is now ready for use. The green light
should therefore be illuminated.
• VEGETABLE PREPARATION ATTACHMENT
The vegetable preparation attachment consists of
two detachable parts: the stainless steel vegetable
preparation bowl and the lid.
1) With the motor base
facing you, fit the bowl onto
the motor base; the ejection
chute should be on your
right.
2) Turn the bowl to the right
until the motor base connec-
tors are securely positioned
in their sockets.