
User Manual


6
Power Up the Unit
1.Unwindthepowercordfromthehandle,and
plugitintoacorrectvoltageoutlet.
2.Turnonthemainpowerswitch.Thersttime
theunitispoweredup,itdisplaystheinitial
setupmode.
Select Language
Theoperatormaychoosetohaveprompts
displayedinoneofthreelanguages:English,
French,orSpanish.
1.
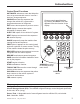
UsetheUPorDOWNarrowkeytotogglethrough
thechoices.RefertoFigure3.
2.
SelectSAVEtochoosethedisplayedlanguage.
UV Dye Inject Bottle
1.UnscrewthelidfromtheUVdye
reservoirandremovethepiston.
2.
FillthereservoirwithUVdyeonlytothe
MAXFILLline.Overllingthereservoir
willcompromisetheo-ringsealandmay
causeairtobeinjectedintothevehicle
system.
3.Spreadathinlmofoilordyeonthepiston
o-ring(toreducesealdrag),andthreadthelid
ontothereservoir.
4.
Slowlypushthepistonintothereservoirunilyou
seedyeattheconnector.
5.
Inspectthedyereservoirbottletoensurethere
arenoairbubblesbetweenthepistonandthe
UVdye—thepistonshouldbeindirectcontact
withthedye.
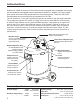
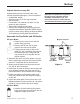
6.RefertoFigure2.Holdtheassemblybythe
connectorwhilesupportingthebottomofthe
plasticbottletokeepthepistonincontactwith
theUVdye.Snaptheconnectorintothecoupler
ontheunit.
7.
Inspectthebottleagaintoensuretherearenoair
bubblesbetweenthepistonandtheUVdye—the
pistonshouldbeindirectcontactwiththedye.
Note: To remove the UV dye bottle from the coupler,
press the release button on the coupler and pull the
bottle straight down.
Setup
Figure 2
UV Dye
Bottle
Release Button
Keypad
Arrow
Keys
Figure 3