
User Manual


8
Manual Tank Fill
1.Afterthevacuumpumpshutsoff,theunit
displays,
CONNECTSOURCETANKTO
TANKFILLHOSE,OPENTANKVALVE,
ANDORIENTATETANK
TOPROVIDELIQUIDSUPPLY.
PRESSSTARTTOBEGINOREXITTOABORT.
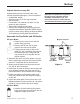
Connectthellhosetotheliquidconnectorona
fullsourcetank.SeeFigure5.
2.Openthesourcetankvalve.
3.Installthesourcetank,andsecureittotheunit
(usingthetankstrap)insuchawaythatliquid
refrigerantissuppliedtotheconnection.
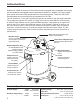
Figure 5
Side View
Fill Hose
(connectto
liquidline)
Source
Tank
Strap
CAUTION: The vacuum pump is shipped
without oil in the reservoir. Failure to add oil
will damage the vacuum pump.
2.Removetheplugfromthevacuumpumpoilll
port.
3.
Attachtheexibletube/captotheoilbottle(from
theaccessorykit);pouronly ve (5) ounces
ofvacuumpumpoilintothellport.Note: You
will top off the oil in the next step as the vacuum
pump is running.
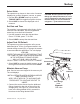
4.SelectNEXT.Whilethevacuumpumpis
running,slowlyaddoiluntilthelevelrisestothe
centerofthesightglass.
5.Installthepluginthellport,andselectEXIT.
Theunitpullsa3-minutevacuumtoclearall
internalairbeforeproceeding.
Note: The “burping” noise heard during this
process indicates air is being purged from the
system—this is normal.
CAUTION: The unit is programmed
to run the setup procedure as outlined
here. To prevent personal injury, do
NOT operate the unit at any other
time without the oil ll port plug
installed, because the vacuum pump is
pressurized during normal operation
.
Maintain Vacuum Pump contd.
Setup