
User Manual


14
Operating Instructions – Automatic
Theautomaticfunctionallowsausertoprograman
automaticrecovery,vacuum,leaktest,and/orcharge
sequence.Theusermaychoosetoskipanystepinthe
automatic operation during the programming. A total
automaticsequencemaytakeanhourtocomplete.
Note:
• Oil recovered during the recovery cycle can be
injected by the user before the charge cycle, or can
be manually injected into the vehicle after charge
using a separate oil injection tool.
• When a charge cycle in automatic mode is
complete, the machine will not prompt to equalize
hoses; it will automatically compensate this amount
of refrigerant.
1.
Connectthehigh-andlow-sideservicehosestothe
A/Csystem,andopenthecouplervalvesonthehoses
.
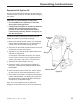
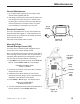
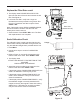
2.PresstheAUTOMATIC button. See Figure 9.
3.Theunitasksifarecoveryisneeded.PressSTOP
/ NOtoskiptherecoverycycle;pressSTART / YES
to accept.
4.
Theunitasksifaleaktestisneeded.PressSTOP /
NOtoskiptheleaktest;pressSTART / YES to accept.
5.
Theunitasksifachargeisneeded.PressSTOP /
NOtoskipthechargecycle;pressSTART / YES to
accept.PressCHARGE to toggle between high- or
low-sidecharge,orboth.
AcceptthedefaultweightbypressingSTART / YES,
ortypeinadesiredweightusingthenumberkeys
andpressSTART / YES.
6.Thedisplayshowsanoverviewofalltheteststhat
wereselected.PressSTART / YES to begin the
automaticsequence.
Note: If a high-side charge has been selected, before
charging, the automatic sequence will pause and
“beep” for 30 seconds to allow the user to inject oil, if
desired. See Replenish the A/C System Oil instructions
in this manual.
7.
Whenthesequenceiscomplete,thedisplayshows
theamountofrefrigerantthatwasrecoveredand
charged.
8.Closethehigh-andlow-sidecouplervalves,and
removetheservicehosesfromtheA/Csystem.
9.PressSTART / YES
toclearthehoses
.
10.Ifanyoilwasrecoveredduringtherecoverycycle,
andoilwasnotinjectedbeforethechangecycle,
useanoilinjectiontoolatthistimetomanuallyinject
oilintotheA/Csystem.
Operating Tips
•
If the weight entered is more than the
refrigerant available in the internal tank, the
charge function will not start. The display reads
INSUFFICIENT REFRIG.
PRESS ANY KEY TO EXIT
Refer to the Maintenance section of this manual
for instructions to Manually Fill the ISV.
•
If problems are encountered during the
automatic sequence, the unit will “beep” three
times and the control panel readout will pinpoint
the problem encountered. The sequence
remains paused until the user enters a decision
regarding how to proceed.
•
Before the unit begins evacuating the A/C
system during the automatic sequence, it
checks for any pressure in the system that
may damage the vacuum pump. If pressure is
detected, the unit displays
PRESSURE EXISTS
PRESS ANY KEY TO EXIT
Press any key to exit the automatic sequence.
• If a leak test was programmed, and a leak is
detected, the unit displays
LEAK TEST FAILED
PRESS STOP TO EXIT
PRESS START TO CONTINUE
Press STOP to exit the automatic sequence
and perform needed repairs. Press START to
continue the automatic sequence despite the
failed leak test.
• To ensure an accurate leak test, it is
imperative that a thorough recovery and
evacuation of the system is performed.
During the recovery process, cold spots can
develop in the automotive system. Pockets
of refrigerant in desiccant and in system oil
will continue to vaporize as the A/C system
temperature equalizes toward ambient. As
this occurs, A/C system pressure increases,
which may be interpreted by the unit as a
leak. This varies somewhat with ambient
temperature conditions.
Automatic
Function
Figure 9