RS4110 RS4220 RS5110 RS5220 RS6110 RS6220 352-00056-001 USERS MANUAL Thank you for purchasing a Robertshaw RS5000 Series programmable thermostat. This user’s manual will guide you through the setup of the RS5110 single stage and the RS5220 two stage thermostats. The thermostat should already be mounted and correctly wired. The default settings will enable the thermostat to operate efficiently. Before making any changes to the schedule read the section on Default Settings.
Application The Robertshaw 5000 family of thermostats is designed to control gas, electric, oil, heat pump, and millivolt heating and electric cooling systems. The RS5110 is a single stage thermostat while the RS5220 is a two-stage thermostat. The RS5000 thermostats use 5-2 programming. This means the 5 weekdays will operate on one schedule and the 2 weekend days will operate on a second schedule.
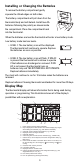
Installing or Changing the Batteries To remove the battery compartment gently squeeze the ribbed edges on both sides. The battery compartment will pull down from the thermostat body and will detach. Install two AA batteries following the polarity as shown inside the compartment. Place the compartment back into the thermostat. When the batteries are low the thermostat will enter a low battery mode. Low battery mode has two levels. • LEVEL 1: The low battery icon will be displayed.
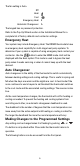
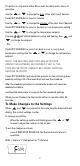
Set Time and Day To adjust the time and day settings press the SET TIME button. The hour will flash. If a button is not pushed within 10 seconds the thermostat returns to operation. To change the settings: 1. Use the and buttons to change the flashing number. 2. Press the SET TIME button to move through hour, minutes, and day of week. 3. Make changes as needed. They will be saved automatically. NOTE: THE THERMOSTAT WILL NOT CORRECT FOR DAYLIGHT SAVING TIME.
The fan setting is Auto. Off Heat Cool Emergency Heat E Automatic Changeover A The keypad has no password protection. Refer to the Pop-Up Wizard section in the Installation Manual for a complete list of factory defaults and contractor settings. Emergency Heat Your system may include Emergency Heat. The RS5220 thermostats have an emergency heat capability for multi-stage heat pump systems. To determine if your system is capable of using emergency heat contact your contractor.
START/STOP SCHEDULE: Switches between running a schedule and manual (permanent override). Cancels a temporary or vacation override. EDIT SCHEDULE: Use this button to start editing the schedule. Push repeatedly to move through the selections. VACATION: Used to set a temporary setpoint for a number of days. SET TIME: Sequences through the hour, minute and day. LIGHT BAR: Turns on the display back light for 10 seconds. FAN: Turns fan to AUTOMATIC, CIRCULATE or ON.
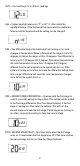
If a button is not pushed within 30 seconds the thermostat returns to operation. Use the or to change the hour of the start time if desired. Push EDIT SCHEDULE to move to minutes. Use the or to change the minutes of the start time if desired. Push EDIT SCHEDULE to move to the heat or cool temperature setting. Use the or to change the temperature setpoint. Pressing will switch between cooling and heating. Use to change the setpoint.
CLOC = Clock setting in 12 or 24 hour readings light = Display backlight always on ”Y” or off ”n”. Also called the nightlight feature. If the thermostat has been wired to enable this feature it will be displayed and the setting can be changed. DIFF = The differential keeps the thermostat from turning on for small changes in temperature. When in Fahrenheit the range is 0.5 to 3.0 degrees. In Celsius the range is 0.5 to 1.5 degrees. The differential is factory set to 1.0 F degree (0.5 C degree).
DEDB = Deadband for auto changeover = the number of degrees that the room temperature can move away from the active setpoint until heating or cooling is called for. The larger the deadband the more the room temperature will vary. This can be from heat to cool or cool to heat. HI = High Heat Limit = This is the highest allowed heating setpoint. The user will not be allowed to set a schedule setpoint or override temperature higher than this value.
CYCL = Cycle Timer allows a compressor to rest between cycles. Can be set from 0 to 5 minutes in 1 minute increments. ! WARNING: A wrong short cycle setting can damage your equipment. This should only be changed by a trained HVAC professional. CAL = Calibration offset. Changes the displayed temperature from the actual temperature by +3 to -3 degrees in one degree increments.
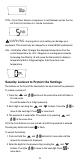
If the wrong password is entered the display will flash NO for 5 seconds then return to normal. 3. Press and when the correct password is displayed. The buttons will be unlocked. Once the security has been disabled, a password needs to be recreated to protect the settings. Two Stage Systems A 2nd stage is a second or additional system that will provide extra heating or cooling. When a 2nd stage is operating the display will show the number 2 by the heating and cooling icons.
will call for heat or cool to maintain the setpoint temperature. Press or to change the setpoint. The heat or cool mode should be selected. Schedule Overrides When the thermostat is following a schedule, an override allows the thermostat to function with a single setpoint for a time period. A temporary override is entered as a setpoint for a number of hours. A vacation override is entered as a setpoint that is held for a number of days. Temporary Override 1. Press or of hours.
Origin of Setpoint When the thermostat is using a schedule the temperature setpoint originates from the schedule settings. When one of the schedule overrides is active the setpoint originates from the override temperature. Use the display to determine the origin of the current temperature setpoint. Permanent Override - The day, time, and schedule are not displayed. Vacation Override - Vac and For are displayed. The clock shows days of override. The display alternates days of override with setpoint.
Setting the Fan to ON, AUTO, or CIRC The fan has 3 settings: On, Auto, and Circ. Press the among the three. button to switch ON: The fan is on constantly. The room temperture, set points, and status of the heating and cooling equipment has no effect on the fan. AUTO: When there is a call for heating or cooling the fan will turn on. CIRC: The fan operates in a cycle of on for 10 minutes and off for 20 minutes. When there is a call for heating or cooling the cycle stops and the fan responds to the call.
Five Year Limited Warranty Invensys Controls warrants to the original contractor installer, or to the original consumer user, each new Robertshaw thermostat to be free from defects in materials and workmanship under normal use and service for a period of five (5) years from date of purchase.
NOTES 16
RS4110 RS4220 RS5110 RS5220 RS6110 RS6220 352-00056-001 MANUAL DEL USUARIO Gracias por comprar un termostato programable Robertshaw Serie RS5000. El manual le ayudará a programar el modelo RS5110 de una sola etapa y el modelo RS5220 de dos etapas. El termostato debe estar instalado y conectado adecuadamente a la red de electricidad. Los ajustes por defecto permiten el funcionamiento eficiente del termostato. Antes de realizar cambios en la programación, lea la sección Ajuste por defecto.
Aplicación La familia de termostatos Robertshaw 5000 está diseñada para controlar sistemas de refrigeración eléctrica y de calefacción de gas, electricidad, petróleo, bombas de calor y minivolt. El modelo RS5110 es un termostato de una sola etapa y el RS5220 es un termostato de dos etapas. Los termostatos RS5000 usan programación 5-2. Es decir que durante los 5 días de semana funcionan con un programa y durante los 2 días del fin de semana funcionan con un segundo programa.
Para instalar o cambiar las pilas Para retirar el compartimiento de las pilas, apriete suavemente los bordes estriados de ambos lados. El compartimiento de pilas de desprenderá del cuerpo del termostato. Coloque dos pilas AA según la indicación de polaridad que figura en el interior del compartimiento. Vuelva a colocar en el termostato. Cuando las pilas están bajas, el termostato empieza a funcionar en modo baja energía. El modo pila baja tiene dos niveles.
Para ajustar la hora y el día Para ajustar la hora y el día, pulse la tecla SET TIME (fijar la hora). La hora titilará en forma intermitente. Si no se pulsa ninguna tecla en 10 segundos, el termostato vuelve a ponerse en funcionamiento. Para cambiar los ajustes: 1. Use las teclas y para modificar los números que titilan. 2. Pulse la tecla SET TIME (fijar la hora) para avanzar las horas, minutos y días de la semana. 3. Realice los cambios necesarios. Se guardarán automáticamente.
calefacción 62°F, refrigeración 85°F. El modo de operación será uno de los siguientes: El ajuste del ventilador es Auto. El teclado no tiene una contraseña de protección. Consulte en la sección del Asistente Desplegable Pop-Up Wizard del Manual de Instalación la lista completa de ajustes por defecto de fábrica y del contratista. Calefacción de emergencia Su sistema puede incluir la función calefacción de emergencia.
Cuando los valores programados titilan se pueden modificar presionando las teclas o Si no se pulsa ninguna tecla en 10 segundos, el termostato vuelve a ponerse en funcionamiento. Puede acceder a las siguientes teclas desde el panel delantero. START/STOP SCHEDULE (PROGRAMA INICIO/DETENCIÓN): cambia entre poner en funcionamiento un programa y el modo manual (sobrecontrol permanente). Cancela el modo sobrecontrol temporario o por vacaciones.
Pulse EDIT SCHEDULE (EDITAR PROGRAMA) para avanzar los minutos. Use las teclas si lo desea. y para modificar los minutos de la hora de inicio Pulse EDIT SCHEDULE (EDITAR PROGRAMA) para pasar a fijar la temperatura de calefacción o refrigeración. Use las teclas Al pulsar las teclas o para cambiar el valor deseado de la temperatura. pasará de calefacción a refrigeración o viceversa. Use y para cambiar los valores deseados.
light = luz del visor siempre prendida ”Y” o apagada ”n”. También llamada función de iluminación nocturna. Si el termostato ha sido conectado para habilitar esta función, aparecerá la indicación correspondiente y se podrá modificar el valor. DIFF = el diferencial evita que el termostato se ponga en funcionamiento ante cambios muy pequeños de temperatura. Si está programado en la escala Fahrenheit, el rango de oscilación es de 0.5 a 3.0 grados.
DEDB = margen de oscilación para conmutación automática = cantidad de grados que la temperatura ambiente puede alejarse del valor deseado hasta que empiece a funcionar el modo calefacción o refrigeración. Cuanto más amplio sea el margen de oscilación más variará la temperatura ambiente. Esto funciona de calefacción a refrigeración y viceversa. HI = límite superior de temperatura = es el valor más elevado de ajuste de calefacción.
CHECK = recordatorio para realizar el mantenimiento del filtro. Por defecto, este control está desactivado. El temporizador funciona cuando el sistema se enciende y se puede finar en 0 (apagado) o en un valor de hasta 9900 horas. Cuando finaliza el tiempo, aparece en el visor CHECK FLTR. Pulse cualquier tecla para volver a fijar y volver al visor normal. CYCL = el temporizador de ciclo le permite al compresor descansar entre ciclos. Se puede fijar de 0 a 5 minutos en incrementos de 1 minuto.
cualquier tecla aparecerá el ícono . Para destrabar las teclas: 1. Pulse y mantenga oprimidas las teclas que el sistema le solicite la contraseña. y 5 segundos hasta 2. Ingrese los dígitos de la contraseña pulsando las teclas Pulse la tecla para pasar al dígito siguiente. y Pulse la tecla para volver atrás. Si ingresa la contraseña equivocada, en el visor titilará la palabra “NO” durante 5 segundos y luego volverá a la pantalla normal. 3. Pulse las teclas y cuando aparezca la contraseña correcta.
Modo Sobrecontrol Cuando se programa el termostato, se guardan los valores y el programa. El termostato cumplirá el programa salvo que se ingrese el Modo Sobrecontrol. El Modo Sobrecontrol tiene tres variantes. Modo Sobrecontrol permanente Pulse el START/STOP SCHEDULE (PROGRAMA INICIO/DETENCIÓN) hasta que la palabra SCHEDULE desaparezca del visor. Aparece el valor deseado de temperatura. El termostato llamará el modo calefacción o refrigeración para mantener el valor deseado de temperatura.
sobrecontrol por vacaciones. El visor mostrará la temperatura ambiente y el valor deseado aparecerá intermitentemente con la cantidad de horas de funcionamiento que quedan en modo sobrecontrol. Pulse las teclas y para modificar el valor deseado. Este será el nuevo valor deseado para futuros usos en el modo sobrecontrol por vacaciones. Cancele el modo sobrecontrol pulsando la tecla START/STOP SCHEDULE (PROGRAMA INICIO/DETENCIÓN).
Cierre automático El termostato no mostrará valores de temperatura superiores a 99°F (37°C) o inferiores a 32°F (0°C). Si eso sucede, el visor mostrará HI o LO. El termostato sigue controlando la calefacción y la refrigeración y mostrará la temperatura cuando los valores se encuentren entre 32°F (0°C) y 99°F (37°C). Para fijar el ventilador en ON, AUTO o CIRC El ventilador tiene tres modos: On, Auto, y Circ. Pulse la tecla cambiar de modo del ventilador. para ON: el ventilador funciona constantemente.
Si no puede resolver algún problema con su termostato, póngase en contacto con www.invensyscontrols.com o Soporte Técnico: (800) 445-8299 Garantia Limitada de 5 años Invensys Control garantiza al instalador contratista original o al usuario original que cada termostato Robertshaw nuevo no tendrá defectos en componentes ni en construcción con el uso y mantenimiento normal durante un período de cinco (5) años desde la fecha de la compra.
NOTES 16