10-1165 6/8/05 11:51 AM Page 1 8601 ® NeW DIGITAL PROGRAMMABLE THERMOSTAT G E O H GAS ELECTRIC OIL HEAT PUMP 5 - 2 Day Programmable 1 Heat / 1 Cool User’s Manual 110-1165 110-1098B YEA WO 2 WA R T Quick Start Installation and Programming RRANTY As an ENERGY STAR® partner, Invensys Controls Americas has determined that this thermostat meets the ENERGY STAR® guidelines for energy efficiency.
110-1165 6/8/05 11:51 AM Page 2 ! WARNING: • Always turn off power at the main power source by unscrewing fuse or switching circuit breaker to the off position before installing, removing, cleaning, or servicing thermostat. • Read all of the information in this manual before installing or programming this thermostat. • DO NOT CONNECT TO 120 VAC. This is a 24V AC low voltage thermostat. Do not install on voltages higher than 30V AC.
110-1165 6/8/05 11:51 AM Page 3 ! WARNING: In heat pump applications, do not connect anything to the W1 terminal. When switched to HP mode, W1 is connected internally to Y1 on the thermostat. 1. Turn off power to heating and cooling system. 2. Remove cover of old thermostat to expose wires. Do not disconnect wires. (See Figure 1) 3. Label wires per the Wiring Table. 4. After labeling wires, remove wires from terminals. 5. Remove existing thermostat base from wall. 6.
110-1165 6/8/05 11:51 AM Page 4 Figure 3 Mounting Holes MON ° F C R G O B Y1 W1 HP OPTION SWITCH Heat pump switch. ELECTRIC/GAS SWITCH Selects fan control. 6. Mark placement of mounting holes (see Figure 3). Set base aside. 7. Drill the marked holes using a 3/16” (5mm) drill bit. NOTE: Enclosed plastic anchors do not require a drilled hole for drywall. 8. Tap plastic anchors into the wall. 9. Align base with plastic anchors and feed wires through opening (see Figure 3). 10.
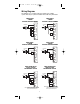
110-1165 6/8/05 11:51 AM Page 5 Wiring Diagrams The following is just a sample of the most common types of HVAC systems. Refer to your system’s installation manual for wiring information.
110-1165 6/8/05 11:51 AM Page 6 To Test Thermostat ! WARNING: DO NOT SHORT (JUMPER) ACROSS TERMINALS OF GAS VALVE OR SYSTEM CONTROL TO TEST OPERATION. THIS WILL DAMAGE THE THERMOSTAT AND VOID YOUR WARRANTY. CAUTION: DO NOT SWITCH SYSTEM TO A/C OR LEAVE IN A/C MODE IF THE TEMPERATURE IS BELOW 50°F (10°C). THIS CAN DAMAGE THE AIR CONDITIONING SYSTEM AND CAUSE PERSONAL INJURY. 1. Place the HEAT-OFF-A/C switch into the A/C position. The will be displayed. 2.
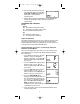
110-1165 6/8/05 11:51 AM Page 7 Programming Guide on heat off a/c auto on MON ° F Cursor prog temp vac hold set select prog temp vac hold set select SETTING TIME OF DAY AND DAY OF WEEK 1. Press SELECT until the cursor is over . Press SET. The HOURS segment will be blinking. Use the or button to adjust the HOURS setting. NOTE: The AM or PM indicator will change as the HOURS display rolls through a 24 hour cycle.
110-1165 6/8/05 11:51 AM Page 8 6. After pressing SET for the 4th event, the day of the week along the top will switch to SAT SUN and AM1 will be displayed. Repeat steps 2-4 to program the weekend settings. 7. With the weekend settings programmed, place the HEAT-OFF-A/C switch in the A/C position. Repeat steps 2-6 to program the cooling settings. CUSTOMIZING YOUR THERMOSTAT Settings System A/C: The thermostat controls the cooling. Off: The heating and cooling systems are off.
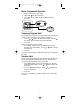
110-1165 6/8/05 11:51 AM Page 9 Begin Programmed Operation 1. Make sure the cursor is above PROG. 2. Place AUTO ON switch into AUTO. 3. Place HEAT-OFF-A/C switch into A/C or HEAT depending on the season. heat off a/c auto on heat off MON ° a/c auto on F prog temp vac hold select set prog temp vac hold select Temporary Program Hold You can temporarily increase or decrease the temperature and hold it for 3 hours or until the next program event, whichever comes first. 1.
110-1165 6/8/05 11:51 AM Page 10 Check Filter Reset Once the filter timer has expired, CHECK FILTER will turn on and stay on. To clear the message and reset the timer: 1. Press SELECT and SET and hold for 3 seconds. CLr will appear in the time display. 2. Press any key to clear the message. The display will transition to the temperature scale display. See step 4 in CUSTOMIZING YOUR THERMOSTAT. 3. No further input is needed. Within a few seconds, the display will return to the normal operating mode.
0-1165 6/8/05 11:51 AM Page 11 Troubleshooting Symptom Thermostat does not turn on system. Remedy Check wiring. (See Installing Item 8601 Thermostat) Thermostat turns on and off too frequently. Increase temperature differential. (See Programming Guide) System fan does not operate properly. Move the Electric/Gas switch to either gas or electric, to match system. (See Installing Item 8601 Thermostat) Time shown on display is not the current time of day. Change time of day setting.
110-1165 6/8/05 11:51 AM Page 12 TWO-YEAR LIMITED WARRANTY Invensys Controls Americas warrants to the original contractor installer or to the original consumer user, each new Robertshaw thermostat to be free from defects in materials and workmanship under normal use and service for a period of two (2) years from date of purchase.