10-1174 English 12/19/05 3:38 PM Page 1 9701i2 9725i2 DELUXE PROGRAMMABLE THERMOSTATS User's Manual Menu Driven Display Fully Programmable Brighter / Adjustable Backlight Night Light Option Auto Changeover Automatic Daylight Saving Time 24 VAC with Worry-Free Memory Storage English, Spanish or French Display Option 110-1174 Five Year Warranty
110-1174 English 12/19/05 3:38 PM Page 2 2 TABLE OF CONTENTS Important Safety Information ..........................................................................................................................................................................................4 Know Your Thermostat’s Controls and Displays Control Buttons ........................................................................................................................................................................
110-1174 English 12/19/05 3:38 PM Page 3 Customize the Display Fahrenheit or Celsius ............................................................................................................................................................................................17 Show Set Temperature ........................................................................................................................................................................................
110-1174 English 12/19/05 3:38 PM Page 4 4 IMPORTANT SAFETY INFORMATION WARNING: • Always turn off power at the main power source by unscrewing fuse or switching circuit breaker to the off position before installing, removing, or cleaning this thermostat. • Read all of the information in this manual before programming this thermostat. • This is a 24V AC low-voltage thermostat. Do not install on voltages higher than 30V AC.
110-1174 English 12/19/05 3:38 PM Page 5 KNOW YOUR THERMOSTAT'S CONTROLS AND DISPLAYS page 1 of 3 NOTE: In many cases the installer made the initial setup of your thermostat. That was based on your preferences and the characteristics of your heating/cooling system. Our User’s Guide gives information allowing you to make basic modifications for your home environment at any time. Become familiar with your thermostat's controls and displays by reviewing the information on the next three pages.
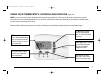
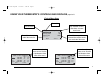
110-1174 English 12/19/05 3:38 PM Page 6 6 KNOW YOUR THERMOSTAT'S CONTROLS AND DISPLAYS page 2 of 3 3 Typical Main Screen Views Animated system icon – flame indicates heating mode. A snowflake indicates cooling mode. These 2 icons move when heating or cooling are on. A small A shows that Auto Changeover is the selected mode. Animated fan icon – rotating blade shows the fan is on. Current date and time Measured temperature This area of the display shows the local, remote and outdoor temperatures.
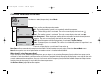
110-1174 English 12/19/05 3:38 PM Page 7 KNOW YOUR THERMOSTAT'S CONTROLS AND DISPLAYS page 3 of 3 3 Typical Menu Views Menu title Item to select Up and down arrows show there are more menu items. Equipment Setup Menu Dotted line shows the end of the menu list. Mon To Sun Program 1st Stg Cool 2nd Stg Cool Short Cycle ----------Back Arrow shows there is more to see. Use the right button to view more of the menu.
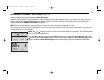
110-1174 English 12/19/05 3:38 PM Page 8 8 CHOOSE HEATING/COOLING 9:15AM Monday °F Jun 20 68.9 Outside 70 Mode To choose a mode (of operation), select Mode. Menu There are five possible operating modes: Off – The heating/cooling systems are turned off, and will not operate. Heat – The heating system is activated. The main screen displays the heat icon ( ). Cool – The cooling system is activated. The main screen displays the cool icon ( ).
110-1174 English 12/19/05 3:38 PM Page 9 OVERRIDE CURRENT SETTINGS page 1 of 2 NOTES: These directions are for both Heating and Cooling. Hold does not appear in the Main Menu if Off is the selected mode. To access the Override Settings, select Menu on the main screen. Hold – With this menu item you may override the current temperature setpoint and choose a new setpoint Main Menu Hold to be held during the override period. This can be a few hours, or it can be a longer period.
110-1174 English 12/19/05 3:38 PM Page 10 10 OVERRIDE CURRENT SETTINGS page 2 of 2 Setting a hold when the operating mode is Auto Changeover. When the selected mode is Auto Changeover, setting a hold means that two setpoints (one for heat and one for cool) have to be chosen. The distance between the heating and cooling setpoints cannot be smaller than the deadband. (For more information about deadband, see COMFORT SETTINGS on page 16.) NOTE: There is a letter A next to the on the main screen.
0-1174 English 12/19/05 3:38 PM Page 11 OVERRIDE FAN OPERATION NOTE: Choosing a fan mode (On, Auto or Intermittent) with the Fan Menu overrides the fan choices made when you use the Main Menu’s Schedule option. (See PROGRAMMING THE THERMOSTAT on page 12 and 13.) Select Menu from the main screen. Select Fan from the Main Menu. Main Menu Hold Fan Schedule Time & Day Back Select Fan Menu Fan Mode Intermittent On Intermittent Off Back Auto 5Min 20Min Select The first item on the Fan Menu is Fan Mode.
110-1174 English 12/19/05 3:38 PM Page 12 12 PROGRAMMING THE THERMOSTAT About EnergyStar page 1 of 2 ® Your thermostat has been preprogrammed with a schedule of setpoints recommended by EnergyStar (www.energystar.gov). This schedule is designed to lower your energy costs year-round. If you changed the schedule and want to return to the EnergyStar schedule, you can do that at any time by selecting Menu, Schedule, Reset to EnergyStar.
110-1174 English 12/19/05 3:38 PM Page 13 PROGRAMMING THE THERMOSTAT page 2 of 2 From the main screen, select Menu, then Schedule, then Program. This will take you to the Select Program Days menu. The choices are: Mon to Sun – All days of the week will be set the same. Mon to Fri – Five weekdays can be set the same. Next Cancel Sat to Sun – Weekend days can be set differently from the weekdays. Individual Days (you may select the actual individual days) – Each day can be set separately.
110-1174 English 12/19/05 3:38 PM Page 14 14 TIME & DAY NOTE: The main screen time/day/date line flashes until time and date are set. Main Menu Hold Fan Schedule Time & Day Back Select Time & Day from the Main Menu. Select Time & Day Menu Time Date 12hr or 24hr Auto DST Back 9:15AM 6/6/05 12hr Standard... Select With the Time & Day Menu you can make these four settings: Time – Set the Time by setting the hour and then the minutes. Date – Set the month, then the day, then the year.
110-1174 English 12/19/05 3:38 PM Page 15 COMFORT SETTINGS page 1 of 2 NOTE: Every person has preferences about personal comfort. The following pages refer to a level of satisfaction with your home environment as it relates to the operation of the heating and cooling system. Comfort Settings control equipment cycling (on/off periods), staging and sensors that may be connected to your thermostat.
110-1174 English 12/19/05 3:38 PM Page 16 16 COMFORT SETTINGS Comfort Settings Menu Sensor Program Deadband 2.5°F Efficient Recovery No ----------Back Select Deadband is used only when the thermostat is set in the Auto Changeover mode. The deadband refers to a band or range between the heating and cooling setpoints that controls how often the thermostat switches from heating to cooling and vice versa.
110-1174 English 12/19/05 3:38 PM Page 17 CUSTOMIZE THE DISPLAY page 1 of 2 User Preferences provides you with more ways to customize the displayed information and maintain optimal comfort. Main Menu Comfort Settings User Preferences System Settings User Security Back From the Main Menu, choose User Preferences. Select User Preference Menu °F or °C Show Set Temp Language Temp Offset Back °F Yes English 0.
110-1174 English 12/19/05 3:38 PM Page 18 18 CUSTOMIZE THE DISPLAY User Preference Menu Temp Offset Resolution Air Quality Display Setting Back 0.0°F Tenths° Select page 2 of 2 Air Quality – Sets service reminders for parts of the heating/cooling system that need periodic attention.
110-1174 English 12/19/05 3:38 PM Page 19 SYSTEM SETTINGS page 1 of 5 NOTE: Only the installing contractor should set System Settings. Choose System Settings from the Main Menu. Main Menu Comfort Settings The System Settings Menu gives nine more ways to get the most from the thermostat. User Preferences System Settings The information below describes how these features enhance thermostat performance.
110-1174 English 12/19/05 3:38 PM Page 20 20 SYSTEM SETTINGS page 2 of 5 Equipment Setup Menu 1st Stg Cool 2nd Stg Cool Short Cycle ----------- Yes No 5Min 1st Stage Cool equipment – Select Yes or No. 2nd Stage Cool equipment can be selected for 9725i2 models only – Select Yes or No. Short Cycle – The minimum time between heating or cooling cycles intended to protect your equipment. (See the WARNING below.) Turn it Off or set it from 1 to 5 minutes.
110-1174 English 12/19/05 3:38 PM Page 21 SYSTEM SETTINGS page 3 of 5 System Settings Menu Balance Points Service Intervals Cooling Limit Heating Limit Back 45°F 90°F Select Select Service Intervals to set service reminders for primary system components of the heating/cooling system that need periodic attention.
110-1174 English 12/19/05 3:38 PM Page 22 22 SYSTEM SETTINGS page 4 of 5 System Settings Menu Auto Changeover Contact Info Reset To Defaults Security On/Off Back No Select Auto Changeover – When this feature is selected, it allows the thermostat to switch automatically between heating and cooling Warning! Adjusting Auto Changeover May to maintain the optimal temperature. Adjust Schedule Data.
110-1174 English 12/19/05 3:38 PM Page 23 SYSTEM SETTINGS System Settings Menu Auto Changeover Contact Info Reset To Defaults Security On/Off Back No page 5 of 5 Security On/Off – This item provides security for the System Settings Menu only. Select Enter PIN to Enable Security 0 0 0 0 Cancel Next To enable Security: Enter a four-digit PIN. When this number is accepted, a closed lock icon ( ) appears next to System Settings on the Main Menu.
110-1174 English 12/19/05 3:38 PM Page 24 24 PREVENT THERMOSTAT ACCESS Choose User Security from the from the Main Menu when you want to prevent others from modifying thermostat operation. In effect, you can make the thermostat tamperproof. Select User Security from the Main Menu.
110-1174 English 12/19/05 3:38 PM Page 25 TECHNICAL SUPPORT Do you have a question about your thermostat? Main Menu Select Tech Support from the Main Menu to find technical support contact information. User Preferences System Settings User Security Tech Support Back Select Thermostat model number Software version Tech Support Model 9725i ABC HEAT 555-1234 vX.
110-1174 English 12/19/05 3:38 PM Page 26 26 FREQUENTLY ASKED QUESTIONS page 1 of 5 Who should I call for help? Visit our web site at www.about-i-series.com. To talk with a Tech Support representative, give us a call at 800-445-8299. What if I forget my PIN? Talk with a Tech Support representative at 800-445-8299 to get a temporary PIN. What should I do if my power goes out? Make sure your family is safe and don’t worry about the thermostat.
110-1174 English 12/19/05 3:38 PM Page 27 FREQUENTLY ASKED QUESTIONS page 2 of 5 What is deadband? The deadband refers to a range between the heating and cooling setpoints that controls how often the thermostat switches from heating to cooling and vice versa. The smaller the deadband, the more often the thermostat will switch between heating and cooling, which typically happens in the fall and spring of the year.
110-1174 English 12/19/05 3:38 PM Page 28 28 FREQUENTLY ASKED QUESTIONS page 3 of 5 How many events can be programmed? This thermostat can be set for two, four, or six events per day. Select two events if someone is home all day. Typically, this requires a constant temperature during the day and a different temperature at night. Four events are common for working households. Event 1 (WAKE) is the morning period. Event 2 (DAY) is when everybody has left for school or work.
110-1174 English 12/19/05 3:38 PM Page 29 FREQUENTLY ASKED QUESTIONS page 4 of 5 Remote outdoor sensor The remote outdoor sensor (Part No. 9025i) can be used to aid in the comfort of your home or simply as a sensing device to inquire about outdoor temperature. With your heat pump system, the remote outdoor sensor helps determine when to turn on the second stage heating for optimal comfort.
110-1174 English 12/19/05 3:38 PM Page 30 30 FREQUENTLY ASKED QUESTIONS page 5 of 5 How do I reset the thermostat? To reset the thermostat, press the button and the LEFT button at the same time. Hold for five seconds. The information screen, including version, is displayed indicating a reset has occurred. NOTE: This will NOT reset any of the programmed settings, and it will not disable any of the security provisions.
110-1174 English 12/19/05 3:38 PM Page 31 FIVE YEAR LIMITED WARRANTY The manufacturer warrants to the original contractor installer or to the original consumer user, each new Robertshaw thermostat to be free from defects in materials and workmanship under normal use and service for a period of five (5) years from the date of purchase.
110-1174 English 12/19/05 3:38 PM Page 32 Controls Americas 515 South Promenade Avenue Corona, CA 92879-1736 United States of America Made in U.S.A. Patents Pending www.about-i-series.