Sound for Generations ROBERTS R9957 Multi-Powered 2 band radio Please read this manual before use
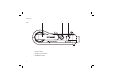
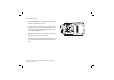
Controls Top 1 1. Dynamo handle 2. Emergency buzzer button 3.
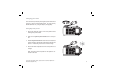
Controls 4 Front 5 6 7 8 9 4. Lamp button 5. Charge indicator 6. Tuning indicator 8. Dial scale with band indicator 10 9. Power/Volume control 10. Lamp 7.
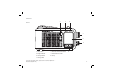
Controls 14 Rear 13 15 16 12 11 11. Carrying strap 3 14. Telescopic aerial 12. Battery compartment 15. Headphone socket 13. Battery/Dynamo switch 16.
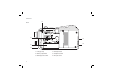
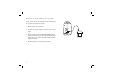
Battery operation 1. Remove the Battery cover on the rear of the unit by pushing the catch in the direction of the arrow. 2. Insert two LR6 (AA size) batteries into the spaces in the compartment. Take care to ensure all batteries are inserted with the correct polarity as shown inside the battery compartment. Replace the battery cover. 3. Reduced power, distortion, and a ‘stuttering’ sound are all signs that the batteries may need replacing. 4.
Operation via an AC adaptor (not included) The AC adaptor for use with the R9957 should provide 3 volts DC output at 300mA centre pin positive. 1. Place your radio on a flat surface. 2. Pull back the rubber protection cover from the DC input socket. 3. Plug the adaptor lead into the DC input socket located on the left hand side end of your radio ensuring that the plug is pushed fully into the socket. The batteries will be automatically disconnected. 4. Plug the adaptor into a wall socket and switch on.
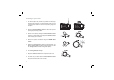
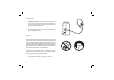
Charging your radio Your radio can be powered by winding the dynamo handle which charges an internal rechargeable battery, by using ordinary alkaline batteries or by using an adaptor. (not supplied) 3 Using Dynamo power 1. Ensure the telescopic aerial is in the rest position before winding the dynamo handle. 2. Take out the Dynamo power handle from its rest position. 3. Wind the Dynamo handle either clockwise or anti-clockwise until the charging LED indicator is illuminated.
Listening to your radio 1. For FM reception fully extend and position the telescopic aerial for best reception. For MW reception there is a built in ferrite aerial, rotate the radio to the position giving best reception. 2. Switch the Dynamo/Battery switch to either the Dynamo (if charged) or battery position. 3. Switch on the radio by rotating the Power/Volume control clockwise, a click will be heard. Adjust the Volume control until a hissing sound is heard. 2 3 4.
Lamp operation Your radio has a built in lamp which can either be used to illuminate the dial scale window or to illuminate for a short distance when required. 1 1. Press the lamp button to switch on the lamp. 2. The lamp can be used with the radio in the on or off position. Emergency buzzer Your radio has a built in buzzer for emergencies. The buzzer is to be used if you require help. 1 1. Press the emergency buzzer button to activate the buzzer. 2.
Headphones 1. A Headphone Socket (3.5mm) located on the left hand end of your radio is provided for use with either headphones or an earpiece. Inserting the headphone plug automatically mutes the internal loudspeaker. 2. Lift back the rubber protection cover then insert headphones into the headphone socket. General Do not allow this unit to be exposed to water, steam or sand.
Specifications Circuit Features Power Requirements Loudspeaker Batteries 2 x LR6 (AA size) Not included Dynamo 1.2V rechargeable Ni-MH battery Mains DC 3 Volts 300mA mains power adaptor centre pin positive (+). (not supplied) Battery Life Approx. 100hrs of listening for 4 hours a day at normal volume using alkaline cells. Frequency Coverage FM 87.5-108MHz MW 530 - 1710kHz 50mm 8 ohms 0.4W Output Power 100mW Headphone socket 3.5mm dia DC socket 2.
Guarantee This instrument is guaranteed for twelve months from the date of delivery to the original owner against failure due to faulty workmanship or component breakdown, subject to the procedure stated below. Should any component or part fail during this guarantee period it will be repaired or replaced free of charge. The guarantee does not cover: 1. Damage resulting from incorrect use. 2. Consequential damage. 3. Receivers with removed or defaced serial numbers. N.B.