
Service manual


SECTION 8: SERVICING INSTRUCTIONS
19
SECTION 8: SERVICING INSTRUCTIONS
Disassembly and removal or replacement of any
pump components must be done by a service con-
tractor or electrician qualified in the installation and
service of gas-fired heating equipment.
Overtorquing can result in a failure of components.
Failure to follow these instructions can compromise
pump operation and void warranty.
8.1 Pre-Season Maintenance and Annual
Inspection
To ensure your safety and years of trouble-free oper-
ation of the pump, service and annual inspections
must be done by a contractor qualified in the installa-
tion and service of gas-fired heating equipment.
Disconnect electric and gas supplies before perform-
ing service or maintenance.
Before every heating season, a contractor qualified
in the installation and service of gas-fired heating
equipment must perform a thorough safety inspec-
tion of the pump.
For safety and best performance, the electrical, vent-
ing, suspensions and overall pump condition are
some of the areas requiring inspection.
Please see Page 20, Section 8.3 for suggested items
to inspect.
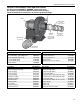
8.2 To Change the Motor and/or the Impeller
Disconnect electrical power before servicing.
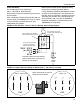
Remove the pump boots from the inlet and outlet of
the scroll assembly, disconnecting the pump from
tailpipe and vent pipe.
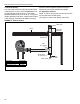
To remove the motor or impeller, the scroll must be
opened. Remove the nuts (12) on the motor side of
the pump frame.
Remove the scroll assembly and inlet assembly from
the frame as one piece.
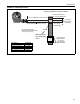
The impeller can be removed by loosening the (4) set
screws in the cooling disc, then removing the hex
head bolt (M8 x 1 x 50) and washer from the end of
the motor shaft. With an appropriate wheel puller,
remove the impeller.
The motor can now be removed, if necessary, by
removing the attachment hardware.
Re-assembly of motor/impeller combination requires
proper alignment. Be certain of proper motor align-
ment and free rotation.
The (4) set screws should be reinstalled with a drop
of thread locking sealant and remain unseated dur-
ing initial re-assembly.
Slide the impeller onto the motor shaft end. Apply a
drop of thread locking sealant to the threads of the
hex head bolt. Slide the washer onto the hex head
bolt and thread the bolt into the shaft so that it bot-
toms on the end of the shaft and hub of the impeller.
Torque to 120 in/lbs.
Seat the (4) set screws. Torque to 140 in/lbs.
Re-attach the scroll and tighten the nuts (12).
Severe Injury Hazard
Install pump scroll and inlet
assembly before operating high
speed rotating impeller.
Keep hands, fingers and clothing
away from inlet and outlet.
Install and operate equipment
according to installation manual.
Failure to follow these instructions
can result in death or severe injury.
WARNING
Electrical Shock Hazard
Heater must be installed and
grounded according to national
codes.
Disconnect electrical power and gas
supply before installation or service.
Failure to follow these instructions
can result in death or electrical
shock.
WARNING