
Installation manual


ROBERTS GORDON
®
ULTRAVAC™ CONTROLLER INSTALLATION MANUAL
8
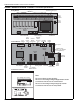
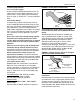
FIGURE 2: ROBERTS GORDON
®
ULTRAVAC™ Controller Specifications
POWER
L1 L2 GRD
OUTPUT 1
L1 L2 GRD
OUTPUT 2
L1 L2 GRD
OUTPUT 3
L1 L2 GRD
OUTPUT 4
L1 L2 GRD
OUTPUT 5
L1 L2 GRD
OUTPUT 6
L1 L2 GRD
OUTPUT 7
L1 L2 GRD
OUTPUT 8
L1 L2 GRD
120 Vac Outputs
Plug-In
Relays
24 V
Power
Switch
Control Board
Transformer
Meter Inputs
Analog
Outputs
Analog
Output
Board
Modem
Phone Port
Analog Inputs
Eprom
Chip
Selector
Switch
Reset
Button
RS 485
Terminals
RS 232
Direct
Connect
Port
24 V
Board
Power
Input
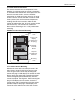
24 V Control Board
Power Supply
Relay Board
24 V
Power
1 A Fuse
16 V
Sensor
Power
120 Vac Power Input
Modem Chip
(optional - only located
on Controller #1)
Run LED
Control
Board
Power LED
24 V
Outputs
24 V Outputs
24 V Input
Connections
Controller Enclosure
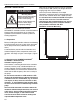
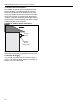
OUTPUT 1
L1
L2
GRD
GRD
L2
L1
OUTPUT 2
GRD
L2
L1
OUTPUT 3
GRD
L2
L1
OUTPUT 4
GRD
L2
L1
OUTPUT 5
GRD
L2
L1
OUTPUT 6
GRD
L2
L1
OUTPUT 7
GRD
L2
L1
OUTPUT 8
GRD
L2
L1
POWER
Line Voltage 120 V wiring
Relay Board
Low Voltage 24 V wiring
+ - + - REF
+5V GND GND +16V
+
1
-
+
2
-
+
3
-
+
4
-
C1+ C2+ C3+ C4+
CCC65++C87++
24VACRS-485
+++21--+43--+++65--+87--
ANALOG INPUTS
24VAC OUTPUTS
24VAC OUTPUTS
METER INPUTS
Control Board
5 V TCP/IP
Module Power
Note:
To ensure robust control signaling;
Do not run line voltage wiring through bottom section
of enclosure that houses the control board.
Do not run low voltage wiring through top section
of enclosure that houses the relay board.