
Installation Guide

ASSEMBLY INSTRUCTIONS FOR YOUR
PARKER FLUSHMOUNT
S664
**IT IS RECOMMENDED THAT A LICENSED ELECTRICIAN INSTALL THIS FIXTURE**
Warning: If any special control devices are used with this xture, follow the instructions carefully to assure full
compliance with N.E.C. requirements. If there are any questions, contact a qualied electrical contractor.
ASSEMBLY INSTRUCTIONS
****SHUT OFF ELECTRICAL SUPPLY AT CIRCUIT BREAKER****
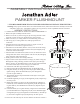
1. Remove all parts carefully from the carton.
2. Remove cross bar (A) from canopy (E) by removing decorative nuts
(G) from cross bar screws (B). Set decorative nuts (G) aside.
3. Afx cross bar (A) to ceiling outlet box with mounting screws (C).
4. Lift canopy (E) to ceiling outlet box; make proper electrical
connection.
5. Attach ground wire from outlet box (green or copper in color) to
ground screw on crossbar (A) (green in color).
6. Attach hot wire from xture (black in color) to hot wire from ceiling
outlet box. Fasten wires together with wire nut (D) and tightly wrap
connection with electrical tape.
7. Attach neutral wire from xture (white in color) to neutral wire from
ceiling outlet box. Fasten wires together with wire nut (D) and tightly
wrap connection with electrical tape.
8. Gently push wires back into ceiling outlet box.
9. Align crossbar screws (B) with holes in canopy (E). Place canopy (E)
ush against ceiling, allowing crossbar screws (B) to pass through
holes in canopy (E). Thread decorative nuts (G) onto exposed threads
of crossbar screws (B) to secure canopy (E) to outlet box.
10. Insert three 75W Max Type A bulb into sockets.
11. Remove nial (M) from threaded tube (H). Set nial (M) aside.
12. Lift glass shade (I) to canopy (E). Place top of glass shade (I) ush
against ceiling. Allow threaded tube (H) to pass through hole
in center of glass shade (I).
13. Thread nial (M) onto exposed threads of tube (H) to secure glass
shade (I) to xture.
14. Unthread alignment pin cap (L) from alignment pin (K). Repeat step
for each pin set.
15. Rotate glass shade (I) so holes on side of shade align with holes in
brackets (F). Insert threaded end of alignment pin (K) through hole
in glass shade (I) into threaded hole in bracket (F). Repeat step for
each pin set.
16. Lift metal shade (J) over glass shade (I). Align holes in metal shade
(J) with threaded holes in alignment pins (K). Insert threaded nipple
on alignment pin cap (L) through hole in metal shade (J). Thread cap
(L) into hole in alignment pin (K). Repeat step for each pin set.
*To clean use soft cloth only. Do not use chemical or abrasive cleaners.*