Version 2.
Robin MMX Spot Table of contents 1. Safety instructions.......................................................................................................... 3 2. Operating determination................................................................................................. 4 3. Fixture exterior view ...................................................................................................... 5 4. Installation.............................................................................
CAUTION! Keep this device away from rain and moisture! Unplug mains lead before opening the housing! FOR YOUR OWN SAFETY, PLEASE READ THIS USER MANUAL CAREFULLY BEFORE YOU INITIAL START - UP! 1. Safety instructions Every person involved with installation and maintenance of this device have to: - be qualified - follow the instructions of this manual CAUTION! Be careful with your operations.
2. Operating determination This device is a moving head for creating decorative effects and was designed for indoor use only. If the device has been exposed to drastic temperature fluctuation (e.g. after transportation), do not switch it on immediately. The arising condensation water might damage your device. Leave the device switched off until it has reached room temperature. Never run the device without lamp! Before switching the fixture OFF, turn the lamp OFF and allow the fixture to cool for a while.
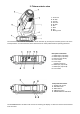
3. Fixture exterior view 1 - Front lens 2 - Air filter 3 - Tilt lock 4 - Pan lock 5 - Air filter 6 - Arm 7 - Base 8 - Arm 9 - Moving head The head should be locked for transportation- the tilt lock latch (2) and the pan lock latch (3) have to be in the locked positions. To unlock the head, move these latches to unlock positions before operating the fixture.
4. Installation Fixtures must be installed by a Qualified electrician in accordance with all national and local electrical and construction codes and regulation. 4.1 Connection to the mains For protection from electric shock, the fixture must be earthed! The Robin MMX Spot is equipped with auto-switching power supply that automatically adjusts to any 50/60Hz AC power source from 100-240 Volts.
4.2 Installing the lamp DANGER ! Install the lamp with the device switched off only. Unplug from mains before ! To insert the new lamp. 1. Disconnect the fixture from power and allow it to cool at least 15 minutes. 2. Make sure that the fixture´s head is in the position as shown on the picture (notices on the lamp cover are in readable position) .Loosen the two quarter-turn fasteners (1) marked “X,Y“ on the lamp cover to open this cover. 3.
4.4 Replacing rotating gobos Install gobos with the device switched off only. Unplug from mains before! To replace rotating gobos. 1. Disconnect the fixture from mains and allow it to cool. 2. Remove the bottom plastic cover of the head by loosening the 4 quarter-turn fasteners on the cover. 3. Gently pull up the gobo holder from the rotation gobo wheel. 4. Remove the spring gobo-lock with an appropriate tool (e.g. small-bladed screwdriver) and remove it.
4.5 Replacing graphic wheels Install graphic wheels with the device switched off only. Unplug from mains before! The dual graphic wheel consists of two graphic wheels. Both wheels has to be changed at the same time. To replace graphic wheels. 1. Disconnect the fixture from mains and allow it to cool. 2. Remove the bottom plastic cover of the head by loosening the 4 quarter-turn fasteners on the cover. 3. Tilt up the dual graphic wheel. 4. Remove the spring graphic wheel - lock with an appropriate tool (e.g.
4.6 Rigging the fixture The installation of the fixture has to be built and constructed in a way that it can hold 10 times the weight for 1 hour without any harming deformation. The installation must always be secured with a secondary safety attachment, e.g. an appropriate catch net. This secondary safety attachment must be constructed in a way that no part of the installation can fall down if the main attachment fails.
Omega holders positions: Truss installation 1.Bolt each clamp (1) to the omega holder (3) with M12 bolt and lock nut through the hole in the holder. 2.Fasten the omega holders on the bottom of the base by inserting both quick-lock fasteners (4) into the holes of the base and tighten fully clockwise. 3. Pull the safety wire (2) through the carrying handles (5) and around the truss (6) as shown on the pictures below.
4.7 DMX-512 connection The fixture is equipped with both 3-pin and 5-pin XLR sockets for DMX input and output.The sockets are wired in parallel. Only use a shielded twisted-pair cable designed for RS-485 and 3-pin or 5-pin XLR-plugs and connectors in order to connect the controller with the fixture or one fixture with another.
4.8 Ethernet connection The fixtures on a data link are connected to the Ethernet with ArtNet communication protocol.The control software running on your PC (or light console) has to support Art-Net protocol. Art-Net communication protocol is a 10 Base T Ethernet protocol based on the TCP/IP.Its purpose is to allow transfer of large amounts of DMX 512 data over a wide area using standard network technology. IP address is the Internet protocol address.
Ethernet / DMX operation Options “Art2DMX” has to be selected from the “Ethernet Mode” menu on the first fixture (connected to the Ethernet) in the fixture chain,next fixtures have standard DMX setting. Connect the Ethernet-input of the first fixture in the data chain with the network. Connect the DMX output of this fixture with the input of the next fixture until all fixtures are connected to the DMX chain. Caution: At the last fixture, the DMX chain has to be terminated with a terminator.
5. Remotely controllable functions Lamp The Robin MMX Spot is to be operated with a Philips MSR Platinum 35. Note: It is also important to note, that the discharge lamp is cold restrike types, that means, that they have to be cold before re-striking. For this reason, you have to wait about 5 minutes after having switched the lamp off before you can switch it on again.
6.
Tab Level 1 Level 2 Level 3 Level 4 Lamp On Lamp Off Fixture Position Fixture Temperatures Head Temperatures Ambient Temperatures Base Temperatures Personality User Mode User A Settings User B Settings User C Settings DMX Presets Mode 1 Mode 2 Mode 3 View Selected Preset DMX Input Wired Wireless Wireless In/XLR Out Pan/Tilt Settings Pan Reverse Off, On Tilt Reverse Off, On Pan/Tilt Feedback Off, On Pan/Tilt mode Time Speed Pan/Tilt acceleration Compatible High Microphone Sensitivit
Tab Level 1 Level 2 Level 3 Level 4 Level 5 Level 6 0-255 Dim./Strobe/H.-Spot Res. Zoom/Foc./Fro./Pri. Res. Iris/Dual G. Wheel Reset Preset Effect Control Pan Position 1-Position 5 : Manual Effect Control Dimmer Position 1- Position 5 Pan 0-255 : Dimmer Fine Stand -Alone Test Sequences 0-255 Dynamic Mode Static Mode MusicTrigger Off, On Preset Playback None Pan 0-255 Tilt 0-255 Zoom 0-255 Focus 0-255 HotSpot 0-255 Start Step 1-100 End Step 1-100 Test Prg. 1 Prg.
7. Control menu The Robin MMX Spot is equipped with the QVGA Robe touch screen with battery backup which allows to set the fixture´s behaviour according to your needs, obtain information on its operation, test its various parts and lastly program it, if it has to be used in a stand-alone mode. The fixture´s menu can be controlled either by the control buttons or directly by touching the icon. Control buttons on the front panel: [ESCAPE] button used to leave the menu without saving changes.
Note: The green icon at the top right corner of the screen indicates the level of the display battery charging. If the whole icon is green, the battery is fully charged while the red icon indicates exhausted battery. The battery charges during fixture operation, its charging lasts cca 6 hours. We recommend that the fixture should be in operation at least 7 hours per week to keep the battery fully charged.
There cannot be 2 fixtures with the same IP address on the network! Default IP Address -Preset IP address, you can set up only first byte of IP address (2 or 10) e.g. 002.019.052.086. Custom IP Address - The option enables to set up all bytes of IP address. Net Mask - The option enables to set up all bytes of Net Mask. . ArtNet Universe - Use this item to set a Universe (0-255). The Universe is a single DMX 512 frame of 512 channels.
Base Temperature - The menu shows temperature in the fixture base (on the display PCB). Current - A current temperature in the fixture base. Maximum NonRes. - A maximum temperature in the fixture base since the fixture has been fabricated. Maximum Res. - A maximum temperature in the fixture base since the counter was last reset. In order to reset this counter to 0, touch the text box next to the item "Maximum Res.
Fixture Position - Recorded installation positions of the fixture: Fixture Temperatures - Recorded temperatures which have exceeded defined levels. Note: The log buffer can contain 8000 records max. If the buffer is full, old data will be overwritten. 7.3 Tab "Personality" User mode - The Robin MMX Spot allows you to recall up to 3 user settings. After switching the fixture on for the first time, the User A settings is active.
Blackout Settings - Use the menu if you need to close the light output under certain conditions which are described below Blackout DMC - Blackout during movement correction. Set this option On if you wish to close light output during the time when the head goes to its correct position, which has been changed by an external force. Active Blackouts - Use this menu if you wish to close the light output during effect changes.
Default Settings - The menu item allows to set all fixture parameters to the default (factory) values. 7.4 Tab "Manual Control" Reset Functions - The menu allows to reset the fixture either per function modules or all modules together. Total Reset - The item resets all function modules. Pan/Tilt Reset - The item resets a pan and tilt movement. Colour System Reset - The item resets a colour wheel and CMY/CTO flags. Gobo System Reset - The item resets a static/rotating gobo wheel. Dim./Strobe/H.-Spot Res.
and [down arrow] and set all desired effects. An item "Step Time" (value of 0-25.5 sec.) is the time during which effects last in the current step 5. Save adjusted effects to the current step by touching the [confirm] or save and copy them to the following step by touching the [confirm+copy]. By touching the text box "Preview" next to the current program step you can view created scene. 6. Repeat the steps 4 and 5 for next program steps. 7.
3. Set desired value and save it by touching the [confirm]. 4. Repeat steps 2 and 3 for the next effects. 5. After calibrating all effects, touch the [confirm] to save all adjusted values and reset the fixture. Calibration via the DMX controller 1. Connect DMX controller to the fixture and set fixture effects to the desired positions before fine calibration. 2. Enter the "Calibrate Effects" menu and now you can exactly calibrate desired effects by DMX controller.
3. Run the Software Uploader program. Select desired COM and then click on the Connect button. (Select COM if the serial port is used or DreamBox1 if the USB port is used). If the connection is OK, click on the “Start Uploading button“ to start uploading. It will take several minutes to perform software update. If the option "Incremental Update" is not checked, all processors will be updated (including processors with the same software version).
SUPPORTED_PARAMETERS * SOFTWARE_VERSION_LABEL * DMX_START_ADDRESS * * IDENTIFY_DEVICE * * DEVICE_MODEL_DESCRIPTION * MANUFACTURER_LABEL * * DEVICE_LABEL * * SENSOR_DEFINITION * SENSOR_VALUE DISPLAY_INVERT * * DISPLAY_LEVEL * * PAN_INVERT * * TILT_INVERT * * DEVICE_RESET * DMX_PERSONALITY * * DMX_PERSONALITY_DESCRIPTION * STATUS_MESSAGES * STATUS_ID_DESCRIPTION * LAMP_STATE LAMP_ON_MODE DEVICE_HOURS LAMP_HOURS 1 * * * * * 2 * 2 LAMP_STRIKES * ...
-->Wireless State). To unlink the fixture from DMX transmitter. The fixture can be unlinked from receiver via the menu item “ Unlink Wireless Adapter“ (Information--> Wireless State --> Unlink Wireless Adapter.). 10. Error and information messages Occurred errors during fixture operation are signalled by the yellow warning icon at the bottom line of the screen: Touch the warning icon or press the [ESCAPE] button to display error messages.
CTO Lamella Error 1 (CTO Lamella Error 2) The messages will appear after the reset of the CTO flag if the flag is not located in the default position. Strobe 1 Error 1 (Strobe 1 Error 2 ) The messages will appear after the reset of the dimmer/strobe module if the strobe lamella 1 is not located in the default position. Strobe 2 Error 1 (Strobe 2 Error 2 ) The messages will appear after the reset of the dimmer/strobe module if the strobe lamella 2 is not located in the default position.
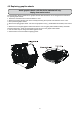
Location of the fans: 32
11. Technical Specifications Electrical Power supply:..........................electronic auto-ranging Input voltage range:................ 100-240V, 50/60Hz Power consumption* @230V: 1020W (I= 4.87A , power factor=0.91) Fuse:.......................................
Position 1 Prism Rotating 5-facet prism with continuous rotation in both directions Iris Motorized iris for different beam diameters Frost filter Zoom Separate,variable frost filter Linear motorized zoom Dual graphic wheel 2 graphic wheels rotating in both directions Strobe Standard graphic wheels Optional graphic wheels (included) Strobe effect with variable speed (max.15 flashes/sec.) Electronic strobbing (max. 33 flashes/sec.
Wireless DMX/RDM module (only for Wireless DMX version) Compliance with USITT DMX-512 (1986 & 1990) and 512-A Full DMX fidelity and frame integrity Auto sensing of DMX frame rate and frame size <5ms DMX latency Operational frequency range of 2402-2480 MHz Producer: LumenRadio Pan/Tilt Pan movement range 540° Tilt movement range 270° 16 bit movement resolution Automatic Pan/Tilt position correction Remotely controllable speed of pan/tilt movement for easy programming Move
Accessories Omega holder (No.99010420)................................2 pcs Gobo-set 16 (No. 15050025) ................................ 1 pc Dual graphic wheel (11020170)............................. 2 pcs Mains cable ............................................................1 pc Optional Accessories - Flash cable RS232/DMX (No.
12. Maintenance and cleaning It is absolutely essential that the fixture is kept clean and that dust, dirt and smoke-fluid residues must not build up on or within the fixture. Otherwise, the fixture‘s light-output will be significantly reduced. Regular cleaning will not only ensure the maximum light-output, but will also allow the fixture to function reliably throughout its life.
DMX protocol Robin MMX Spot - DMX protocol, version 1.7 (For fixtures produced after 25/08/2013 or updated with a software DSU_RobinMMXSpot_13081343.zip (DSU_RobinMMXSpot_13081343.tar.bz2) or latter . DSU RobinPointe_YYMMDDTT.zip -->YY=year, MM=month, DD= day.
DMX protocol (For fixtures produced after 25/08/2013 or updated with a software DSU_RobinMMXSpot_13081343.zip (DSU_RobinMMXSpot_13081343.tar.bz2) or latter . DSU RobinPointe_YYMMDDTT.zip -->YY=year, MM=month, DD= day.) Mode/channel 210 - 229 Reserved 230 - 239 Lamp Off step 240 Disabled "Silent" mode of fans step To activate the "Silent mode", stop in range of 241-255 at least 3 sec. 7 7 5 7 241-255 Silent mode of fans: Fans noise fom min.
DMX protocol (For fixtures produced after 25/08/2013 or updated with a software DSU_RobinMMXSpot_13081343.zip (DSU_RobinMMXSpot_13081343.tar.bz2) or latter . DSU RobinPointe_YYMMDDTT.zip -->YY=year, MM=month, DD= day.
DMX protocol (For fixtures produced after 25/08/2013 or updated with a software DSU_RobinMMXSpot_13081343.zip (DSU_RobinMMXSpot_13081343.tar.bz2) or latter . DSU RobinPointe_YYMMDDTT.zip -->YY=year, MM=month, DD= day.
DMX protocol (For fixtures produced after 25/08/2013 or updated with a software DSU_RobinMMXSpot_13081343.zip (DSU_RobinMMXSpot_13081343.tar.bz2) or latter . DSU RobinPointe_YYMMDDTT.zip -->YY=year, MM=month, DD= day.) Mode/channel 68-69 70-71 72-73 74-75 76-77 78-79 80-81 82-83 84-85 86-87 88-89 90-91 92-93 94-95 96-97 98-99 100-101 102-103 104-105 106-107 108-109 110-111 112-113 114-115 116-117 118-119 120-121 122-123 124-125 126-127 128-255 19 18 16 * use Rot.
DMX protocol (For fixtures produced after 25/08/2013 or updated with a software DSU_RobinMMXSpot_13081343.zip (DSU_RobinMMXSpot_13081343.tar.bz2) or latter . DSU RobinPointe_YYMMDDTT.zip -->YY=year, MM=month, DD= day.
DMX protocol (For fixtures produced after 25/08/2013 or updated with a software DSU_RobinMMXSpot_13081343.zip (DSU_RobinMMXSpot_13081343.tar.bz2) or latter . DSU RobinPointe_YYMMDDTT.zip -->YY=year, MM=month, DD= day.
DMX protocol (For fixtures produced after 25/08/2013 or updated with a software DSU_RobinMMXSpot_13081343.zip (DSU_RobinMMXSpot_13081343.tar.bz2) or latter . DSU RobinPointe_YYMMDDTT.zip -->YY=year, MM=month, DD= day.
DMX protocol (For fixtures produced after 25/08/2013 or updated with a software DSU_RobinMMXSpot_13081343.zip (DSU_RobinMMXSpot_13081343.tar.bz2) or latter . DSU RobinPointe_YYMMDDTT.zip -->YY=year, MM=month, DD= day.) Mode/channel 0 1 8 16 24 32 40 48 56 64 72 80 88 96 104 112 120 128 136 144 152 160 168 176 184 192 200 208 216 224 232 240 248 255 35 29 27 37 36 30 28 38 Select desired distance and effect on which you need to focus and use "Focus" channel (32/27/25) to focus the image.
DMX protocol (For fixtures produced after 25/08/2013 or updated with a software DSU_RobinMMXSpot_13081343.zip (DSU_RobinMMXSpot_13081343.tar.bz2) or latter . DSU RobinPointe_YYMMDDTT.zip -->YY=year, MM=month, DD= day.
39