
Use and Care Guide

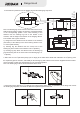


6. Pull the two supports of the attached panel of the mainframe with both hands and pull them upward, tear off the
protective film of the panel and the attached panel of the mainframe, and insert the attached panel of the mainframe
back along the gap between the panel of the mainframe and the shell.
7.
up at the hitching leg on the wall at an angle, and use a level ruler to ensure that the machine is installed horizontally.
Fix the check valve on the range hood as shown in the figure, then lift the range hood and hang the back hook hole
8.
pipe, and tighten the nut (to prevent the machine from decoupling accidentally under external force).
After the machine is installed in place, install the hitching leg stop block and the gasket on the M6 metal expansion
31
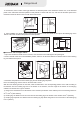
9 Attach the duct to the check valve and seal with aluminum
tape, and then plug it in.
.
Note: Please straighten the flexible aluminum duct when
mounting, to avoid noise generated when the flexible aluminum
duct is semi-stretched, and cut off the excess parts with wire
pliers. The connection between the air outlet pipe and the wall
hole or the public flue must be tightly sealed to ensure that the
air outlet pipe is firmly connected with the check valve or the
public flue, and ensure that the blade at the connection of the
check valve or the public flue is opened and closed flexibly.
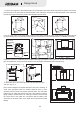
S 4.2×18
self tapping
screw
T
Check valve
Check valve
seal
Junction
box
3
2-2- /16”(50-55mm)
3
Ø /8”(10mm)
Range Hood