
User's Manual
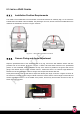
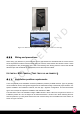
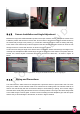
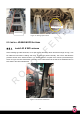
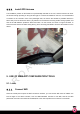
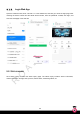
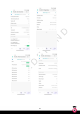
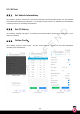
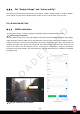
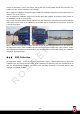
Table Of Contents
- Safety Instructions
- Installation Precautions
- 1.PRODUCT INTRODUCTION
- 2.PRODUCT FEATURES
- 3.APPEARANCE DESCRIPTION
- 4.PRODUCT CONFIGURATION LIST
- 5.PRODUCT FUNCTION OVERVIEW
- 6.INSTALLATION PREPARATION
- 7.LIST OF INSTALLATION TOOLS
- 8.INSTALLATION GUIDANCE AND PRECAUTIONS
- 9.USE OF WEB APP CONFIGURATION TOOLS
- 10.USER NOTICE

21
8.3. INSTALL ADAS CAMERA
8.3.1.
Installation Position Requirements
The middle of the windshield is recommended. Commercial vehicles are relatively high, so the camera is
located below the middle of the windshield; The passenger car is low, and the camera is installed above the
middle of the windshield, as shown in Figure 10 below.
Figure 10:ADAS Camera Installation Position
8.3.2.
Camera Fixing and Angle Adjustment
Wipe the preinstalled area of the windshield with a dry rag, remove the 3M adhesive sticker and lens
protective film of the camera, as shown in Figure 11 below. Stick the ADAS camera on the preinstalled
position on the windshield, measure whether the top of the camera is parallel to the ground with a level
gauge, and observe the live image of ADAS camera , Make sure there is no obvious height difference
between the left and right sides of the live image, and compact the camera after that.
Gently lift the handle, slide up and down to adjust the camera pitch angle, as shown in Figure 12 below. At
the same time, observe the live image of ADAS camera to ensure that the camera angle is horizontal and
forward, the distant horizon is in the middle of the picture, and the sky and the earth account for half, as
shown in Figure 13 below.
Figure 11: ADAS Camera
middle line
Middle line
3M adhesive sticker