
User Manual


EN
3
Boot
Plug the power cord connector into the AC connector on the back of the machine and plug the power cord
into a power outlet.
Turn on the power switch on the back of the machine and the soldering iron starts to warm up.
At this point, you can use the keys to adjust the temperature you want, or use the set of sengs
to select the temperature you want.
Temperature seng funcon:
three sets of temperature program sengs
The seng method is as follows:
First use the middle buon to adjust to the temperature you want to set. Aer the temperature is set,
press the SAVE buon and then press the number you want to store. When the storage is successful, there
will be a display above the number of the display. The table temperature seng is stored.
Use the same method to adjust to the desired temperature. First press the SAVE buon and then press the
number you want to store to store the other two sets of temperature memory. This unit can provide three
sets of temperature memory for users to use.
other funcons:
1. Temperature correcon funcon:
Press SET and at the same me. The blue number in the lower right corner of the display starts to ash. You
can use to adjust the temperature correcon. This unit can provide temperature correcon of ±50°C.
When the correcon is completed, press ENTER to conrm.
2. Set the standby me:
Press SET and at the same me. At this me, the blue number in the lower right corner of the display starts
to ash. You can use to adjust.
Set the standby me to enter the standby state from 000 seconds (not automac sleep standby) to 999
seconds. Aer the input is completed, press ENTER to conrm.
The standby me starts from the me when the soldering iron is placed in the rack.
When entering standby mode, the display will show --- and the moon sign will be displayed on the le, which
is the sleep standby state.
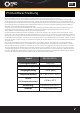
Product Specication