
Specifications


4." Quick Start
Easy Installation
Before starting
•
Review the safety information in section 1. Important Information
•
Familiarize yourself with the iMux and it’s modules as described in section 2. Introduction
• Know how to handle fiber optic cable, have a suitable installation environment with the correct power, and have the
necessary test equipment as described in section 3. Before Installing
Install the iMux
The iMux is pre-configured at the factory for your particular requirements, and will operate without any setup. For
additional configuration instructions please refer to the iMux User Guide.
• Mount the iMux in a 19” equipment rack, on a shelf or table
• Make sure the power switches are OFF
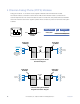
Connect power
For AC Power units
Remove power from AC mains supply. Connect the AC power cord to the terminals on the iMux and plug into
110/240VAC, 50/60Hz mains outlet.
• Alternately, wire AC mains power directly from AC power source
For DC Power supply
• Check that DC power source voltage matches voltage range of DC power input.
• Remove power from the DC power source prior to connecting to the iMux.
• Connect the DC power cables to the iMux. Check the positive and negative polarity of the connection.
• Energize the power source.
Connect fiber cables
• The fiber cable(s) must be the right type of cable, with the correct connectors and suitable length.
• Attach the connector(s) carefully using care to avoid bending the fiber cable too sharply and damaging the fiber.
• Do not touch fiber connector ends which could cause contamination and lower signal performance.
Caution
Radiation emitted by laser devices is dangerous to to human eyes. Avoid eye exposure to direct or
indirect radiation. Do not operate without fiber cable attached.
20! RLH Industries, Inc. • 866-DO-FIBER • www.fiberopticlink.com! Quick Start