
User Manual


26 • Viewing, Printing, Exporting, & Deleting Data in the Data Window
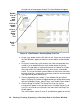
the right side of the program window. The Data Window will appear.
2. If necessary, double-click the GX-2012 or Gas Tracer icon in the top of
the Data Window’s upper left frame to see the folders of downloaded
data.
3. Find your instrument by serial number, then click the expanded view
symbol (+) of or double-click the serial number folder to view the
contents.The top folder is untitled and contains the Bump Test Folder
along with folders for calibration history, alarm events, and trouble
events. The rest of the folders contain folders for the interval trend files,
bar hole mode files, snap log files, and alarm trend files and are named
and organized by date (month/year).
4. Click the expanded view symbol (+) of or double-click the untitled
folder. The Bump Test folder will appear below the untitled folder along
with the Calibration History, Alarm Events, and Trouble Events folders.
5. Click the Bump Test folder. The Bump Test file or files for that
instrument will appear in the top right frame. If multiple Station ID’s or
User ID’s are used for an instrument, then more than one Bump Test
file will appear.
The serial number, station ID, user ID, and date/time appear on the line
Figure 18: Data Window - Selecting Bump Test Files
click to
show
Click to
expand
Click to
Bump
data
folders
folder
show
Bump
Test
File
Test
File
Double